 Just Fold Paper
Fold only
Origami Dog Face
Fold a flat paper dog face with two matching floppy ears and a short chin. Finish with optional drawn eyes and a nose.
Preparation + 7 numbered steps
Materials
Square origami paper · 6 × 6 inches
One flexible 6 × 6-inch square (15.24 × 15.24 cm, approximately 15.2 cm square). Start with the intended face color down. No scissors or glue. A pencil or pen is optional for the face; a ruler can help place the ear folds.
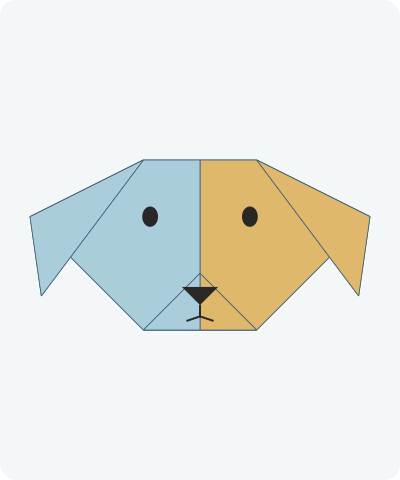
Drag to rotate · swipe sideways on touch.
Arrow keys rotate when focused.
Follow along
PreparationThe interactive guide needs JavaScript. Read every illustrated step below.
Help · controls & diagram
Play or drag the progress slider to watch a fold from 0% to 100%. Use the view buttons or drag the diagram to look from another angle.
Blue and gold identify the original left and right halves of one sheet, not its front and back colors. Darker shades show the reverse. Orange outlines show moving layers and dashed orange lines show the active crease. Black facial features in the last diagram are optional pen marks, not cuts or extra paper.
With the diagram focused: Space plays or pauses, ←/→ change steps, and Home resets.
Every step, at a glance
Compare your paper with each diagram after completing the action. Blue and gold identify the original left and right halves of one sheet, not its front and back colors. Darker shades show the reverse. Orange outlines show moving layers and dashed orange lines show the active crease. Black facial features in the last diagram are optional pen marks, not cuts or extra paper.
- 0. Prepare a square
- 1. Fold a downward-pointing triangle
- 2. Find the center of the triangle
- 3. Open the center crease
- 4. Fold the right ear down
- 5. Fold the left ear to match
- 6. Shorten the chin
- 7. Add an optional face
PREPARATION · Flat dog face
Prepare a square
Place the square as a diamond with one corner up and the intended face color down. Keep the left and right corners level.
Layers: One square sheet; blue and gold track its original halves.
Check: All four edges have equal length.
Explore this step ↑STEP 1 · Flat dog face
Fold a downward-pointing triangle
Bring the top corner down onto the bottom corner. Match the sloping edges and press the horizontal fold.
Layers: Move the upper half of the square over the lower half.
Check: The long folded edge is at the top; two free tips meet at the bottom.
Explore this step ↑STEP 2 · Flat dog face
Find the center of the triangle
Bring the right corner across onto the left corner. Match the edges and lightly press the vertical fold.
Layers: Move both layers of the right half together.
Check: The fold runs from the middle of the long edge to the bottom point.
Explore this step ↑STEP 3 · Flat dog face
Open the center crease
Return the right corner to the right and flatten the triangle. Keep the first horizontal fold closed.
Layers: Open only the center fold; the triangle still has two layers.
Check: The long edge is horizontal again, with a center crease below its midpoint.
Explore this step ↑STEP 4 · Flat dog face
Fold the right ear down
On the upper edge, find the point one quarter of the way from its center to the right corner. On the right sloping edge, find the point one quarter of the way from that corner toward the bottom tip. Fold the right corner down along the line joining these two points.
Layers: Fold both layers of the right corner together toward you. Keep the middle of the face flat.
Check: A triangular ear hangs down on the right, outside the central face.
Explore this step ↑STEP 5 · Flat dog face
Fold the left ear to match
Use matching points on the left: one quarter of the way from the upper-edge center to its corner, and one quarter down the sloping edge. Fold both layers down along the line between them.
Layers: Move just the left corner packet; leave the right ear folded.
Check: The two ear tips sit at the same height, with a short straight edge across the forehead.
Explore this step ↑STEP 6 · Flat dog face
Shorten the chin
Find the point halfway up the centerline from the bottom tip to the top edge. Bring both bottom tips up to that point and press the horizontal crease.
Layers: Lift both layers of the bottom corner together. Do not separate or tuck either layer.
Check: The chin has a short flat bottom, and a small triangular flap rests on the front.
Explore this step ↑STEP 7 · Flat dog face
Add an optional face
Keep the ears down. Draw two eyes on the wide central panel and a nose on the small chin flap; add a short mouth below the nose if you like. The black marks shown here are a drawing suggestion.
Layers: No paper moves in this step. The eyes, nose and mouth are optional pen marks.
Check: You have a flat dog face with matching ears and a centered chin.
Explore this step ↑
Sources & notes
Origami Guide (construction reference; designer not established), Easy Origami Dog Face (2020 image sequence; undated page).
Dog-face triangle, ears and two-layer chin ↗ · Reference continuation and optional facial decoration ↗ · Origami Way dog-face variant ↗
The reference labels the construction traditional; its designer and design license are not established here. Public access does not license the reference photographs, text, video or diagrams. These English instructions, geometry and illustrations are independently authored with AI assistance. No reference media, prose or code is reproduced; no public-domain clearance is asserted.
Adaptation: A simple flat version of the reference through step 8, followed by drawn eyes and a nose. We omit the reference continuation’s tucked snout, refolded nose, chin reshaping and tongue. Uses a 6-inch square. The triangle center crease is folded and fully reopened. For repeatable ears, each hinge joins a point one quarter of the way from the upper-edge center to its corner to a point one quarter of the way down that side’s sloping edge. The chin crease lies one quarter of the triangle height above its lower tip. These exact proportions are authored choices for the reference’s adjustable ears and small bottom fold, not measurements taken from its photographs. All corner folds move both layers. The optional drawn face is shown as a static decorating step, not a paper fold. Origami Way is a crosscheck for the triangle/center/ear idea; its turned-over forehead and chin finishing variant is not mixed into this sequence.
Original instructions and diagrams, made with AI assistance. About & reuse
Accuracy notes
Real-paper follow-along and paper weight have not been tested. Diagrams illustrate the sequence, not paper thickness, contact, collisions or exact layer visibility.