 Just Fold Paper
Fold only
Origami Envelope
Fold a rectangular envelope for a small note from one square. A doubled lower edge receives the top flap, so the envelope closes with one tuck and no glue.
Preparation + 16 numbered steps
Materials
Square paper · 8 × 8 inches
One thin, flexible 8 × 8-inch square (20.32 × 20.32 cm). Start with the intended outside color facing down and an edge horizontal. Write a note on the inside before folding, or add a small flat note before closing. No cutting, tape or glue. The folded outline is about 5 × 3 inches; leave room around an insert. This is a hand-delivery envelope, not a sealed mailing envelope.
Drag to rotate · swipe sideways on touch.
Arrow keys rotate when focused.
Follow along
PreparationThe interactive guide needs JavaScript. Read every illustrated step below.
Help · controls & diagram
Play or drag the progress slider to watch a fold from 0% to 100%. Use the view buttons or drag the diagram to look from another angle.
Blue and gold identify the original left and right halves of one sheet, not its front and back colors. Darker shades show the reverse. Orange marks active folds. During the final tuck, gently bow the lid and lift the pocket lip; do not press a new crease into the lid.
With the diagram focused: Space plays or pauses, ←/→ change steps, and Home resets.
Every step, at a glance
Compare your paper with each diagram after completing the action. Blue and gold identify the original left and right halves of one sheet, not its front and back colors. Darker shades show the reverse. Orange marks active folds. During the final tuck, gently bow the lid and lift the pocket lip; do not press a new crease into the lid.
- 0. Start with a square
- 1. Find the horizontal center
- 2. Open the square
- 3. Mark the lower quarter
- 4. Reopen the lower section
- 5. Fold a narrow lower hem
- 6. Raise the doubled lower edge
- 7. Mark where the lid will close
- 8. Lift the lid back up
- 9. Fold the lower left corner
- 10. Match the lower right corner
- 11. Fold the left side inward
- 12. Fold the right side inward
- 13. Shape the upper left of the lid
- 14. Shape the upper right of the lid
- 15. Bow and tuck the closing flap
- 16. Check the envelope
PREPARATION · Square envelope with a tucked top flap
Start with a square
Place the 8-inch square with its outside color down. Keep an edge horizontal; write your note on the face now showing if you wish.
Layers: One uncut sheet; blue and gold track its left and right halves.
Check: All four edges measure 8 inches.
Explore this step ↑STEP 1 · Square envelope with a tucked top flap
Find the horizontal center
Bring the bottom edge to the top edge. Match the corners and press the fold.
Layers: Lift the entire bottom half.
Check: The paper is a wide rectangle.
Explore this step ↑STEP 2 · Square envelope with a tucked top flap
Open the square
Unfold the bottom half completely.
Layers: Undo only the last fold.
Check: One horizontal crease runs through the middle.
Explore this step ↑STEP 3 · Square envelope with a tucked top flap
Mark the lower quarter
Bring the bottom edge to the center crease and press.
Layers: Move the lower section, leaving the upper half still.
Check: The new crease is halfway between the bottom edge and the center.
Explore this step ↑STEP 4 · Square envelope with a tucked top flap
Reopen the lower section
Return the bottom edge to its original position.
Layers: Unfold the quarter fold.
Check: The lower half has a crease across its middle.
Explore this step ↑STEP 5 · Square envelope with a tucked top flap
Fold a narrow lower hem
Bring the bottom edge to the quarter crease you just made. Leave this narrow fold in place.
Layers: Only the lowest eighth of the square moves.
Check: A 1-inch folded strip runs along the bottom.
Explore this step ↑STEP 6 · Square envelope with a tucked top flap
Raise the doubled lower edge
Keep the hem folded. Bring the NEW bottom edge up to the original center crease. Press the fold.
Layers: Move the hem and the paper beneath it together.
Check: A 1½-inch band sits below the center crease; its inner crease is visible 1 inch below center.
Explore this step ↑STEP 7 · Square envelope with a tucked top flap
Mark where the lid will close
Bring the top edge down to that visible crease, 1 inch below the center. Press the new horizontal fold.
Layers: Move the complete upper section; keep the lower band folded.
Check: The top edge reaches the crease within the lower band.
Explore this step ↑STEP 8 · Square envelope with a tucked top flap
Lift the lid back up
Reopen the top section, leaving the doubled lower band in place.
Layers: Undo only the lid guide fold.
Check: The long top panel is upright on the page again.
Explore this step ↑STEP 9 · Square envelope with a tucked top flap
Fold the lower left corner
Fold the lower-left corner of the band diagonally inward. Its tip meets the upper edge of the band, 1½ inches from the left side.
Layers: Fold every layer in this small corner, including the backing beneath the band.
Check: The diagonal crease joins the left end of the band’s upper edge to a point 1½ inches along its bottom edge.
Explore this step ↑STEP 10 · Square envelope with a tucked top flap
Match the lower right corner
Fold the lower-right corner inward by the same amount.
Layers: Move the small right corner packet only.
Check: Both lower corners have matching sloping edges.
Explore this step ↑STEP 11 · Square envelope with a tucked top flap
Fold the left side inward
Use the inner end of the lower-left diagonal as a guide. Fold the entire left side inward on a vertical line 1½ inches from the outer edge.
Layers: Move the full side strip and its folded lower corner.
Check: The envelope now has a straight left side.
Explore this step ↑STEP 12 · Square envelope with a tucked top flap
Fold the right side inward
Make a matching vertical fold through the inner end of the right diagonal.
Layers: Move the full right strip; leave the left side folded.
Check: The width between the folded sides is 5 inches.
Explore this step ↑STEP 13 · Square envelope with a tucked top flap
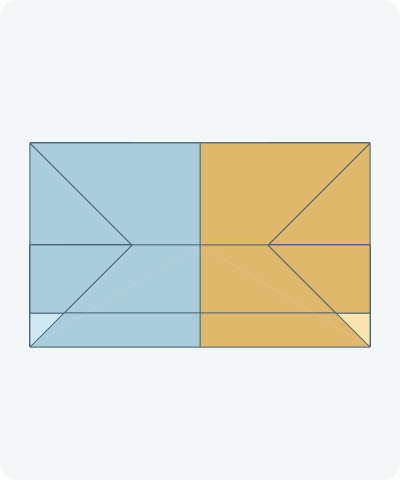
Shape the upper left of the lid
Bring the upper-left corner down and inward so its top edge follows the vertical centerline. The corner lands on the lid guide crease.
Layers: Move all layers of the upper-left corner together.
Check: A diagonal edge rises from the left end of the lid guide to the top center.
Explore this step ↑STEP 14 · Square envelope with a tucked top flap
Shape the upper right of the lid
Fold the upper-right corner inward to match. Align its top edge with the centerline.
Layers: Move all layers of this upper corner.
Check: The lid is triangular, with one point centered above the envelope.
Explore this step ↑STEP 15 · Square envelope with a tucked top flap
Bow and tuck the closing flap
Place your note inside. Gently lift the middle of the lower band’s top lip. Bow the triangular lid without pressing a new crease, guide its tip UNDER that lip, then let both parts settle flat.
Layers: The lid goes between the lower band and the backing, not behind the entire envelope. The side folds stay in place.
Check: The tip is hidden under the lower band. Do not force thick paper into the pocket.
Explore this step ↑STEP 16 · Square envelope with a tucked top flap
Check the envelope
Smooth the existing folded edges. To open, ease the triangular tip out of the lower band and lift the lid.
Layers: One square sheet remains, held closed by one tucked flap.
Check: The outline is rectangular, the flap tip is concealed and the note can be removed without tearing.
Explore this step ↑
Sources & notes
Emma, Gathering Beauty (construction reference; original designer not established), How To Make An Origami Envelope — No Glue (2018).
Complete photographed envelope reference ↗
The reference is publicly readable, not a license to reproduce its photographs or text. Design authorship and design license are not established here. These English instructions, SVG diagrams and code are independently authored with AI assistance. No reference images, templates, prose or code are included.
Adaptation: Scales the reference square to exactly 8 inches. The bottom eighth remains folded when its new bottom edge meets the center, making a 1½-inch lower band. The lid guide meets the visible crease 1 inch below center. Side folds are 1½ inches inward; the closed outline is 5 × 3 inches. Paired folds and unfolding are separated. The final tuck uses a temporary two-segment bow and a lifted lower lip to explain the insertion; those interpolation choices are authored teaching aids, not measured hand motion or extra creases to press.
Original instructions and diagrams, made with AI assistance. About & reuse
Accuracy notes
Real-paper follow-along and paper weight have not been tested. Diagrams illustrate the sequence, not paper thickness, contact, collisions or exact layer visibility. The ordinary folds use rigid panels with immutable material coordinates. The final tuck includes an authored flexible pocket lip and a temporary lid bend. Static diagrams share the interactive endpoints. Zero-thickness teaching geometry is not a paper-physics, friction or contact simulation. Real-paper folding, closure retention and postal suitability have not been tested.