 Just Fold Paper
Cut & fold
Cut-and-fold Glider
Cut a connected wing, body and tail. Build the front edge with four small folds.
Preparation + 7 numbered steps
Materials
Trimmed rectangle · 8 × 11 inches
Stiff writing paper; ruler, pencil and scissors. No glue. Trim ½ inch from one long edge of a Letter sheet first.
Drag to rotate · swipe sideways on touch.
Arrow keys rotate when focused.
Follow along
PreparationThe interactive guide needs JavaScript. Read every illustrated step below.
Help · controls & diagram
Play or drag the progress slider to watch a fold from 0% to 100%. Use the view buttons or drag the diagram to look from another angle.
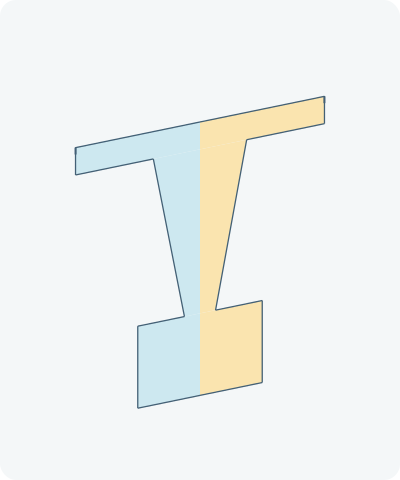
Blue and gold mark parts of one connected sheet. Orange outlines show where to cut; dashed orange lines show where to fold. Discard the gray scraps.
With the diagram focused: Space plays or pauses, ←/→ change steps, and Home resets.
Draw the full-size template
Use a ruler; the screen diagrams are not full-size print patterns. All coordinates below are in inches. Start at the midpoint of the front edge: x is negative to the left, positive to the right; y runs toward the tail. Mark these points in order, join them with straight lines, and join the last point back to the first. Do not cut the centerline. Internal coordinates identified in the source note as adaptations are modern choices.
| Point | x (in) | y (in) |
|---|---|---|
| 1 | -4 | 0 |
| 2 | 4 | 0 |
| 3 | 4 | 2 |
| 4 | 1.5 | 2 |
| 5 | 0.5 | 8 |
| 6 | 2 | 8 |
| 7 | 2 | 11 |
| 8 | -2 | 11 |
| 9 | -2 | 8 |
| 10 | -0.5 | 8 |
| 11 | -1.5 | 2 |
| 12 | -4 | 2 |
Every step, at a glance
Compare your paper with each diagram after completing the action. Blue and gold mark parts of one connected sheet. Orange outlines show where to cut; dashed orange lines show where to fold. Discard the gray scraps.
- 0. Prepare the blank
- 1. Draw the cutting outline
- 2. Cut out the connected shape
- 3. Turn the front edge over: 1 of 4
- 4. Turn the front edge over: 2 of 4
- 5. Turn the front edge over: 3 of 4
- 6. Turn the front edge over: 4 of 4
- 7. Your cut-and-fold glider
PREPARATION · Figure 66B; paper preparation
Prepare the blank
Measure an 8 × 11 inch rectangle of stiff writing paper. Place an 8-inch edge across the top; this will be the front. Have a ruler, pencil and scissors ready. The original gives no paper weight.
Layers: One sheet, still flat. Blue and gold are not separate pieces.
Check: The blank is 8 inches wide and 11 inches deep, not an untrimmed Letter sheet.
Explore this step ↑STEP 1 · Figure 66B; unnumbered widths explicitly adapted
Draw the cutting outline
Use the full-size template coordinate table: measure x left or right from the center of the front edge, and y toward the tail. Connect the listed points in order, then close the outline. Keep the first 2 inches full width. The body tapers from 3 inches to 1 inch wide over the next 6 inches; the last 3 inches form a 4-inch-wide tail.
Layers: Pencil marks only; do not cut the central connection.
Check: The two sides match. The tail starts 8 inches from the front and ends at 11 inches.
Explore this step ↑STEP 2 · Figure 66B
Cut out the connected shape
With scissors, follow only the outside outline. Remove the gray side scraps. Leave the wing, tapered body and rectangular tail connected as one piece. The animation traces a cutting guide and then hides the scraps; it does not simulate the scissors.
Layers: Cut through the single flat sheet only. No central slit.
Check: One connected piece remains: a broad front wing and a smaller rectangular tail linked by the taper.
Explore this step ↑STEP 3 · p. 104: four folds; ¼-inch spacing is adapted
Turn the front edge over: 1 of 4
Mark a line ¼ inch behind the front edge. Fold that narrow strip onto the upper face of the wing and press it flat. Keep the wing and tail on the table.
Layers: Move all 1 layer in the front packet together. The rest of the wing, body and tail stay still.
Check: This crease is 0.25 inch from the original front edge. After this turn, the 2-layer band lies between 0.25 and 0.5 inches on the original blank.
Explore this step ↑STEP 4 · p. 104: four folds; ¼-inch spacing is adapted
Turn the front edge over: 2 of 4
Without unfolding the earlier turns, turn the entire narrow front packet over onto the same upper face by another ¼ inch. Do not alternate sides as in an accordion. Press the whole packet flat.
Layers: Move all 2 layers in the front packet together. The rest of the wing, body and tail stay still.
Check: This crease is 0.5 inch from the original front edge. After this turn, the 3-layer band lies between 0.5 and 0.75 inches on the original blank.
Explore this step ↑STEP 5 · p. 104: four folds; ¼-inch spacing is adapted
Turn the front edge over: 3 of 4
Without unfolding the earlier turns, turn the entire narrow front packet over onto the same upper face by another ¼ inch. Do not alternate sides as in an accordion. Press the whole packet flat.
Layers: Move all 3 layers in the front packet together. The rest of the wing, body and tail stay still.
Check: This crease is 0.75 inch from the original front edge. After this turn, the 4-layer band lies between 0.75 and 1 inches on the original blank.
Explore this step ↑STEP 6 · p. 104: four folds; ¼-inch spacing is adapted
Turn the front edge over: 4 of 4
Without unfolding the earlier turns, turn the entire narrow front packet over onto the same upper face by another ¼ inch. Do not alternate sides as in an accordion. Press the whole packet flat.
Layers: Move all 4 layers in the front packet together. The rest of the wing, body and tail stay still.
Check: This crease is 1 inch from the original front edge. After this turn, the 5-layer band lies between 1 and 1.25 inches on the original blank.
Explore this step ↑STEP 7 · Figure 66C; construction only
Your cut-and-fold glider
Check the four closed turns at the front and the flat, connected body and tail. Leave the rest of the sheet flat; this version has no center-body fold and needs no glue. The tutorial ends with construction.
Layers: The front band has five paper layers after four turns; the remaining wing and tail are single-layer.
Check: No wing or tail has been detached. Real-paper follow-along of these adapted dimensions is still pending.
Explore this step ↑
Sources & notes
A. Frederick Collins, The Magic of Science: A Book of Scientific Amusements. New York and other cities: Fleming H. Revell Company, 1917, pp. 103–104; Figure 66 B/C.
Dimensions, p. 103 ↗ · Instructions, p. 104 ↗ · 1917 copyright page ↗


Based on the 1917 edition, public domain in the United States. This does not cover modern tutorial media or rights in other countries.
Adaptation: The original labels the 8-inch span, 2-inch wing depth, 6-inch body segment, 3-inch tail depth and 3-inch body root, and asks for four leading-edge folds. It does not number the tail span, narrow body end or fold spacing. This adaptation specifies a 4-inch tail span, 1-inch narrow end and four ¼-inch roll folds. These are new construction parameters, not recovered historical dimensions.
Original instructions and diagrams, made with AI assistance. About & reuse
Accuracy notes
Real-paper follow-along and paper weight have not been tested. Diagrams illustrate the sequence, not paper thickness, contact, collisions or exact layer visibility. Cutting is shown schematically.