 Just Fold Paper
Fold only
Canard
Reopen a pointed base, shape two small front wings, then fold the broad main wings around a narrow body.
Preparation + 29 numbered steps
Materials
US Letter, portrait · 8.5 × 11 inches
One flexible 8½ × 11-inch Letter sheet, a ruler and a pencil for the wing-root marks. No scissors, glue or tape. Keep the folded layers outside the body as shown.
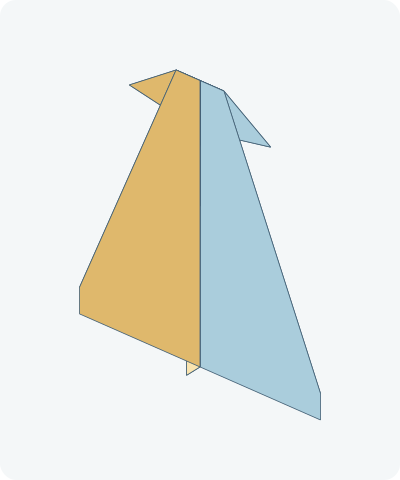
Drag to rotate · swipe sideways on touch.
Arrow keys rotate when focused.
Follow along
PreparationThe interactive guide needs JavaScript. Read every illustrated step below.
Help · controls & diagram
Play or drag the progress slider to watch a fold from 0% to 100%. Use the view buttons or drag the diagram to look from another angle.
Blue and gold identify the original left and right halves of one sheet. Darker shades show the reverse. Orange outlines mark moving paper; the dashed orange line is the hinge. Other lines show paper edges and earlier creases.
With the diagram focused: Space plays or pauses, ←/→ change steps, and Home resets.
Every step, at a glance
Compare your paper with each diagram after completing the action. Blue and gold identify the original left and right halves of one sheet. Darker shades show the reverse. Orange outlines mark moving paper; the dashed orange line is the hinge. Other lines show paper edges and earlier creases.
- 0. Prepare portrait Letter
- 1. Crease the center
- 2. Open the centerfold
- 3. Bring the right corner to center
- 4. Match the left corner
- 5. Narrow the right side
- 6. Narrow the left side
- 7. Reopen the left long fold
- 8. Reopen the right long fold
- 9. Open the left top corner
- 10. Open the right top corner
- 11. Refold the full right side
- 12. Swing the right corner outward
- 13. Refold the full left side
- 14. Swing the left corner outward
- 15. Lower the diamond tip
- 16. Return the small tip upward
- 17. Bring the right outer flap inward
- 18. Match the left outer flap
- 19. Fold out the right canard
- 20. Fold out the left canard
- 21. Close the body away
- 22. Fold the gold wing outward
- 23. Turn to the blue side
- 24. Fold the blue wing outward
- 25. Turn back to the gold side
- 26. Open the gold wing
- 27. Open the blue wing
- 28. Hold the body underneath
- 29. Check the finished Canard
PREPARATION · Letter Canard
Prepare portrait Letter
Place the short edges at the top and bottom. Keep the top end as the nose throughout the flat folds.
Layers: One complete 8½ × 11-inch sheet.
Check: The sheet is taller than it is wide.
Explore this step ↑STEP 1 · Letter Canard
Crease the center
Bring the left long edge onto the right long edge and press.
Layers: Move the whole left half.
Check: The long edges match.
Explore this step ↑STEP 2 · Letter Canard
Open the centerfold
Return the folded half to the table.
Layers: Open the same half without making a new crease.
Check: A straight center crease runs from top to bottom.
Explore this step ↑STEP 3 · Letter Canard
Bring the right corner to center
Fold the right part of the top edge onto the centerline.
Layers: Move only the upper-right corner.
Check: The corner tip meets center 4¼ inches below the top.
Explore this step ↑STEP 4 · Letter Canard
Match the left corner
Fold the left part of the top edge onto the centerline.
Layers: Move the upper-left corner; leave the right fold closed.
Check: A pointed roof sits above the lower rectangle.
Explore this step ↑STEP 5 · Letter Canard
Narrow the right side
Bring the right sloping roof edge onto the centerline. Press the long diagonal.
Layers: Carry the folded corner and backing together.
Check: The edge reaches center and the new crease continues almost to the bottom-right corner.
Explore this step ↑STEP 6 · Letter Canard
Narrow the left side
Bring the left sloping edge onto center in the same way.
Layers: Move the complete left packet.
Check: The pointed dart has matching sides. These are preparation creases.
Explore this step ↑STEP 7 · Letter Canard
Reopen the left long fold
Unfold just the most recent long diagonal.
Layers: Keep the original left top corner folded for now.
Check: The left roof edge returns.
Explore this step ↑STEP 8 · Letter Canard
Reopen the right long fold
Unfold the matching long diagonal.
Layers: Keep the original right top corner folded.
Check: The broad roof shape returns.
Explore this step ↑STEP 9 · Letter Canard
Open the left top corner
Return the left top corner to its original position.
Layers: Unfold the original short diagonal only.
Check: The upper-left part of the rectangle is open.
Explore this step ↑STEP 10 · Letter Canard
Open the right top corner
Return the right top corner to its original position.
Layers: Unfold the original short diagonal.
Check: The complete rectangle is flat again, with its preparation creases visible.
Explore this step ↑STEP 11 · Letter Canard
Refold the full right side
Fold the full right side inward on the long second crease, from the top midpoint toward the lower-right edge. Let the original top corner travel across center.
Layers: Move all paper beyond that long crease; do not close the first corner crease yet.
Check: The original corner crease now lies on the centerline. The corner itself projects across it.
Explore this step ↑STEP 12 · Letter Canard
Swing the right corner outward
Lift the original top-right corner back out on its old first crease. Keep the long side fold closed.
Layers: Only the original corner triangle opens; the backing stays flat.
Check: A half-diamond projects to the right, with its lower tip on center.
Explore this step ↑STEP 13 · Letter Canard
Refold the full left side
Repeat the long-crease fold on the left. The original top-left corner travels across center over the right packet.
Layers: Move the complete left side beyond the long crease.
Check: Its original corner crease now lies on center, ready for the outward opening.
Explore this step ↑STEP 14 · Letter Canard
Swing the left corner outward
Open the original top-left corner outward on its first crease.
Layers: Move only that corner triangle.
Check: A full diamond sits above two long folded strips.
Explore this step ↑STEP 15 · Letter Canard
Lower the diamond tip
Bring the top point to the lower junction of the diamond on the centerline.
Layers: Fold all layers above the new horizontal crease.
Check: The new top edge joins the two outer diamond corners.
Explore this step ↑STEP 16 · Letter Canard
Return the small tip upward
Fold the lowered tip back up until it touches the horizontal top edge.
Layers: Move only the lowered triangular packet, not the broad paper underneath.
Check: A small upright triangle sits over the center of the folded nose.
Explore this step ↑STEP 17 · Letter Canard
Bring the right outer flap inward
Bring the right corner packet’s lower diagonal edge onto center, then press the fold through that packet. The existing sloping segment is only a partial guide; extend the crease through the other carried layers.
Layers: Carry the original corner layers, including their down-and-up folded portions. Leave the broad wing backing still.
Check: A narrow point rises above the horizontal nose edge on the right of center.
Explore this step ↑STEP 18 · Letter Canard
Match the left outer flap
Bring the left corner packet’s lower diagonal edge onto center, then press the matching fold through that packet. Its sloping guide is also partial; crease the other carried layers to match.
Layers: Carry the left corner layers, including their down-and-up folded portions. Leave the broad wing backing still.
Check: Two narrow points stand beside the centerline.
Explore this step ↑STEP 19 · Letter Canard
Fold out the right canard
Find the center end of the small return-fold edge and the right outer shoulder at the horizontal nose edge. Crease between those landmarks and fold the upper flap outward.
Layers: Move only the upper part of the raised right packet. Hold its lower section and the backing flat.
Check: A small front wing projects right; the crease reaches the existing outer shoulder.
Explore this step ↑STEP 20 · Letter Canard
Fold out the left canard
Use the matching center-to-shoulder crease to fold the left upper flap outward.
Layers: Move only the upper part of the raised left packet.
Check: The two small front wings match, ahead of the broad main-wing paper.
Explore this step ↑STEP 21 · Letter Canard
Close the body away
Fold the blue half away from you along the original centerline.
Layers: Move the entire half with all of its layers.
Check: The folded nose and canards remain outside the closed body.
Explore this step ↑STEP 22 · Letter Canard
Fold the gold wing outward
Mark ½ inch from the centerfold at the nose and rear. Join the marks with a straight line parallel to the centerfold. Fold the gold wing outward on that line.
Layers: Move all layers outside the line, including the front canard.
Check: A ½-inch-wide body strip remains.
Explore this step ↑STEP 23 · Letter Canard
Turn to the blue side
Turn the whole closed model over from side to side.
Layers: Every layer turns together; this makes no crease.
Check: The blue main-wing paper faces you.
Explore this step ↑STEP 24 · Letter Canard
Fold the blue wing outward
Mark the same ½-inch body width and make the matching parallel wing-root crease.
Layers: Move the complete blue wing and its canard.
Check: Both root creases match from nose to rear.
Explore this step ↑STEP 25 · Letter Canard
Turn back to the gold side
Turn the complete model back over, keeping both root creases closed.
Layers: Move all layers together.
Check: The gold wing is facing you again.
Explore this step ↑STEP 26 · Letter Canard
Open the gold wing
Reopen the gold root crease halfway, to a right angle with the body.
Layers: Keep the nose and canard folds closed within the wing packet.
Check: The broad wing separates from the body.
Explore this step ↑STEP 27 · Letter Canard
Open the blue wing
Reopen the other wing to the same angle on the opposite side.
Layers: The complete blue packet opens; the centerfold stays closed.
Check: Both broad wings extend from the body, with smaller canards at the front.
Explore this step ↑STEP 28 · Letter Canard
Hold the body underneath
Rotate the entire model to place the narrow body below the wings.
Layers: Turn the whole connected sheet without adding a fold.
Check: The front canards and the broad rear wings are distinct.
Explore this step ↑STEP 29 · Letter Canard
Check the finished Canard
Compare the paired front canards and main-wing roots. Hold the narrow body underneath.
Layers: Every surface belongs to the original uncut sheet.
Check: Both sides match. The construction is complete; flight has not been tested.
Explore this step ↑
Sources & notes
Fold ’N Fly (publisher; inventor not established), Canard (undated).
Photographed construction reference ↗ · Publisher’s refold and flap video ↗
The name and construction reference come from Fold ’N Fly. Publisher credit does not establish an inventor or a design license. This guide’s English, SVG geometry and code are independently authored with AI assistance. Reference photographs, source prose and printable templates are not included. Public access to a reference does not grant permission to reuse its media.
Adaptation: This guide reconstructs the default portrait Letter construction, with the centerfold closing away from the folded face. It does not adopt the source’s reversed centerfold and tape alternative. Paired folds and reopening actions are separated for playback. After the dart is completely reopened, each full side folds on the long second crease; its original top corner then swings outward on the transformed first crease. The resulting diamond has a half-width of 4¼/√2 inches, derived from the edge alignments. The top tip meets the diamond’s lower junction; its new horizontal crease therefore passes through the two outer corners. The tip then returns to that horizontal edge. For each inward front-flap fold, bring the outer corner packet’s lower diagonal edge onto center, then press a crease through the selected packet, including the portions folded down and back up. An existing sloping crease segment in the middle layer supplies a partial guide; the lower original-corner layer and the small return-fold layer receive new crease segments. The broad backing stays still and is not creased with the packet. We use exact centerline alignment rather than reproducing the photographs’ small uneven gaps. Each outward canard crease joins the center end of the small return-fold edge to the outer shoulder at the horizontal nose edge. Those two existing landmarks determine its slope, rather than a guessed angle. The source does not dimension the main wing roots: our parallel roots are an authored ½ inch from the centerfold. Ruler marks, handling turns, single-hinge timing and 90° wing openings are teaching choices, not measured hand motions or flight settings.
Original instructions and diagrams, made with AI assistance. About & reuse
Accuracy notes
Real-paper follow-along and paper weight have not been tested. Diagrams illustrate the sequence, not paper thickness, contact, collisions or exact layer visibility.