 Just Fold Paper
Fold & roll
Ring-wing Glider
Fold a double-peaked sheet, turn a narrow rim, then curl and tuck it into a ring.
Preparation + 6 numbered steps
Materials
US Letter · 8.5 × 11 inches
One flexible sheet, a ruler and a pencil for light guide marks. Optional: a small piece of transparent tape. No cutting or glue.
Drag to rotate · swipe sideways on touch.
Arrow keys rotate when focused.
Follow along
PreparationThe interactive guide needs JavaScript. Read every illustrated step below.
Help · controls & diagram
Play or drag the progress slider to watch a fold from 0% to 100%. Use the view buttons or drag the diagram to look from another angle.
Blue and gold identify the halves of one sheet; dark gold marks the turned rim. Dashed orange lines are new creases, arrows show movement, and solid lines are paper edges.
With the diagram focused: Space plays or pauses, ←/→ change steps, and Home resets.
Complete illustrated guide
Compare your paper with each diagram after completing the action. Blue and gold identify the halves of one sheet; dark gold marks the turned rim. Dashed orange lines are new creases, arrows show movement, and solid lines are paper edges.
- 0. Prepare a Letter sheet
- 1. Fold along the diagonal
- 2. Mark a half-inch rim
- 3. Turn the rim over once
- 4. Curl with the rim inside
- 5. Tuck one end into the other
- 6. Check the completed ring
Preparation · Illustrated guide
Prepare a Letter sheet
Set the sheet upright, with the 8½-inch edges at top and bottom. Call the top-left corner A, top-right B, bottom-right C and bottom-left D. You may mark the letters lightly. Keep the sheet whole.
Layers: One flat sheet; no folds yet.
Check: The sheet is a rectangle, not a square. The A–C diagonal joins opposite corners.
Next illustrated step ↓Step 1 · Illustrated guide
Fold along the diagonal
Crease from A straight to C, bringing the triangle containing B over onto the triangle containing D. A and C stay in place. Do not force B to meet D: the two free corners must remain offset. Rotate the whole folded sheet so C is at the left and A at the right, with the long folded edge at the bottom. Do not turn it over.
Layers: Move the B half of the sheet; the D half stays beneath it.
Check: Two separate peaks remain. If you made the free corners coincide, open the sheet and crease along A–C instead.
Next illustrated step ↓Step 2 · Illustrated guide
Mark a half-inch rim
Lay the folded sheet flat with the long folded edge nearest you and both peaks pointing away. Measure ½ inch at right angles inward from that edge at several places. Join those marks lightly with a ruler: the new crease is parallel to the long edge, not parallel to either sloping side.
Layers: Keep both overlapping halves together. Do not unfold the first crease.
Check: You still see two peaks. The new line is ½ inch from the folded edge all along it.
Next illustrated step ↓Step 3 · Illustrated guide
Turn the rim over once
Fold the entire narrow strip upward on the line you just marked, toward the two peaks. Press along the new crease. Turn both layers together in one fold; do not roll the edge into several turns. The turned strip now rests against the face you are looking at.
Layers: Both sheet halves turn together; the rim contains the doubled paper.
Check: A narrow reinforced strip lies on the near face. Both peaks remain free above it.
Next illustrated step ↓Step 4 · Illustrated guide
Curl with the rim inside
Lift the sheet with the turned strip facing you. Curve the left and right ends toward you and toward each other, so that this face becomes the inside of a tube. Bend smoothly across the width; do not press new sharp creases. Keep the two peaks at the opposite, unreinforced edge.
Layers: Curve the entire folded sheet together. The turned strip must be on the concave, inside face.
Check: Looking through the opening, you can see the turned rim inside. If the strip is outside, uncurl and bend the other way.
Next illustrated step ↓Step 5 · Illustrated guide
Tuck one end into the other
At one end, gently lift the short end of the turned rim to find its pocket. Slide the other end under that folded lip, between the lip and the sheet behind it. Keep the two reinforced edges at the same level. Close the lip over the inserted end and let the rest of the sheet overlap naturally. Use only enough overlap to hold the join; a small tape piece across the seam is optional if it slips.
Layers: One end enters the other end’s rim pocket. It does not simply sit on top of the outside surface.
Check: The joined rim makes one continuous circle. The inserted end is trapped under a folded lip, not hanging loose in the opening.
Next illustrated step ↓Step 6 · Illustrated guide
Check the completed ring
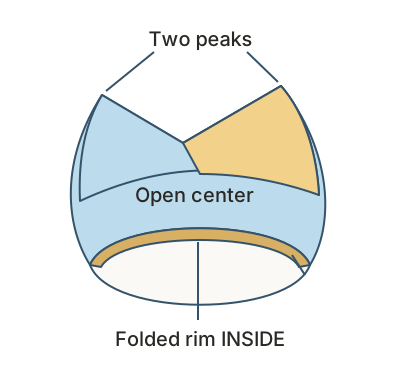
Look through the reinforced opening. Ease the curve into a round shape without flattening it. At the opposite edge, find the two peaks and the V-shaped dip between them. Check that the folded rim is inside and the tucked seam is held. If it opens, repeat the tuck or add the optional small tape piece.
Layers: One continuous curled sheet, with overlapping ends secured at the inside rim.
Check: Two peaks, an open center, an inward-facing rim and a tucked join. This completes the making sequence.
Sources & notes ↓
Sources & notes
NASA/JPL Education, Make a Paper Glider (updated November 5, 2024), construction steps 2–3.
Official activity ↗ · Official template (PDF; Carlo Cayetano credit) ↗ · JPL image-use policy ↗ · NASA media guidelines ↗
The template credits Carlo Cayetano, based on NASA’s original Ring Wing Glider. This independent guide is not authored, reviewed or endorsed by NASA, JPL or Caltech. Their photographs, template artwork and logos are not reproduced.
Adaptation: Uses the Letter rectangle’s corner-to-corner diagonal and the official ½-inch rim. Corner letters, preparation/checking stages, viewpoints and colors are our teaching choices. The source specifies no overlap length: insert only enough to hold the join, keeping the rim circular.
Original instructions and diagrams, made with AI assistance. About & reuse
Accuracy notes
Real-paper follow-along and paper weight have not been tested. Diagrams illustrate the sequence, not paper thickness, contact, collisions or exact layer visibility. Curling and the enlarged tuck are schematics; overlap is illustrative and join retention is untested.