 Just Fold Paper
Cut & fold
Cut-and-fold Paper Snail
Cut one connected blank, fold four corners behind its shell and bend the two tentacle tips. The broad shell, long sliding foot and forked head make a snail silhouette without a drawn spiral.
Preparation + 7 numbered steps
Materials
8 × 5-inch rectangle · 8 × 5 inches
One 8 × 5-inch rectangle (20.32 × 12.7 cm) of thin paper, ruler, pencil and scissors. Use adult help for cutting the narrow tentacles. No glue or separate parts. The printed diagrams are not full-size cutting templates.
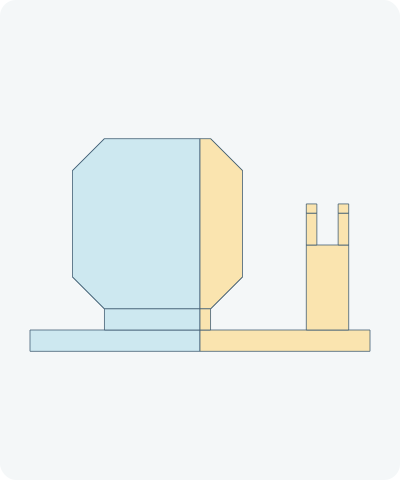
Drag to rotate · swipe sideways on touch.
Arrow keys rotate when focused.
Follow along
PreparationThe interactive guide needs JavaScript. Read every illustrated step below.
Help · controls & diagram
Play or drag the progress slider to watch a fold from 0% to 100%. Use the view buttons or drag the diagram to look from another angle.
Blue and gold identify the original left and right portions of the same paper; darker shades show its reverse. Orange marks a moving flap and crease. Lines between preparation rectangles are drawing guides, not cuts.
With the diagram focused: Space plays or pauses, ←/→ change steps, and Home resets.
Every step, at a glance
Compare your paper with each diagram after completing the action. Blue and gold identify the original left and right portions of the same paper; darker shades show its reverse. Orange marks a moving flap and crease. Lines between preparation rectangles are drawing guides, not cuts.
- 0. Measure and cut one connected blank
- 1. Fold the upper-left shell corner behind
- 2. Fold the upper-right shell corner behind
- 3. Fold the lower-right shell corner behind
- 4. Complete the octagonal shell
- 5. Bend the left tentacle tip
- 6. Bend the right tentacle tip
- 7. Display the paper snail
PREPARATION · Original measured cut-and-fold design
Measure and cut one connected blank
Place the 8 × 5-inch rectangle landscape. Measure coordinates in inches from its lower-left corner: x goes right and y goes up. Draw these six touching rectangles as one outline: foot x=0–8, y=0–0.5; bridge x=1.75–4.25, y=0.5–1; shell x=1–5, y=1–5; head x=6.5–7.5, y=0.5–2.5; left tentacle x=6.5–6.75, y=2.5–3.5; right tentacle x=7.25–7.5, y=2.5–3.5. Cut around their combined OUTER boundary and remove the waste. Do not cut the touching joins or the lines inside the blank.
Layers: One connected piece: shell → bridge → foot → head → both tentacles. The illustrated starting state is the cut blank, not an uncut rectangle.
Check: The shell is a 4-inch square; the head has two separate 0.25-inch-wide tentacles. All six regions stay attached.
Explore this step ↑STEP 1 · Original measured cut-and-fold design
Fold the upper-left shell corner behind
On the shell square, mark 0.75 inch from the upper-left corner along both adjoining edges. Fold that corner away from you on the line joining the marks. Keep the rest of the blank flat.
Layers: Move only the small triangular shell corner, behind the shell.
Check: The upper-left shell corner becomes a short diagonal.
Explore this step ↑STEP 2 · Original measured cut-and-fold design
Fold the upper-right shell corner behind
Mark 0.75 inch from the upper-right shell corner on its top and right edges. Fold that triangle behind on the joining line.
Layers: Move the upper-right shell corner only. The first flap stays in place.
Check: The shell has two matching bevels across its top.
Explore this step ↑STEP 3 · Original measured cut-and-fold design
Fold the lower-right shell corner behind
Mark 0.75 inch from the lower-right shell corner on its bottom and right edges. Fold the corner behind along the joining line. Stop at the bridge edge; do not fold or cut the bridge.
Layers: Only the shell triangle moves. The bridge, head and long foot stay flat.
Check: The fold ends exactly where the bridge meets the shell.
Explore this step ↑STEP 4 · Original measured cut-and-fold design
Complete the octagonal shell
Make matching 0.75-inch marks at the lower-left shell corner and fold this last corner behind. Smooth all four corner folds.
Layers: The four shell flaps remain behind the central shell face; the bridge is intact.
Check: An eight-sided shell rises above the long foot, with no drawn outline needed.
Explore this step ↑STEP 5 · Original measured cut-and-fold design
Bend the left tentacle tip
On the left tentacle mark a line 0.25 inch below its free end. Bend only that short tip toward you by about 30 degrees. Leave the long stalk and head flat.
Layers: One single-layer 0.25 × 0.25-inch tip bends; the other tentacle stays still.
Check: The left tip lifts gently off the table, without being folded flat.
Explore this step ↑STEP 6 · Original measured cut-and-fold design
Bend the right tentacle tip
Bend the other tentacle tip toward you at the same 0.25-inch mark and about 30 degrees.
Layers: Move only the right tip. The shell corners remain tucked behind their own shell face.
Check: Two separate short tips lift above a forked head.
Explore this step ↑STEP 7 · Original measured cut-and-fold design
Display the paper snail
Lay the long foot flat for a side-view display. Keep the broad shell above it, the head to the right and both tentacles visible. No spiral or face drawing is needed. This is a flat paper picture, not a free-standing animal.
Layers: All visible parts belong to the same cut blank. No additional paper, glue or ink.
Check: The octagonal folded shell, long foot and forked head distinguish the snail from a turtle.
Explore this step ↑
Sources & notes
Just Fold Paper, Original measured paper-snail construction (2026).
Original construction and measurement instructions ↗
This measured blank, fold sequence, English text and diagrams were authored for this guide with AI assistance. No external model, photograph, diagram, prose or code was copied. This is not attributed as a traditional origami design; no project-wide reuse license is granted.
Adaptation: Original cut-and-fold profile, not an adaptation of the turtle or a reconstruction of a traditional snail. The shell starts as a 4-inch square attached to the foot by a 2.5-inch bridge. Four 0.75-inch corner folds make an octagon. The 8-inch foot and cut forked head are integral to the same blank; the two tips bend forward 30 degrees. There is no rolled spiral, added shell, glue or ink needed for recognition.
Original instructions and diagrams, made with AI assistance. About & reuse
Accuracy notes
Real-paper follow-along and paper weight have not been tested. Diagrams illustrate the sequence, not paper thickness, contact, collisions or exact layer visibility. The connected prepared blank is 23.75 square inches. All shell corners and tentacle tips move on rigid hinges, with original material coordinates retained. Preparation removes 16.25 square inches of waste from the 40-square-inch rectangle; that discarded waste is not animated. Zero-thickness teaching geometry with sampled seam, trajectory and layer checks. Physical cutting/folding, paper thickness and general collision behavior have not been tested.