 Just Fold Paper
Cut & fold
Paper Stingray
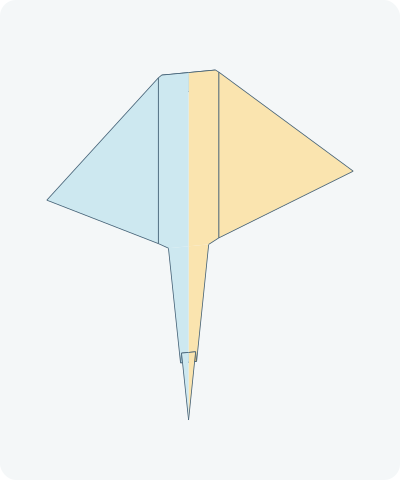
Cut one connected ray-shaped blank, fold a short snout and a narrow tail pleat, then raise two broad wing-like fins. The long tail is part of the same sheet. This original measured cut-and-fold display is not a fold-only origami fish.
Preparation + 7 numbered steps
Materials
8 × 10-inch rectangle · 8 × 10 inches
One prepared 8 × 10-inch rectangle (20.32 × 25.4 cm) of light paper, about 70–90 gsm; ruler, pencil and scissors. A protractor is useful for the shallow fin angles. No glue or extra tail piece. Start with the intended upper color facing you. Help younger makers with cutting.
Drag to rotate · swipe sideways on touch.
Arrow keys rotate when focused.
Follow along
PreparationThe interactive guide needs JavaScript. Read every illustrated step below.
Help · controls & diagram
Play or drag the progress slider to watch a fold from 0% to 100%. Use the view buttons or drag the diagram to look from another angle.
Blue and gold track the original left and right paper halves; darker shades show the reverse. Orange highlights the moving paper and hinge. The red outline is a scissors path, not a crease. The finished animal needs no drawn features.
With the diagram focused: Space plays or pauses, ←/→ change steps, and Home resets.
Every step, at a glance
Compare your paper with each diagram after completing the action. Blue and gold track the original left and right paper halves; darker shades show the reverse. Orange highlights the moving paper and hinge. The red outline is a scissors path, not a crease. The finished animal needs no drawn features.
- 0. Measure the outline
- 1. Cut one connected blank
- 2. Fold the snout behind
- 3. Fold the tail tip upward
- 4. Return the tail downward
- 5. Raise the right pectoral fin
- 6. Raise the left pectoral fin
- 7. Check the finished stingray
PREPARATION · Original measured cut-and-fold stingray
Measure the outline
Lay the 8 × 10-inch blank portrait. Measure all coordinates from its top-left corner: A is (4, 0), B is (0, 3), C is (3.5, 5), D is (4, 10), E is (4.5, 5), and F is (8, 3), in inches across then down. Join A–B–C–D–E–F–A with straight pencil lines. Lightly mark the vertical center from A to D.
Layers: One full rectangular layer. These are cutting lines, not folds.
Check: C and E are one inch apart; the narrow triangle C–D–E is the attached tail.
Explore this step ↑STEP 1 · Original measured cut-and-fold stingray
Cut one connected blank
Cut along the six outer lines A–B–C–D–E–F–A and remove the surrounding scraps. Keep the broad upper body and the long triangular tail as one piece. Do not cut across C–E or along the center line. Keep A at the top and D at the bottom.
Layers: Cut the single layer only. The complete one-inch C–E root joins the tail to the body.
Check: You have two wide side points and one long narrow tail, with no separate pieces to attach.
Explore this step ↑STEP 2 · Original measured cut-and-fold stingray
Fold the snout behind
Mark a horizontal line 1/2 inch below A. Fold the small top triangle away from you and flatten it behind the body. Keep the tail pointing down.
Layers: Move the entire small top triangle; the body and fins stay still.
Check: The pointed nose becomes a short straight snout edge.
Explore this step ↑STEP 3 · Original measured cut-and-fold stingray
Fold the tail tip upward
From the middle of C–E, measure 3 inches down the tail and mark a line straight across it. Fold all the tail below that line toward you and upward. Flatten the fold gently.
Layers: Move the complete terminal tail triangle, not either body fin.
Check: The tip now lies 1 inch below C–E, in front of the stationary tail root.
Explore this step ↑STEP 4 · Original measured cut-and-fold stingray
Return the tail downward
On the lifted tail flap, mark a line 1/4 inch above the fold you just made. Fold only the lifted flap toward you and downward on this new line. Hold the underlying tail still.
Layers: Only the previously lifted packet moves. Its narrow base band remains folded upward.
Check: A quarter-inch zigzag pleat shortens the tail by 1/2 inch; the tip points down again, 4.5 inches below C–E.
Explore this step ↑STEP 5 · Original measured cut-and-fold stingray
Raise the right pectoral fin
Mark a line parallel to the center, 3/4 inch to its right, across the broad body only. Hold a ruler on that line and lift all the paper to its right toward you. Crease lightly and leave the fin about 20 degrees above the central body; a protractor can help. Do not fold it flat across the body.
Layers: The broad right panel rotates as one attached fin. The snout and slender tail remain still.
Check: The outer right point is about 1.1 inches above the central body, with a straight continuous root.
Explore this step ↑STEP 6 · Original measured cut-and-fold stingray
Raise the left pectoral fin
Repeat on a line 3/4 inch to the left of center. Lift the complete left panel toward you to about 20 degrees. Support the middle so the completed right fin and tail do not change.
Layers: Only the broad left fin moves. Both fins are still integral parts of the body.
Check: The two side points rise equally; a 1.5-inch-wide central strip stays between their hinges.
Explore this step ↑STEP 7 · Original measured cut-and-fold stingray
Check the finished stingray
Display the stingray with its short snout forward, broad paired fins slightly raised and its single slender tail trailing behind. Check that the tail root is uncut and the small zigzag pleat is visible. Adjust only the two fin angles gently if needed.
Layers: One connected cut-and-fold sheet; no ink, separate tail or hidden fastener.
Check: The broad pectoral disc and long integral tail identify the stingray from above and at an angle.
Explore this step ↑
Sources & notes
Just Fold Paper; anatomy background by Nancy Passarelli and Andrew Piercy, Florida Museum, Original measured stingray construction; Southern Stingray species profile (2026).
Florida Museum: Southern Stingray anatomy (not folding instructions) ↗
This measured outline, fold sequence, text, diagrams and geometry were authored for Just Fold Paper. The museum reference supports the broad diamond-like pectoral disc and slender tail, not this paper construction. No external photographs, diagrams or wording are reproduced. No traditional attribution or project-wide reuse license is claimed.
Adaptation: A genuinely original cut-and-fold design, not an adaptation of the catalog fish or angelfish. An 8 × 10-inch blank becomes one connected six-vertex outline. The body and triangular tail share a full one-inch root. A half-inch snout fold shortens the nose; two opposing tail folds create a quarter-inch pleat; two 20-degree fin-root folds lift the broad side panels. The discarded outline scraps are explicit. The one-page PDF is an instruction sheet, not a full-size cutting template. Proportions are stylized, not a species-scale anatomical model.
Original instructions and diagrams, made with AI assistance. About & reuse
Accuracy notes
Real-paper follow-along and paper weight have not been tested. Diagrams illustrate the sequence, not paper thickness, contact, collisions or exact layer visibility. Rigid hinges preserve every point of the retained 23.5-square-inch outline. Cutting removes 56.5 square inches of scrap in one explicit nonanimated step; no material is added. The tail pleat carries the complete selected packet. The two raised fins remain joined along continuous hinges. Zero-thickness geometry and bounded layer/contact tests do not certify finite-thickness behavior. Physical cutting, folding and printing have not been tested. The finished piece is a display, not a swimming or flying toy.