 Just Fold Paper
Cut, fold & assemble
Folded Paper Crown
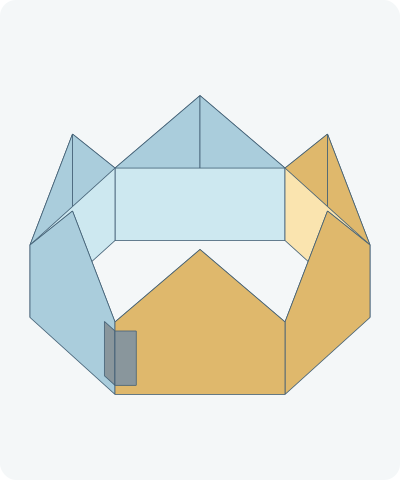
Make a six-point party crown from one long strip. Five short cuts release the point folds; a visible taped butt joint closes the wearable band. Measure the fit before cutting: the illustrated size is an example, not a universal fit.
Preparation + 9 numbered steps
Materials
24 × 4-inch rectangle · 24 × 4 inches
One 24 × 4-inch strip (60.96 × 10.16 cm) of light paper, ruler, pencil, scissors and one 1 × 1.5-inch piece of paper tape. Use a large sheet or roll so the strip is continuous. For another size, scale every paper measurement by the same factor; the strip length is the finished band perimeter. Check a loose six-sided loop for fit first, then cut a fresh proportional strip. Ask an adult to help with scissors. This is an open costume crown, not protective headwear.
Drag to rotate · swipe sideways on touch.
Arrow keys rotate when focused.
Follow along
PreparationThe interactive guide needs JavaScript. Read every illustrated step below.
Help · controls & diagram
Play or drag the progress slider to watch a fold from 0% to 100%. Use the view buttons or drag the diagram to look from another angle.
Blue and gold identify the original left and right halves of the strip. Orange marks moving paper and cuts. Gray is separate joining tape, not paper hidden inside the band.
With the diagram focused: Space plays or pauses, ←/→ change steps, and Home resets.
Every step, at a glance
Compare your paper with each diagram after completing the action. Blue and gold identify the original left and right halves of the strip. Orange marks moving paper and cuts. Gray is separate joining tape, not paper hidden inside the band.
- 0. Measure and mark the strip
- 1. Cut five upper slits
- 2. Fold each upper left corner
- 3. Fold each upper right corner
- 4. Bend the band at 20 inches
- 5. Bend the band at 16 inches
- 6. Bend the band at 12 inches
- 7. Bend the band at 8 inches
- 8. Bring the two ends together
- 9. Tape the outside seam
PREPARATION · Original six-panel crown construction
Measure and mark the strip
Lay the 24-inch edge horizontally, with the inside face toward you. Mark vertical panel boundaries 4, 8, 12, 16 and 20 inches from the left edge. Mark a horizontal line 2 inches below the top. Mark the top midpoint of each 4-inch panel. These are pencil guides, not folds yet.
Layers: One continuous rectangle; six equal panels remain joined.
Check: Each panel is 4 inches wide. The uncut lower band will be 2 inches tall.
Explore this step ↑STEP 1 · Original six-panel crown construction
Cut five upper slits
Cut down each of the five vertical marks from the top edge to the halfway line. Stop exactly 2 inches down. Do not cut across the strip or into the lower band.
Layers: The six upper tabs are released at their sides; the whole lower band stays connected.
Check: There are five 2-inch slits, no detached pieces and no removed triangles.
Explore this step ↑STEP 2 · Original six-panel crown construction
Fold each upper left corner
On each tab, bring its top left corner down and right to the tab center on the halfway line. Crease the diagonal from the tab’s top midpoint to its left slit endpoint. Work across all six tabs; the animation shows the six independent folds together.
Layers: Move only the upper left corner triangle of each tab. Keep all lower-band paper flat.
Check: Six left slopes are folded. Every corner lands at its own tab center, not a neighboring tab.
Explore this step ↑STEP 3 · Original six-panel crown construction
Fold each upper right corner
Mirror the fold on the right side of every tab. Bring each top right corner down and left to the same center on the halfway line. Press the paired triangles flat.
Layers: Move only the six upper right triangles; keep the left triangles and lower band still.
Check: Six points remain at the original top midpoints. The folded triangles meet edge to edge beneath each point.
Explore this step ↑STEP 4 · Original six-panel crown construction
Bend the band at 20 inches
At the original 20-inch mark from the left edge, bend the band inward by 60 degrees, carrying everything to its right. Leave the panels to the left flat for now. Keep earlier bends at 60 degrees.
Layers: Carry the complete right-hand section, including all its folded point layers. Do not tear the band below the slit.
Check: The inside angle between adjoining panels is 120 degrees.
Explore this step ↑STEP 5 · Original six-panel crown construction
Bend the band at 16 inches
At the original 16-inch mark from the left edge, bend the band inward by 60 degrees, carrying everything to its right. Leave the panels to the left flat for now. Keep earlier bends at 60 degrees.
Layers: Carry the complete right-hand section, including all its folded point layers. Do not tear the band below the slit.
Check: The inside angle between adjoining panels is 120 degrees.
Explore this step ↑STEP 6 · Original six-panel crown construction
Bend the band at 12 inches
At the original 12-inch mark from the left edge, bend the band inward by 60 degrees, carrying everything to its right. Leave the panels to the left flat for now. Keep earlier bends at 60 degrees.
Layers: Carry the complete right-hand section, including all its folded point layers. Do not tear the band below the slit.
Check: The inside angle between adjoining panels is 120 degrees.
Explore this step ↑STEP 7 · Original six-panel crown construction
Bend the band at 8 inches
At the original 8-inch mark from the left edge, bend the band inward by 60 degrees, carrying everything to its right. Leave the panels to the left flat for now. Keep earlier bends at 60 degrees.
Layers: Carry the complete right-hand section, including all its folded point layers. Do not tear the band below the slit.
Check: The inside angle between adjoining panels is 120 degrees.
Explore this step ↑STEP 8 · Original six-panel crown construction
Bring the two ends together
At the original 4-inch mark from the left edge, bend the band inward by 60 degrees, carrying everything to its right. The two short lower-band ends should meet edge to edge, without overlap. Keep the top open.
Layers: Carry the complete right-hand section, including all its folded point layers. Do not tear the band below the slit.
Check: Six equal sides form a hexagon. The ends touch but are not locked together yet.
Explore this step ↑STEP 9 · Original six-panel crown construction
Tape the outside seam
Hold the two band ends edge to edge. Bend a separate 1 × 1.5-inch piece of paper tape along its length to follow the corner. Center it vertically on the 2-inch band and press half its width onto each outer face across the join. The animation moves this pre-bent tape into contact. Check the join and loose fit before putting the crown on; if it is tight, remake a larger proportional strip.
Layers: Gray shows separate tape bridging the butt joint. No paper ends overlap or tuck into a pocket.
Check: The six-point crown is an open wearable band with a taped seam, not a closed hat or a helmet.
Explore this step ↑
Sources & notes
Just Fold Paper, Original six-panel cut-and-fold crown (2026).
This dimensioned construction, English instructions, diagrams and animation were authored for Just Fold Paper. It combines elementary corner folds with a six-panel band and an explicitly taped butt joint; no external tutorial, photograph or diagram was copied. No claim of historical priority, traditional attribution or public-domain status is made.
Adaptation: Original design, not an adaptation of the existing paper hat or flat samurai helmet. Five slits stop halfway down a continuous strip. Twelve corner triangles fold inward to create six points. Five 60-degree bends and one taped end joint make an open hexagonal band. The tape is shown as a separate pre-bent piece approaching the outside seam. Fit, adhesive strength and real-paper behavior have not been tested.
Original instructions and diagrams, made with AI assistance. About & reuse
Accuracy notes
Real-paper follow-along and paper weight have not been tested. Diagrams illustrate the sequence, not paper thickness, contact, collisions or exact layer visibility. Rigid panels retain all 96 square inches of paper, including the twelve folded corner triangles. Only the five disclosed upper slits release material seams; the lower band remains connected. Tape is a separate 1.5-square-inch accessory. Zero-thickness folds and tape contact are teaching geometry, not a thickness or adhesive simulation. Check fit loosely before wearing; the crown has an open top and no protective function.