 Just Fold Paper
Cut, fold & assemble
Cut-and-fold Paper Lantern
Make a small decorative lantern with eight angular, outward-folded walls. Cut the slits, close two octagonal rims with tape and attach a separate folded handle. This is a paper decoration, not a light fixture.
Preparation + 10 numbered steps
Materials
16 × 12 cm body + separate handle · approximate body size · 6.3 × 4.72 inches
One 16 × 12 cm rectangle and one separate 1 × 14.83 cm strip of ordinary paper; ruler, pencil, scissors and transparent tape. Prepare both blanks from larger paper before starting. Use a firm surface for marking. Decorative use only: no candle, heat source or light fitting.
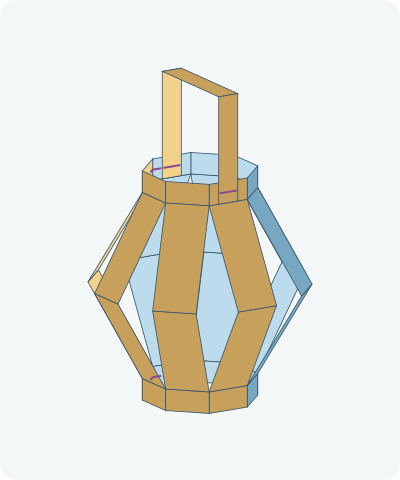
Drag to rotate · swipe sideways on touch.
Arrow keys rotate when focused.
Follow along
PreparationThe interactive guide needs JavaScript. Read every illustrated step below.
Help · controls & diagram
Play or drag the progress slider to watch a fold from 0% to 100%. Use the view buttons or drag the diagram to look from another angle.
Blue and gold identify the two halves of the body; the separate handle is gold. Darker shades show reverse faces. Solid orange shows cuts, dashed orange shows crease positions, and purple marks tape placement. Panel boundaries at the rim are real folds; slit walls remain attached at both ends.
With the diagram focused: Space plays or pauses, ←/→ change steps, and Home resets.
Every step, at a glance
Compare your paper with each diagram after completing the action. Blue and gold identify the two halves of the body; the separate handle is gold. Darker shades show reverse faces. Solid orange shows cuts, dashed orange shows crease positions, and purple marks tape placement. Panel boundaries at the rim are real folds; slit walls remain attached at both ends.
- 0. Prepare and mark the two blanks
- 1. Fold the body in half
- 2. Cut seven stopped slits
- 3. Unfold the slit rectangle
- 4. Mark the rim and wall hinges
- 5. Form two octagonal rims
- 6. Tape the two rim joins
- 7. Push the walls outward
- 8. Fold the separate handle
- 9. Align the handle above the rim
- 10. Attach both handle ends
PREPARATION · Faceted slit-lantern adaptation; dimensions in centimetres
Prepare and mark the two blanks
Lay the 16 × 12 cm body horizontally. On each 16 cm edge, mark 2, 4, 6, 8, 10, 12 and 14 cm from the left. Set the separate 1 × 14.83 cm handle strip aside. Mark the handle 5 cm from each end.
Layers: One rectangular body and one separate handle; no joined pieces yet.
Check: The body has eight equal 2 cm columns. The handle’s middle section is approximately 4.83 cm long.
Explore this step ↑STEP 1 · Faceted slit-lantern adaptation; dimensions in centimetres
Fold the body in half
Bring the upper 16 cm edge down to the lower edge. Crease across the center. Keep the folded edge at the top and the two free long edges together at the bottom.
Layers: Move the entire upper half, including its future rim.
Check: The folded rectangle is 16 cm wide and 6 cm tall.
Explore this step ↑STEP 2 · Faceted slit-lantern adaptation; dimensions in centimetres
Cut seven stopped slits
At each of the seven 2 cm marks, cut from the folded edge toward the paired free edges. Cut 5 cm through BOTH layers, stopping 1 cm short of those free edges. Do not cut through the remaining band.
Layers: Cut both layers at each mark; remove no strip. Adult help is appropriate for scissors.
Check: Seven cuts create eight wall strips, all still connected by an uncut 1 cm band.
Explore this step ↑STEP 3 · Faceted slit-lantern adaptation; dimensions in centimetres
Unfold the slit rectangle
Open the upper half completely. Lay the body flat without pulling the slit edges apart.
Layers: Reopen all eight upper wall halves and their connected rim together.
Check: Each slit is now 10 cm long, with a continuous 1 cm band at both top and bottom.
Explore this step ↑STEP 4 · Faceted slit-lantern adaptation; dimensions in centimetres
Mark the rim and wall hinges
Draw a light line across the paper 1 cm from each long edge, through the slit endpoints. At each slit, extend its line across the adjacent uncut rim to the outer edge. Use these short rim lines for the next bends; use the two long lines as hinges when shaping the walls.
Layers: Mark only; do not extend a cut into either rim. The existing horizontal center crease crosses every wall strip.
Check: Seven short corner lines divide each rim into eight 2 cm panels.
Explore this step ↑STEP 5 · Faceted slit-lantern adaptation; dimensions in centimetres
Form two octagonal rims
Bend the seven marked corners of both rims in the same direction, about 45 degrees at each corner. Keep corresponding top and bottom corners vertically aligned. Bring the body’s left and right edges together without overlapping them.
Layers: The slit wall columns follow their rim panels. Keep the walls straight for now.
Check: Viewed from above, both rims are matching eight-sided loops. The two free edges meet at the eighth corner.
Explore this step ↑STEP 6 · Faceted slit-lantern adaptation; dimensions in centimetres
Tape the two rim joins
Hold the free edges together. Wrap one small piece of tape across the join in the top 1 cm rim, then another across the bottom rim join. Each piece must grip paper on both sides of the corner. Keep all tape within the rim bands.
Layers: Join only the two rim ends. Leave the long wall edges between them free, just like the seven cut slits.
Check: Both octagons stay closed; the eighth wall gap is not taped shut. Purple marks show the two tape locations.
Explore this step ↑STEP 7 · Faceted slit-lantern adaptation; dimensions in centimetres
Push the walls outward
Hold the top and bottom rims parallel. Gently bring them closer while guiding every middle crease outward, away from the hollow center. Bend each wall at its two rim hinges and its middle crease. Aim for each 5 cm half to lean about 30 degrees from vertical.
Layers: All eight wall strips stay attached to both rims. Their slit sides separate; the rims themselves keep their octagonal shape.
Check: The lantern has a broad angular middle and open gaps at all eight corners. Its total height is about 10.66 cm.
Explore this step ↑STEP 8 · Faceted slit-lantern adaptation; dimensions in centimetres
Fold the separate handle
On the handle strip, bend both 5 cm end sections to the same side of the middle 4.83 cm section. Make two right-angle folds to form a squared U.
Layers: Move the two end arms of the separate strip; leave the finished lantern still.
Check: The arms are parallel and equal in length. The flat bridge between them spans about 4.83 cm.
Explore this step ↑STEP 9 · Faceted slit-lantern adaptation; dimensions in centimetres
Align the handle above the rim
Turn the U so its bridge is horizontal and both arms point down. Center it over the lantern, with its arms above the centers of two opposite rim faces. Keep both arm ends above the rim while aligning.
Layers: Move the entire folded handle as one piece. Do not unfold its corners.
Check: The arms straddle the outside of opposite faces, not neighboring faces.
Explore this step ↑STEP 10 · Faceted slit-lantern adaptation; dimensions in centimetres
Attach both handle ends
Lower the aligned handle until the bottom 1 cm of each arm lies against the OUTSIDE of its rim face. Tape each overlapping end securely to that rim, keeping the tape on the rim and handle rather than across a slit. Adjust the creases gently and display the empty decoration.
Layers: Two handle ends overlap two opposite top-rim faces by 1 cm; no tuck or hidden interlock is used.
Check: Eight slit walls, two taped rim joins and two taped handle ends complete the decoration. Handle strength and hanging have not been tested. Keep it away from heat and do not add a light fitting.
Explore this step ↑
Sources & notes
FirstPalette (general slit-lantern reference); Just Fold Paper (faceted adaptation), Paper Lanterns (web tutorial).
General folded-slit lantern reference ↗
FirstPalette describes folding a rectangle, cutting parallel slits, joining the top and bottom and adding a handle. Its photographs and prose are protected and are not reproduced. No design-reuse license or named original inventor is established here. The octagonal measurements, butt-taped rim joints, angular wall motion, fitted U handle, text, code and diagrams are independently authored for this guide.
Adaptation: This is a faceted adaptation, not an exact reconstruction of the source’s rounded overlapping tube. Eight 2 cm panels make regular octagonal rims; only the two rim ends are butt-joined with tape. Slits stop 1 cm from each long edge. Each 5 cm wall half tips outward by about 30 degrees. A separate 1 cm-wide U handle spans opposite rim faces (2 + 2√2 ≈ 4.83 cm), with two 5 cm arms and 1 cm attachment overlaps. No source images, text, decorative templates or cultural-origin claims are imported.
Original instructions and diagrams, made with AI assistance. About & reuse
Accuracy notes
Real-paper follow-along and paper weight have not been tested. Diagrams illustrate the sequence, not paper thickness, contact, collisions or exact layer visibility. The body retains 192 cm² and the handle retains 14.8284 cm² in the ideal measured model. All panels move rigidly; only seven cut wall seams separate. The top and bottom bands remain connected. Zero-thickness, prescribed hinge motion; tape is a placement symbol. No adhesive strength, finite-thickness collision certificate, hanging-load or real-paper verification is claimed.