 Just Fold Paper
Fold & glue
Paper Bow Tie
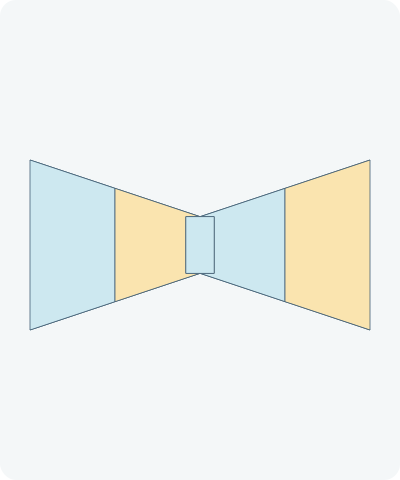
Make a flat paper bow tie with two distinct tapered wings and a real folded center band. Glue the band across the meeting ends for a card or gift decoration.
Preparation + 11 numbered steps
Materials
Two 3-inch wing squares + one 1-inch center square · 3 × 3 inches
Two 3 × 3 inch (7.62 cm) squares and one 1 × 1 inch (2.54 cm) square of thin paper. Ruler, pencil and glue stick. Scissors only if preparing the squares. This is a flat decoration, with no neck strap or wearable attachment.
Drag to rotate · swipe sideways on touch.
Arrow keys rotate when focused.
Follow along
PreparationThe interactive guide needs JavaScript. Read every illustrated step below.
Help · controls & diagram
Play or drag the progress slider to watch a fold from 0% to 100%. Use the view buttons or drag the diagram to look from another angle.
Blue and gold identify the original halves of each separate sheet; darker shades show the reverse. Orange marks moving paper. Focus views leave the other completed pieces aside, not unfolded or discarded.
With the diagram focused: Space plays or pauses, ←/→ change steps, and Home resets.
Every step, at a glance
Compare your paper with each diagram after completing the action. Blue and gold identify the original halves of each separate sheet; darker shades show the reverse. Orange marks moving paper. Focus views leave the other completed pieces aside, not unfolded or discarded.
- 0. Prepare three squares
- 1. Left wing: fold the upper corner behind
- 2. Left wing: fold the lower corner behind
- 3. Take the right wing square
- 4. Right wing: fold the upper corner behind
- 5. Right wing: fold the lower corner behind
- 6. Take the center square
- 7. Double the center band
- 8. Position the left wing
- 9. Bring the narrow ends together
- 10. Glue the folded band over the joint
- 11. Let the flat bow dry
PREPARATION · Original three-square bow construction
Prepare three squares
Prepare two 3-inch squares for the wings and one 1-inch square for the center. Use thin paper, a ruler, pencil and glue stick. Cut the squares first if needed. Place the wing squares with the display side up and edges level.
Layers: Three separate squares; none is cut during the folding sequence.
Check: The wing squares match; the center square is one third as wide.
Explore this step ↑STEP 1 · Original three-square bow construction
Left wing: fold the upper corner behind
On the right edge of the left square, mark 1 inch down from the top. Fold the upper-right corner behind along the line from this mark to the top-left corner.
Layers: Move the single upper corner away from you; leave the broad middle still.
Check: The upper edge slopes down toward a short right edge.
Explore this step ↑STEP 2 · Original three-square bow construction
Left wing: fold the lower corner behind
On the same right edge, mark 1 inch up from the bottom. Fold the lower-right corner behind along the line from this mark to the bottom-left corner.
Layers: Move the complete lower corner behind the wing and behind the first flap where they overlap.
Check: The left wing is 3 inches tall at its outer end and 1 inch tall at its narrow right end.
Explore this step ↑STEP 3 · Original three-square bow construction
Take the right wing square
Set the completed left wing aside. Take the second 3-inch square with the display side up.
Layers: The left wing stays folded; only the right square is in focus.
Check: The second square is flat.
Explore this step ↑STEP 4 · Original three-square bow construction
Right wing: fold the upper corner behind
Mark the left edge 1 inch down from the top. Fold the upper-left corner behind along the line from that mark to the top-right corner.
Layers: Move the upper-left corner away from you.
Check: The slope mirrors the top of the left wing.
Explore this step ↑STEP 5 · Original three-square bow construction
Right wing: fold the lower corner behind
Mark the left edge 1 inch up from the bottom. Fold the lower-left corner behind along the line from that mark to the bottom-right corner.
Layers: Move the lower corner behind the wing and behind the first flap where they overlap.
Check: The narrow left end is 1 inch tall; the two wings are mirror images.
Explore this step ↑STEP 6 · Original three-square bow construction
Take the center square
Keep both wings aside. Take the 1-inch square with its display side up.
Layers: This is the third, separate piece of paper.
Check: Its edges are level.
Explore this step ↑STEP 7 · Original three-square bow construction
Double the center band
Fold the right edge behind to meet the left edge. Press the vertical halfway crease.
Layers: Move the entire right half behind the left half.
Check: The doubled center band is ½ inch wide and 1 inch tall.
Explore this step ↑STEP 8 · Original three-square bow construction
Position the left wing
Lay the left wing flat, with its broad end on the left and narrow end toward the middle. Keep the corner flaps underneath.
Layers: Slide the complete left wing without changing its folds.
Check: Its narrow vertical edge is ready for the joint.
Explore this step ↑STEP 9 · Original three-square bow construction
Bring the narrow ends together
Slide the right wing left until its narrow edge meets the left wing’s narrow edge. Align the tops and bottoms of the 1-inch ends. Do not overlap the wings.
Layers: Move the whole right wing; keep both wings face up and their corner flaps underneath.
Check: A vertical seam separates two mirrored wings, with no gap.
Explore this step ↑STEP 10 · Original three-square bow construction
Glue the folded band over the joint
Apply glue between the band’s two layers, then to its back. Center it over the wing seam, covering ¼ inch of each wing. Lower it onto the fronts, align its top and bottom with the narrow ends, and press gently.
Layers: Move both band layers together, above the wings. Glue bonds the band to both wing fronts; there is no insertion or wraparound.
Check: The ½-inch-wide band bridges the seam and holds the two wings together.
Explore this step ↑STEP 11 · Original three-square bow construction
Let the flat bow dry
Leave the bow flat until the glue is dry according to its label. Keep both broad wings visible. You can glue the finished decoration onto a card or gift.
Layers: No additional fold. The center band remains on the front; four corner flaps remain behind.
Check: Two broad, sloping wings and a compact rectangular center form the finished bow tie.
Explore this step ↑
Sources & notes
Just Fold Paper, Original three-square flat bow tie (2026).
Original design and assembly notes ↗
This measured three-square construction, English instructions, diagrams and code were authored for Just Fold Paper with AI assistance. No external tutorial text, photographs or diagrams were copied. No claim of historical priority, traditional attribution or project-wide reuse license is made.
Adaptation: An original flat craft design: two mirrored 3-inch squares each receive two diagonal corner folds behind, leaving 1-inch inner ends. A separate 1-inch square is folded to a doubled ½ × 1-inch band and glued over the abutting wing ends. The band is a face bridge, not a wraparound knot or hidden tuck. Unlike a necktie, this has two broad lateral wings and no long hanging blade.
Original instructions and diagrams, made with AI assistance. About & reuse
Accuracy notes
Real-paper follow-along and paper weight have not been tested. Diagrams illustrate the sequence, not paper thickness, contact, collisions or exact layer visibility. Three separate rigid paper sheets retain 9 + 9 + 1 square inches. All four corner flaps and both center-band layers remain in the final assembly. Whole-piece placement is continuous, with an above-paper approach for the center band. Zero-thickness diagrams omit glue thickness and drying behavior. Real-paper folding, bond strength and physical handling have not been tested. Keep the decoration flat; it has no wearable neck attachment.