 Just Fold Paper
Fold only
Origami Heart
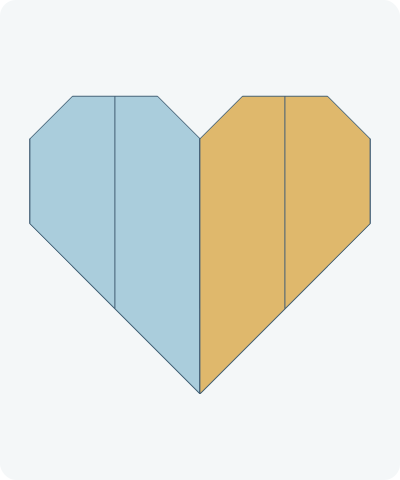
Make a flat paper heart with two lobes and a pointed base. Start with cross creases, then fold the small finishing corners behind the heart.
Preparation + 15 numbered steps
Materials
Square origami paper · 6 × 6 inches
One flexible 6 × 6-inch square (15.24 × 15.24 cm, approximately 15.2 cm square). Start with the intended outside color facing down and a corner pointing up. No cutting or glue; an optional ruler helps match the finishing folds.
Drag to rotate · swipe sideways on touch.
Arrow keys rotate when focused.
Follow along
PreparationThe interactive guide needs JavaScript. Read every illustrated step below.
Help · controls & diagram
Play or drag the progress slider to watch a fold from 0% to 100%. Use the view buttons or drag the diagram to look from another angle.
Blue and gold identify the original left and right halves of one sheet, not its front and back colors. Darker shades show the reverse. Orange outlines mark moving layers and dashed orange lines mark the active crease. Solid lines are panel edges and earlier folds, not extra folds to make.
With the diagram focused: Space plays or pauses, ←/→ change steps, and Home resets.
Every step, at a glance
Compare your paper with each diagram after completing the action. Blue and gold identify the original left and right halves of one sheet, not its front and back colors. Darker shades show the reverse. Orange outlines mark moving layers and dashed orange lines mark the active crease. Solid lines are panel edges and earlier folds, not extra folds to make.
- 0. Prepare a square as a diamond
- 1. Crease from top to bottom
- 2. Open the first crease
- 3. Make the crossing crease
- 4. Open the diamond again
- 5. Bring the top point to the center
- 6. Bring the bottom point to the upper edge
- 7. Raise the right half into a lobe
- 8. Raise the left half to match
- 9. Turn the heart over
- 10. Fold the right outer corner inward
- 11. Match the left outer corner
- 12. Soften the upper right tip
- 13. Soften the upper left tip
- 14. Turn to the finished face
- 15. Check your flat heart
PREPARATION · Simple flat heart
Prepare a square as a diamond
Place a 6-inch square with one corner pointing up and the intended outside color facing down. The other corners point left, right and down.
Layers: One square sheet. Blue and gold track its original halves.
Check: All four edges have equal length.
Explore this step ↑STEP 1 · Simple flat heart
Crease from top to bottom
Bring the left corner onto the right corner. Match the two sloping edges and press the vertical fold.
Layers: Move the complete left half.
Check: The crease connects the upper and lower corners.
Explore this step ↑STEP 2 · Simple flat heart
Open the first crease
Return the left corner to its starting position and flatten the sheet.
Layers: Unfold only the fold just made.
Check: The full diamond is open with one vertical crease.
Explore this step ↑STEP 3 · Simple flat heart
Make the crossing crease
Bring the top corner onto the bottom corner. Match the edges and press the horizontal fold.
Layers: Move the complete upper half.
Check: The new crease joins the left and right corners.
Explore this step ↑STEP 4 · Simple flat heart
Open the diamond again
Lift the top corner back up and lay the sheet flat. Keep the original top corner at the top.
Layers: Unfold the upper half completely.
Check: Two creases cross at the center of the square.
Explore this step ↑STEP 5 · Simple flat heart
Bring the top point to the center
Fold the upper corner down to the crossing of the two creases. Press the new horizontal fold.
Layers: Only the upper triangular corner moves.
Check: Its tip rests at the center; a short horizontal edge replaces the top point.
Explore this step ↑STEP 6 · Simple flat heart
Bring the bottom point to the upper edge
Lift the bottom corner to the midpoint of the short upper edge. Keep the top flap folded and press the new lower horizontal crease.
Layers: Move the lower triangle over the center; do not reopen the upper flap.
Check: The bottom tip meets the upper edge, and a long horizontal folded edge lies below.
Explore this step ↑STEP 7 · Simple flat heart
Raise the right half into a lobe
Bring the right half of the lower horizontal edge onto the vertical center crease. The crease starts at the lower edge midpoint and slopes up to the right.
Layers: Fold all layers in the lower-right section together. Leave the left section flat.
Check: The former lower-right edge stands vertically on the centerline; a peak rises on the right.
Explore this step ↑STEP 8 · Simple flat heart
Raise the left half to match
Bring the left half of the lower horizontal edge onto the centerline, beside the right half. Match the lower point carefully.
Layers: Move every layer in the lower-left section; keep the right lobe folded.
Check: Two peaks sit above a central notch, and the heart has a downward point.
Explore this step ↑STEP 9 · Simple flat heart
Turn the heart over
Turn the entire heart over from side to side, keeping the lower point down. Do not open any fold.
Layers: All layers turn as one packet.
Check: The reverse shows a horizontal backing edge beneath the two peaks.
Explore this step ↑STEP 10 · Simple flat heart
Fold the right outer corner inward
Locate the right end of the exposed horizontal backing edge. Make a vertical crease through it and fold the small outer point inward.
Layers: Move all layers beyond that vertical line only.
Check: The sharp right corner is replaced by a short vertical side.
Explore this step ↑STEP 11 · Simple flat heart
Match the left outer corner
Use the left end of the same backing edge to place a matching vertical crease. Fold that small point inward.
Layers: Move just the left outer corner packet.
Check: The left and right sides have matching short vertical edges.
Explore this step ↑STEP 12 · Simple flat heart
Soften the upper right tip
Fold the upper right tip down to the height of the central notch. Place the horizontal crease halfway between that tip and the notch level.
Layers: Move only the small right peak; keep the backing still.
Check: The right lobe has a short flat top and the folded tip meets the notch level.
Explore this step ↑STEP 13 · Simple flat heart
Soften the upper left tip
Fold the left peak down by the same amount. Match the height of the two short top edges.
Layers: Only the left upper tip moves.
Check: Both lobes have matching flat tops.
Explore this step ↑STEP 14 · Simple flat heart
Turn to the finished face
Turn the whole heart over again, keeping the point down and all four finishing folds behind.
Layers: The entire connected sheet turns, with no new fold.
Check: A flat heart has two shaped lobes, a central notch and a single lower point.
Explore this step ↑STEP 15 · Simple flat heart
Check your flat heart
Compare the two lobes and gently press the folded edges. Leave the small corner folds behind the heart.
Layers: One square sheet remains; no parts have been cut away.
Check: Both sides match and the lower point is centered.
Explore this step ↑
Sources & notes
Origami-Instructions.com and Green Kid Crafts (construction references; designer not established), Easy Origami Heart (undated; crosscheck updated 2024).
Photographed easy-heart sequence ↗ · Green Kid Crafts crosscheck ↗ · Reference video ↗
This is the common simple flat-heart version shown by the linked references. Its designer and design license are not established here. A traditional-model caption is not a license grant. Public access does not license source text, photographs, videos or templates. Our English instructions, diagrams and geometry are independently authored with AI assistance; no source media or prose is reproduced and no public-domain clearance is asserted.
Adaptation: Uses an exact 6-inch square, oriented as a diamond. The first two diagonal creases are each folded and fully reopened. The upper point meets the cross-crease center; the lower point meets the midpoint of the new upper edge. Each lower horizontal half-edge then meets the vertical centerline. After turning over, the side-corner creases are vertical through the ends of the exposed horizontal backing edge. Each upper-tip crease is halfway between its peak and the central notch, so its tip meets the notch level. Those exact finishing landmarks are our authored choices for the qualitative source folds. Simultaneous source actions are separated, including both upper tips. Turns carry the entire packet, with no new crease. This is not the more complex heart currently taught at origami.me/heart/.
Original instructions and diagrams, made with AI assistance. About & reuse
Accuracy notes
Real-paper follow-along and paper weight have not been tested. Diagrams illustrate the sequence, not paper thickness, contact, collisions or exact layer visibility.