 Just Fold Paper
Fold only
Navy Plane
Build a layered pointed nose, spread two swept wings, then lift a pair of small tail flaps from the same sheet.
Preparation + 23 numbered steps
Materials
US Letter, landscape · 11 × 8.5 inches
One flexible 11 × 8½-inch Letter sheet, a ruler and a pencil for light guide marks. No cuts, glue or added fins. Use Letter only: the source gives a different nose fold for A4.
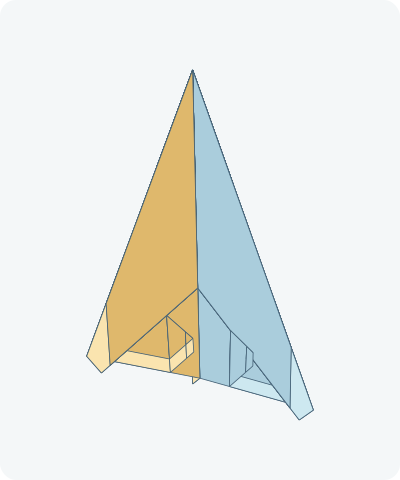
Drag to rotate · swipe sideways on touch.
Arrow keys rotate when focused.
Follow along
PreparationThe interactive guide needs JavaScript. Read every illustrated step below.
Help · controls & diagram
Play or drag the progress slider to watch a fold from 0% to 100%. Use the view buttons or drag the diagram to look from another angle.
Blue and gold identify the original left and right halves of one sheet. Darker shades show the reverse. Orange outlines mark moving packets; the dashed orange line is the hinge. Other solid lines are paper edges and earlier folds.
With the diagram focused: Space plays or pauses, ←/→ change steps, and Home resets.
Every step, at a glance
Compare your paper with each diagram after completing the action. Blue and gold identify the original left and right halves of one sheet. Darker shades show the reverse. Orange outlines mark moving packets; the dashed orange line is the hinge. Other solid lines are paper edges and earlier folds.
- 0. Prepare landscape Letter
- 1. Crease the center
- 2. Open the rectangle
- 3. Fold the left top corner
- 4. Match the right top corner
- 5. Lower the pointed nose packet
- 6. Fold the right top edge inward
- 7. Match the left top edge
- 8. Turn to the plain face
- 9. Bring one rear corner to center
- 10. Match the other rear corner
- 11. Narrow the first leading edge
- 12. Narrow the other leading edge
- 13. Mark the two tail hinges
- 14. Close the centerfold
- 15. Fold the first wing away
- 16. Turn for the other wing
- 17. Fold the matching wing
- 18. Open the blue wing
- 19. Open the gold wing
- 20. Hold the body below the wings
- 21. Raise the blue tail flap
- 22. Raise the gold tail flap
- 23. Check the finished jet
PREPARATION · Letter Navy Plane
Prepare landscape Letter
Place the 11-inch edges across the top and bottom. Keep the top as the nose end.
Layers: One whole 11 × 8½-inch sheet.
Check: The sheet is wider than it is tall.
Explore this step ↑STEP 1 · Letter Navy Plane
Crease the center
Bring the left short edge onto the right short edge and press the fold.
Layers: Move the complete left half.
Check: The short edges coincide.
Explore this step ↑STEP 2 · Letter Navy Plane
Open the rectangle
Unfold the center crease and lay the sheet flat again.
Layers: Return just the folded half.
Check: A vertical crease joins the midpoints of the long edges.
Explore this step ↑STEP 3 · Letter Navy Plane
Fold the left top corner
Bring the left part of the top edge onto the centerline. Press the diagonal from the top midpoint to the left edge.
Layers: Move the upper-left corner only.
Check: Its tip reaches the centerline 5½ inches below the original top.
Explore this step ↑STEP 4 · Letter Navy Plane
Match the right top corner
Bring the right part of the top edge onto the same centerline.
Layers: Move the upper-right corner; leave the left flap closed.
Check: Both tips meet above a 3-inch-tall lower rectangle.
Explore this step ↑STEP 5 · Letter Navy Plane
Lower the pointed nose packet
Fold the upper point down to the meeting corner tips. The horizontal crease is halfway between those points, 2¾ inches below the original top.
Layers: Move every overlapping layer in the upper triangle.
Check: The tip touches the junction, and a short horizontal edge replaces the upper point. This is the Letter position.
Explore this step ↑STEP 6 · Letter Navy Plane
Fold the right top edge inward
Bring the right half of the new horizontal top edge onto the centerline. Carry all layers beneath that corner.
Layers: Move the complete right corner packet, including the folded nose layers.
Check: The new diagonal continues toward the lower-right corner; a narrow strip remains along the bottom.
Explore this step ↑STEP 7 · Letter Navy Plane
Match the left top edge
Bring the left half of the horizontal edge onto the centerline in the same way.
Layers: Move the full left corner packet.
Check: A centered point and two long diagonal sides form the new outline.
Explore this step ↑STEP 8 · Letter Navy Plane
Turn to the plain face
Turn the whole packet over from side to side, keeping the point at the top. Do not rotate it end for end.
Layers: Every layer turns together without a new crease.
Check: The two long folded strips are underneath.
Explore this step ↑STEP 9 · Letter Navy Plane
Bring one rear corner to center
Bring the lower corner on your left to the bottom centerline. Keep the bottom edges aligned. This is the original gold half after the turnover.
Layers: Fold the complete rear corner packet, including the thin folded rim.
Check: A vertical side crease forms 2¾ inches from the centerline.
Explore this step ↑STEP 10 · Letter Navy Plane
Match the other rear corner
Bring the lower corner on your right to the same bottom center point.
Layers: Fold the original blue rear corner packet.
Check: The two rear flaps meet at bottom center; the outline resembles a pointed roof above two vertical sides.
Explore this step ↑STEP 11 · Letter Navy Plane
Narrow the first leading edge
Bring the upper sloping edge on your left onto the centerline. Fold all layers crossing this crease together.
Layers: Move the original gold leading-edge packet and the covered part of its rear flap.
Check: A long narrow flap ends near the rear; a triangular portion of the rear flap remains exposed.
Explore this step ↑STEP 12 · Letter Navy Plane
Narrow the other leading edge
Repeat with the upper sloping edge on your right. Align it to the centerline.
Layers: Move the original blue leading-edge packet, leaving the gold side folded.
Check: Both sides match. Identify the two exposed rear triangles before closing the body.
Explore this step ↑STEP 13 · Letter Navy Plane
Mark the two tail hinges
Find the visible junction where each rear flap’s diagonal free edge emerges from under the overlying nose flap. From that junction, draw a light line parallel to the centerline down to the rear edge. Keep the mark on the exposed rear paper; do not continue it across the nose flap. Do not crease yet.
Layers: Mark only the exposed rear flaps. Leave the overlying nose layers and broad backing flat.
Check: Both marks end at the visible junctions, about 0.805 inches to either side of center in this Letter guide. All paper inward of each mark is clear of the nose cover.
Explore this step ↑STEP 14 · Letter Navy Plane
Close the centerfold
Fold the original blue half, now on your right, over the gold half along the centerline.
Layers: Move a complete half with all its earlier layers.
Check: The narrow folded strips remain outside the closed packet.
Explore this step ↑STEP 15 · Letter Navy Plane
Fold the first wing away
At the original bottom-edge level, mark ¼ inch from the centerfold. Join that mark to the nose point. Fold the outside wing away on this sloping line.
Layers: Move all layers of the blue wing, including its rear flap.
Check: A slender wedge of body remains between the centerfold and the wing root.
Explore this step ↑STEP 16 · Letter Navy Plane
Turn for the other wing
Turn the whole plane over to expose the other wing. Keep the first wing fold closed.
Layers: All layers turn together.
Check: The unfolded gold wing is now accessible.
Explore this step ↑STEP 17 · Letter Navy Plane
Fold the matching wing
Make the matching nose-to-¼-inch-mark crease on this side and fold the second wing outward.
Layers: Move the complete gold wing packet only.
Check: The two wing-root creases match.
Explore this step ↑STEP 18 · Letter Navy Plane
Open the blue wing
Open the first wing halfway back, to a right angle at its root. Keep the centerfold closed.
Layers: The complete blue wing opens with its earlier layers.
Check: The wing separates from the body without undoing the rear flap.
Explore this step ↑STEP 19 · Letter Navy Plane
Open the gold wing
Open the second wing by the same amount on the opposite side.
Layers: The complete gold wing opens.
Check: Both swept wings extend from the narrow body.
Explore this step ↑STEP 20 · Letter Navy Plane
Hold the body below the wings
Rotate the entire model so the narrow body hangs underneath. This is a handling turn, not a fold.
Layers: Move the connected sheet as one object.
Check: The layered nose leads and the two rear flap packets are visible on top.
Explore this step ↑STEP 21 · Letter Navy Plane
Raise the blue tail flap
Lift the exposed blue inner packet upright along its pencil mark. Let the small bent corner close slightly on its old wing-root crease as the flap rises, keeping it beside the body junction. Once upright and clear of the wings, ease that corner open into the flat tail.
Layers: Only the exposed blue rear packet moves. The nose-covered rear paper, broad wing backing and gold side stay still. Do not push the inner corner through a wing.
Check: The tail stands flat and upright. Its entire hinge is below the overlying nose edge; no covered layers were pulled out.
Explore this step ↑STEP 22 · Letter Navy Plane
Raise the gold tail flap
Lift the exposed gold inner packet on its matching mark. Allow its bent corner to close slightly beside the body junction during the lift. Once the flap is upright and clear, open that corner into the flat tail, just as on the blue side.
Layers: Move only the exposed gold rear packet. Keep the backing, nose cover and blue side still.
Check: Two flat upright tails rise from the exposed rear flaps, with the covered paper still held beneath the nose folds.
Explore this step ↑STEP 23 · Letter Navy Plane
Check the finished jet
Compare the two wing roots, layered nose and upright rear flaps. Gently hold the body beneath the wings.
Layers: All parts still belong to the original sheet.
Check: The construction is complete; these diagrams do not establish physical folding or flight performance.
Explore this step ↑
Sources & notes
Fold ’N Fly (publisher; inventor not established), Navy Plane (undated).
Photographed construction reference ↗ · Publisher’s wing and inner-flap video crosscheck ↗
The model name and construction reference come from Fold ’N Fly. Publisher credit does not establish an inventor or design license. This guide’s English, geometric SVG diagrams and code are independently authored with AI assistance. No reference photographs, prose or printable templates are bundled. Public source access does not grant media reuse permission.
Adaptation: Letter only. We follow the landscape proportions visible from source step 2, despite its portrait preparation photo. The first corner tips meet 5½ inches below the original top. The folded nose tip then meets that junction: its crease is 2¾ inches below the top, not the alternative A4 position. The second pair brings each half of the new horizontal top edge to the centerline. After turning to the reverse face, each rear corner meets the bottom center. We align the next leading edges exactly to the centerline by bisecting 45°; the photographs leave a small unmeasured gap. The photographed wing roots and tail folds lack dimensions; the publisher’s linked video suggests roughly one inch for the inner flaps. Our authored wing root runs from the nose to a mark ¼ inch from the centerline at the original bottom-edge level. Each tail hinge runs parallel to the centerline through the visible junction where the rear flap’s free diagonal emerges from under the overlying nose edge. For this exact-center Letter construction, those junctions are about 0.805 inches from center and the hinges about 1.055 inches long; these are derived dimensions, not measurements from the photos. The complete selected rear packet lies outside the stationary nose cover. Do not lift rear paper still covered by the nose or the broad wing backing. While lifting a tail, its bent inner corner closes slightly on its existing wing-root crease to stay beside the body junction; once the tail is upright and clear, that corner opens into the flat fin. This constrained two-hinge interpolation is an authored teaching path, not a measured hand trajectory. It adds no crease, cut or tucked shape. Paired actions, guide marking and handling turns are separated. Wings reopen 90° and tails rise 90° as display choices, not tested flight settings. The video later adds outer winglets; this guide follows the photograph’s two-inner-tail endpoint instead.
Original instructions and diagrams, made with AI assistance. About & reuse
Accuracy notes
Real-paper follow-along and paper weight have not been tested. Diagrams illustrate the sequence, not paper thickness, contact, collisions or exact layer visibility.