 Just Fold Paper
Start here · Fold only
Basic Dart
A narrow body, two opening wings. Build it one fold at a time.
Preparation + 9 numbered steps
Materials
US Letter · 8.5 × 11 inches
One sheet, portrait. No cuts or glue.
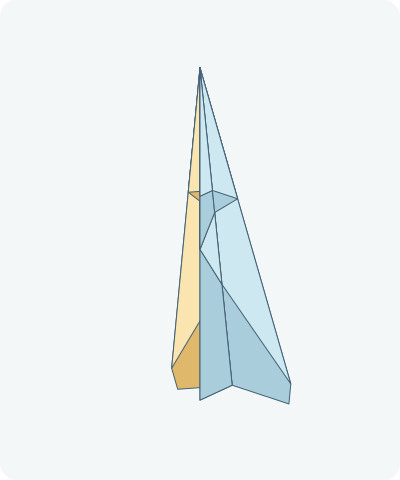
Drag to rotate · swipe sideways on touch.
Arrow keys rotate when focused.
Follow along
PreparationThe interactive guide needs JavaScript. Read every illustrated step below.
Help · controls & diagram
Play or drag the progress slider to watch a fold from 0% to 100%. Use the view buttons or drag the diagram to look from another angle.
Blue and gold identify the two halves of one sheet; darker shades show the reverse. Fold along the dashed orange hinge. Orange outlines mark moving layers; solid lines are paper edges and earlier folds, not new creases.
With the diagram focused: Space plays or pauses, ←/→ change steps, and Home resets.
Every step, at a glance
Compare your paper with each diagram after completing the action. Blue and gold identify the two halves of one sheet; darker shades show the reverse. Fold along the dashed orange hinge. Orange outlines mark moving layers; solid lines are paper edges and earlier folds, not new creases.
- 0. Prepare one sheet
- 1. Close the long fold
- 2. Fold the first nose corner
- 3. Match the other corner
- 4. Narrow the blue side
- 5. Narrow the gold side
- 6. Make the blue wing crease
- 7. Make the gold wing crease
- 8. Open just the wings
- 9. Your folded dart
PREPARATION · Modern paper-size adaptation
Prepare one sheet
Place a Letter sheet upright, with a short edge at the top. Its top midpoint will become the nose. The colors identify the original left half (L, blue) and right half (R, gold); you do not need two sheets.
Layers: Both halves are joined along the center line.
Check: One uncut 8.5 × 11 inch sheet. No glue. Long edges run up and down.
Explore this step ↑STEP 1 · Before figure 1
Close the long fold
Bring the left long edge over to the right long edge. Crease down the middle and keep the sheet closed, like a narrow book. Keep the nose end at the top.
Layers: Move the entire blue L half; hold the gold R half still.
Check: The long free edges meet. The center fold is the spine on the left.
Explore this step ↑STEP 2 · First side of figure 1
Fold the first nose corner
On the blue outside face, fold the top free corner back to the spine. The top short edge should lie along the spine. Press the diagonal crease.
Layers: Move only the L corner triangle, not the gold half underneath.
Check: The corner lands halfway down the original sheet width: 4¼ inches from the nose along the spine.
Explore this step ↑STEP 3 · Figure 1
Match the other corner
Turn the closed paper over to reach the gold outside face. Repeat the same corner fold on this side. Turning the paper is only a viewing change, not another crease.
Layers: Move only the R corner triangle; keep the L half folded.
Check: Both nose corners meet the spine at the same height. The two sides match.
Explore this step ↑STEP 4 · First side of figure 2
Narrow the blue side
Turn back to the blue side. Bring its sloping leading edge to the spine. Fold the whole layered packet on this side together, including the corner you already folded.
Layers: All L layers beyond the dashed crease move together. R stays still.
Check: The old diagonal leading edge now lies along the spine. Do not peel a single layer out of the packet.
Explore this step ↑STEP 5 · Figure 2
Narrow the gold side
Turn the paper over. Bring the gold side’s sloping leading edge to the spine, folding its layered packet together.
Layers: All R layers beyond the crease move together. L stays still.
Check: The two sides have the same narrow nose profile.
Explore this step ↑STEP 6 · First side of figure 3
Make the blue wing crease
Turn back to blue. Bring the new sloping edge to the spine once more, folding the whole outer packet outward. Flatten this third narrowing fold to establish the wing crease.
Layers: Move every L layer outside the new crease, including both earlier folds.
Check: Keep the narrow central body closed. The folded tail may extend beyond the original bottom edge; do not trim it.
Explore this step ↑STEP 7 · Figure 3
Make the gold wing crease
Turn over and repeat the third narrowing fold on the gold side. Press both wing creases, keeping the spine closed.
Layers: Move the full R outer packet, not the blue wing or the central body.
Check: Both sides now match the fully folded side profile. Each side has had three narrowing folds.
Explore this step ↑STEP 8 · Figure 4; 90° is a modern display choice
Open just the wings
Hold the central body. Reopen only the last fold on each side by a quarter turn, so the two wing packets spread to opposite sides. Leave the earlier nose folds closed.
Layers: Only the exact packets used in the last two steps reopen. The center body stays fixed.
Check: Two wings open from the same body. Nothing is detached, and the first two narrowing folds remain in place.
Explore this step ↑STEP 9 · Figure 4
Your folded dart
Compare both wings and the narrow body. This is the end of the folding sequence. Use the side and wing views to revisit a crease, or read the complete steps below.
Layers: The finished model is the same folded sheet, with no replacement geometry.
Check: The wings are on opposite sides and the spine remains joined. Real-paper follow-along of this reconstruction is still pending.
Explore this step ↑
Sources & notes
Edward Verrall Lucas and Elizabeth Lucas, What Shall We Do Now? A Book of Suggestions for Children’s Games and Employments. New York: Frederick A. Stokes Company, 1904, pp. 233; Paper darts, figures 1–4.
Read the original page 233 ↗ · 1904 title page ↗


Based on the 1904 US edition, public domain in the United States. The Lucases are credited as book authors, not model inventors.
Adaptation: Letter paper and a 90° reopening of each wing are modern reconstruction choices, not dimensions or angles specified by the book.
Original instructions and diagrams, made with AI assistance. About & reuse
Accuracy notes
Real-paper follow-along and paper weight have not been tested. Diagrams illustrate the sequence, not paper thickness, contact, collisions or exact layer visibility.