 Just Fold Paper
Cut & fold
Pop-up Greeting Card
Turn two short cuts into a real pop-up step. The step stays attached to both halves of one sheet and folds inside the closed greeting card.
Preparation + 7 numbered steps
Materials
6 × 8-inch rectangle · 6 × 8 inches
One prepared 6 × 8-inch rectangle (15.24 × 20.32 cm) of light card or sturdy paper, scissors, ruler, pencil and a blunt scoring tool such as an empty ballpoint pen. Use a scrap mat underneath when scoring. A pen for your greeting is optional. No glue or separate pop-up piece. Children need adult help with scissors.
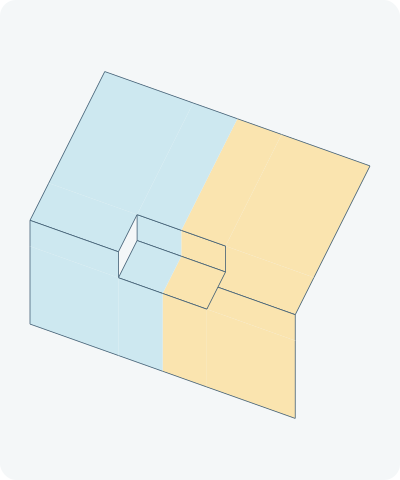
Drag to rotate · swipe sideways on touch.
Arrow keys rotate when focused.
Follow along
PreparationThe interactive guide needs JavaScript. Read every illustrated step below.
Help · controls & diagram
Play or drag the progress slider to watch a fold from 0% to 100%. Use the view buttons or drag the diagram to look from another angle.
Blue and gold track the original left and right halves of one sheet, not actual paper colors. Orange outlines identify moving paper; orange dashed lines identify action guides. The two slits are cuts, not folds.
With the diagram focused: Space plays or pauses, ←/→ change steps, and Home resets.
Every step, at a glance
Compare your paper with each diagram after completing the action. Blue and gold track the original left and right halves of one sheet, not actual paper colors. Orange outlines identify moving paper; orange dashed lines identify action guides. The two slits are cuts, not folds.
- 0. Prepare the card blank
- 1. Fold the card in half
- 2. Cut two short parallel slits
- 3. Open flat to see the cuts
- 4. Score the two step roots
- 5. Lift the connected step inward
- 6. Close around the step
- 7. Open your greeting card
PREPARATION · Single-step card adaptation
Prepare the card blank
Place the 6-inch edge horizontally and the 8-inch edge vertically. Put the intended inside face up. Mark the midpoint of each long side, 4 inches from either end.
Layers: One flat rectangular sheet.
Check: The two midpoint marks are level.
Explore this step ↑STEP 1 · Single-step card adaptation
Fold the card in half
Bring the top short edge down to the bottom short edge. Crease across the midpoint marks, then leave the card folded.
Layers: Move the entire upper half onto the lower half.
Check: The folded card measures 6 inches wide by 4 inches tall.
Explore this step ↑STEP 2 · Single-step card adaptation
Cut two short parallel slits
Along the closed top edge, mark points 2 inches and 4 inches from the left. From each point, cut straight down 1 inch through both layers. Stop exactly at that depth. Do not cut between the ends.
Layers: Both layers are cut at each mark. The 2-inch-wide central tab stays attached at its two roots.
Check: Two equal cuts enter from the fold; no scrap is removed.
Explore this step ↑STEP 3 · Single-step card adaptation
Open flat to see the cuts
Unfold the upper half completely onto the table. Keep the inside face up.
Layers: The central strip opens with the rest of the card for now.
Check: Each slit is now 2 inches long, extending 1 inch on either side of the center crease.
Explore this step ↑STEP 4 · Single-step card adaptation
Score the two step roots
Join the upper slit tips with a light pencil line, and join the lower tips with another. Each line is 2 inches long and 1 inch from the center crease. Use a ruler and blunt tool to score those two lines lightly. Do not cut them or extend them across the side panels.
Layers: Score only the central strip. Both root lines remain uncut hinges.
Check: The central strip contains two 2 × 1-inch panels, joined by the original center crease.
Explore this step ↑STEP 5 · Single-step card adaptation
Lift the connected step inward
Hold the lower card half on the table. Begin lifting the upper half toward you. At the same time, lift the middle of the cut strip toward you and slightly toward the lower edge. Let its lower root bend upward and its upper panel stay parallel to the table. Stop with the card open at a right angle. Reverse the middle crease so it is the ridge of the step, opposite the surrounding card fold.
Layers: Both step panels move together, attached to the card at the scored roots. The side areas bend only at the original card crease.
Check: A 2-inch-wide step rises 1 inch above the lower half and projects 1 inch forward from the upright back.
Explore this step ↑STEP 6 · Single-step card adaptation
Close around the step
Slowly bring the upper card half down onto the lower half. Guide the step inward between them, keeping its middle ridge directed toward the lower edge. Press the three step creases gently when closed.
Layers: The step folds between the two card halves; do not push it back into the outside opening.
Check: The card closes to 6 × 4 inches. The step is contained inside, with a rectangular notch visible at the folded edge.
Explore this step ↑STEP 7 · Single-step card adaptation
Open your greeting card
Lift the upper card half back to a right angle. The connected step rises with it. Write a short greeting on the upright face of the step and your message on the lower half; you can open the card flat to write, then close it with the step guided inward again. Leave it open at about 90 degrees to display.
Layers: The same two panels form the pop-up; nothing is glued on. Written decoration is optional and is not additional paper.
Check: The finished card has a raised rectangular step attached at both roots. Keep the cuts visible; this single-sheet version has no outer cover.
Explore this step ↑
Sources & notes
Amy Guerrero and Jessica Gibson / wikiHow, How to Make a Pop Up Card — Method 1 (web tutorial, accessed 2026).
Reference: parallel-cut tab mechanism ↗
The reference explains the parallel-cut pop-up tab. Its named authors are credited for the tutorial, not asserted to be the inventors of the mechanism. No source text, photographs or illustrations are reproduced. These instructions, measurements, geometry and drawings are independently authored; no project-wide reuse license or public-domain status is claimed.
Adaptation: Uses one 6 × 8-inch sheet, two 1-inch cuts spaced 2 inches apart, and a 90-degree display opening. The step itself carries a greeting; the reference’s glued picture and second backing sheet are omitted, leaving the cut opening visible on the outside. Scoring the two root lines while flat and forming the step during closure makes the connected motion explicit. This is not a card folder or a glued-on ornament.
Original instructions and diagrams, made with AI assistance. About & reuse
Accuracy notes
Real-paper follow-along and paper weight have not been tested. Diagrams illustrate the sequence, not paper thickness, contact, collisions or exact layer visibility. A rigid four-hinge linkage preserves every material panel and both uncut step roots through forming, full closure and reopening. Zero-thickness panel geometry does not model card thickness, crease fatigue or standing stability. Real-paper folding and physical printing have not been tested.