 Just Fold Paper
Cut & fold
Long-tailed Paper Dinosaur
Cut two matching dinosaur sides from a folded rectangle, keep the back joined, and gently spread the four legs for a shallow three-dimensional display.
Preparation + 8 numbered steps
Materials
8 × 6-inch rectangle · 8 × 6 inches
One 8 × 6-inch rectangle (20.32 × 15.24 cm) of ordinary paper, ruler, pencil and scissors. Prepare the rectangle first. Adult help with scissors for young makers. No glue, separate legs or printed decoration is needed.
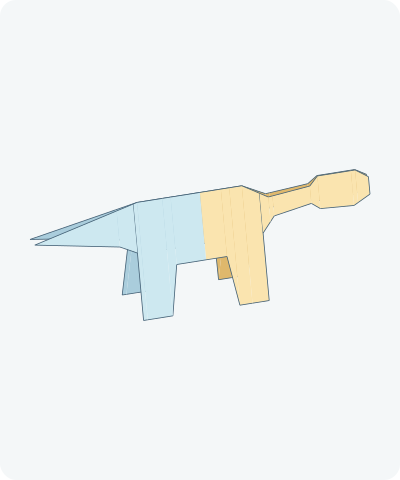
Drag to rotate · swipe sideways on touch.
Arrow keys rotate when focused.
Follow along
PreparationThe interactive guide needs JavaScript. Read every illustrated step below.
Help · controls & diagram
Play or drag the progress slider to watch a fold from 0% to 100%. Use the view buttons or drag the diagram to look from another angle.
Blue and gold identify the original left and right halves, not literal paper colors. Orange marks the fold or cutting route. The back bridge must stay uncut. Diagrams are not full-size cutting templates.
With the diagram focused: Space plays or pauses, ←/→ change steps, and Home resets.
Every step, at a glance
Compare your paper with each diagram after completing the action. Blue and gold identify the original left and right halves, not literal paper colors. Orange marks the fold or cutting route. The back bridge must stay uncut. Diagrams are not full-size cutting templates.
- 0. Prepare the rectangle
- 1. Fold the top half down
- 2. Mark the back, tail and head
- 3. Mark the belly and two legs
- 4. Cut the upper contour
- 5. Cut the legs and belly
- 6. Remove the cut waste
- 7. Spread the two sides
- 8. Level the four feet
PREPARATION · Original measured dinosaur pattern
Prepare the rectangle
Place the 8-inch edges horizontally and the 6-inch edges vertically. Keep the rectangle flat.
Layers: One continuous uncut sheet.
Check: The sheet is 8 inches wide and 6 inches tall.
Explore this step ↑STEP 1 · Original measured dinosaur pattern
Fold the top half down
Bring the top long edge to the bottom long edge. Press the horizontal middle crease. Keep this closed folded edge at the top.
Layers: Fold the entire top half behind the bottom half.
Check: You have an 8 × 3-inch doubled packet with its fold along the top.
Explore this step ↑STEP 2 · Original measured dinosaur pattern
Mark the back, tail and head
On the doubled packet, measure x from the left edge and y DOWN from the top fold, all in inches. Mark the upper route: (0,0.6), (2.5,0), (5,0), (5.6,0.35), (6.6,0.25), (6.8,0.05), (7.7,0.05), (8,0.25), (8,0.65). Join successive points with straight lines. The segment from x=2.5 to x=5 lies on the top fold: mark it KEEP, not CUT.
Layers: Draw on one outer face; the cuts will go through both layers.
Check: The long tail is on the left, and the small blunt head is on the right. The 2.5-inch back bridge is protected.
Explore this step ↑STEP 3 · Original measured dinosaur pattern
Mark the belly and two legs
Using the same origin, mark the lower route: (0,0.6), (2,0.95), (2.4,1.15), (2.4,2.7), (3.1,2.7), (3.3,1.55), (4.5,1.55), (4.7,2.7), (5.4,2.7), (5.4,1.15), (5.7,0.8), (6.6,0.65), (6.8,0.8), (7.6,0.85), (8,0.65). Join successive points. These two routes enclose the full dinosaur side.
Layers: The two leg shapes are cut through both layers, making four legs after opening.
Check: Both foot edges are 2.7 inches below the fold. The belly gap reaches only to y=1.55.
Explore this step ↑STEP 4 · Original measured dinosaur pattern
Cut the upper contour
Hold both layers together. Cut from the left tail tip up to the back at (2.5,0), then stop. Separately cut from (5,0) around the neck and head to (8,0.65). Do NOT cut the folded back between (2.5,0) and (5,0).
Layers: Cut both layers together. Leave the back bridge intact.
Check: The neck and head edges match on both sides, and the back still joins them.
Explore this step ↑STEP 5 · Original measured dinosaur pattern
Cut the legs and belly
Cut along the entire lower route through both layers. Work slowly around the feet and into the gap between the legs; rotate the packet instead of forcing the scissors. Stop at the marked belly line.
Layers: Cut both layers, including the gap between each pair of legs.
Check: Each side has two broad feet, a belly, a long tapering tail and a separate neck outline.
Explore this step ↑STEP 6 · Original measured dinosaur pattern
Remove the cut waste
Lift away all loose paper outside the dinosaur outline. Keep the folded back intact and set the scraps aside. The animation separates the waste before omitting it from later steps.
Layers: Retain both matching dinosaur sides and their original-paper back bridge.
Check: The folded silhouette is one connected piece, with no loose legs or glued parts.
Explore this step ↑STEP 7 · Original measured dinosaur pattern
Spread the two sides
Hold the back gently and open its existing crease a little, separating the two pairs of legs. Aim for about 30 degrees between the sides; do not flatten the model out.
Layers: Move the original upper half only; keep the other complete dinosaur side still.
Check: Four legs are now separated in depth, joined only along the back. The head and tail remain attached to each body side.
Explore this step ↑STEP 8 · Original measured dinosaur pattern
Level the four feet
Tilt the whole dinosaur so both sides lean outward equally. Place all four foot edges on a flat surface and release gently. If thin paper will not hold the pose, display it supported or lay it flat; standing stability is untested. Optional eyes may be drawn afterward.
Layers: Move the whole connected dinosaur, without another crease or cut.
Check: The back is above the belly; four equal-height feet, a low neck, blunt head and long tapered tail define the dinosaur without ink.
Explore this step ↑
Sources & notes
Just Fold Paper, Original measured low-neck dinosaur pattern (2026).
The measured outline, English instructions, diagrams and code were authored for Just Fold Paper with AI assistance. This is an original geometric cut-and-fold design, not a traditional origami attribution or a reproduction of another dinosaur tutorial. No external template, text or photographs were copied. No project-wide reuse license is granted.
Adaptation: An original 8 × 6-inch blank folds to an 8 × 3-inch packet. Two matching long-tailed quadruped profiles remain joined along a 2.5-inch back bridge. Each side includes a real cut head, low neck, tail and two legs. The sides open about 30 degrees; the final whole-model tilt places all four foot edges at the same height. This stylized dinosaur is not a species reconstruction, fold-only origami or a rabbit variation.
Original instructions and diagrams, made with AI assistance. About & reuse
Accuracy notes
Real-paper follow-along and paper weight have not been tested. Diagrams illustrate the sequence, not paper thickness, contact, collisions or exact layer visibility. Original material coordinates are retained through the half-fold, measured contour cuts, explicit waste removal and back-hinge opening. All four leg panels are real retained paper. The single uncut back bridge connects both sides. Rigid zero-thickness teaching geometry; scissors, finite paper thickness and standing stability are not simulated. Real-paper cutting, folding and balance have not been tested.