 Just Fold Paper
Cut & fold
Fold-and-cut Paper Snowflake
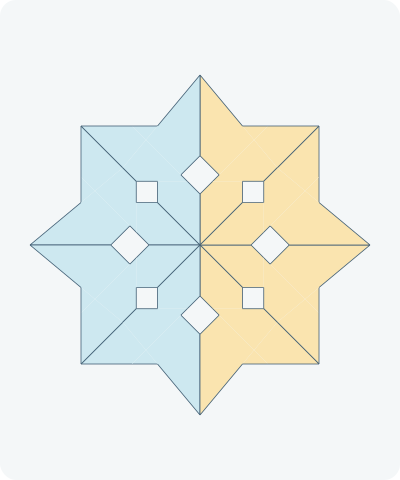
Fold a square into eight layers, cut three original shapes through the packet, then unfold a connected eight-point decoration. This is a fold-and-cut craft, not a six-sided natural snow crystal.
Preparation + 10 numbered steps
Materials
8-inch square · Cut & fold · 8 × 8 inches
One 8 × 8-inch square (20.32 × 20.32 cm) of thin paper, scissors, ruler and pencil. Avoid card: the final packet has eight layers. Children need suitable scissors and adult help. No glue is needed.
Drag to rotate · swipe sideways on touch.
Arrow keys rotate when focused.
Follow along
PreparationThe interactive guide needs JavaScript. Read every illustrated step below.
Help · controls & diagram
Play or drag the progress slider to watch a fold from 0% to 100%. Use the view buttons or drag the diagram to look from another angle.
Blue and gold track the original left and right paper halves. Orange lines show folds or cuts. Cut scraps lift away and fade as they are set aside; they do not become part of the snowflake.
With the diagram focused: Space plays or pauses, ←/→ change steps, and Home resets.
Every step, at a glance
Compare your paper with each diagram after completing the action. Blue and gold track the original left and right paper halves. Orange lines show folds or cuts. Cut scraps lift away and fade as they are set aside; they do not become part of the snowflake.
- 0. Prepare the square
- 1. Fold left to right
- 2. Fold bottom to top
- 3. Make the eight-layer triangle
- 4. Cut the outer valley
- 5. Cut the straight-edge window
- 6. Cut the diagonal-edge window
- 7. Open the diagonal fold
- 8. Open the horizontal fold
- 9. Open the final fold
- 10. Flatten and display
PREPARATION · Original eight-point cut pattern and authored ruler landmarks
Prepare the square
Lay the square flat with level edges. Use thin paper that you can cut cleanly through eight layers.
Layers: One uncut square.
Check: Each side measures 8 inches.
Explore this step ↑STEP 1 · Original eight-point cut pattern and authored ruler landmarks
Fold left to right
Bring the left edge over to the right edge. Match the corners and crease the vertical middle.
Layers: Move the whole left half.
Check: A tall two-layer rectangle remains to the right of the fold.
Explore this step ↑STEP 2 · Original eight-point cut pattern and authored ruler landmarks
Fold bottom to top
Bring the bottom edge up to the top edge. Keep the first fold closed and press the horizontal middle.
Layers: Move both layers of the lower half.
Check: A four-layer 4-inch square lies above and to the right of the original center.
Explore this step ↑STEP 3 · Original eight-point cut pattern and authored ruler landmarks
Make the eight-layer triangle
Bring the lower-right corner of this small square to its upper-left corner. Fold along the diagonal from the original center to the upper-right corner. Keep the triangle with its vertical folded edge on the left and its level open edge at the top.
Layers: Move all four layers below the diagonal.
Check: The center is the lower-left tip. The left side is 4 inches high; the diagonal slopes up to the right.
Explore this step ↑STEP 4 · Original eight-point cut pattern and authored ruler landmarks
Cut the outer valley
Measure from the center tip: mark A at the top of the left edge (0 across, 4 inches up), B at 1 inch across and 2.8 inches up, and C on the diagonal at 2.8 inches across and 2.8 inches up. Cut A–B–C through all eight layers. Set aside the large outer scrap. Keep the side containing the center tip.
Layers: Cut the entire packet, not only the visible layer.
Check: Two straight cuts form an inward valley; the retained piece still joins both folded edges.
Explore this step ↑STEP 5 · Original eight-point cut pattern and authored ruler landmarks
Cut the straight-edge window
On the left folded edge mark points 1.2 and 2.1 inches above the center tip. Mark an inner point 0.45 inch to the right and 1.65 inches above the tip. Cut from each edge mark to the inner point; remove the small triangle.
Layers: Cut through all eight layers. Do not extend either cut past the inner point.
Check: An open V notch enters only the left folded edge. The center and the outer valley remain joined.
Explore this step ↑STEP 6 · Original eight-point cut pattern and authored ruler landmarks
Cut the diagonal-edge window
On the diagonal mark D at 1 inch across and 1 inch up, and E at 1.5 inches across and 1.5 inches up, both measured from the center tip. Mark F at 1 inch across and 1.5 inches up. Cut D–F–E and remove the triangle.
Layers: Cut all eight layers, stopping exactly at the marks.
Check: The two notches do not meet. Leave the center tip intact.
Explore this step ↑STEP 7 · Original eight-point cut pattern and authored ruler landmarks
Open the diagonal fold
Gently swing the upper triangle back down to the right along the last fold. Support the narrow bridges beside the holes.
Layers: Unfold four retained layers together; do not pull on the points.
Check: The quarter-square opens, showing mirrored windows and an outer valley.
Explore this step ↑STEP 8 · Original eight-point cut pattern and authored ruler landmarks
Open the horizontal fold
Open the lower half downward along the horizontal crease. Keep the vertical fold closed.
Layers: Unfold the two-layer lower packet.
Check: Half of the snowflake is open, with the cut pattern repeated above and below.
Explore this step ↑STEP 9 · Original eight-point cut pattern and authored ruler landmarks
Open the final fold
Swing the left half out along the vertical crease. Support the center while separating the last layers.
Layers: Open the last two layers into one connected sheet.
Check: The full eight-point outline opens without separating the center.
Explore this step ↑STEP 10 · Original eight-point cut pattern and authored ruler landmarks
Flatten and display
Gently flatten the creases with your fingertips and lay the snowflake on a contrasting surface.
Layers: One connected cut sheet; all scraps have been set aside.
Check: Eight outer points surround four square windows, four diamond windows and a solid center. The axes and diagonal points are approximately the same distance from the center.
Explore this step ↑
Sources & notes
Just Fold Paper, Original eight-point window snowflake (2026).
Original measured cut pattern ↗
The cut pattern, measurements, tutorial text, diagrams and code were authored for this guide. The generic fold-and-cut method is not claimed as a new invention. No reference photographs, templates or prose are copied. No project-wide reuse license is implied.
Adaptation: Original pattern: a two-segment outer valley, a triangular notch on the straight folded edge and a triangular notch on the diagonal folded edge. Three ordinary half folds produce eight layers. The dimensions deliberately retain a solid center and bridges between the windows and outer outline. This is an eight-point decoration, not a sixfold snow-crystal model.
Original instructions and diagrams, made with AI assistance. About & reuse
Accuracy notes
Real-paper follow-along and paper weight have not been tested. Diagrams illustrate the sequence, not paper thickness, contact, collisions or exact layer visibility. The model tracks immutable material coordinates through three rigid folds, cuts every layer in the packet, accounts for the removed scraps, and reverses the same hinges to open the retained connected sheet. Zero-thickness diagrams omit scissor blades and paper thickness. Scraps translate upward and fade only after their cut is complete. Numerical checks are not physical folding or cutting verification.