 Just Fold Paper
Cut & fold
Cut-and-fold Paper Shark
Make a complete stylized shark from one measured paper net. Cut its outline and four short release lines, then raise a dorsal fin and forked tail while lowering both pectoral fins. The small opening under the dorsal fin is part of this original design.
Preparation + 9 numbered steps
Materials
8 × 4-inch rectangle · 8 × 4 inches
One prepared 8 × 4-inch rectangle (20.32 × 10.16 cm) of paper, about 100–120 gsm; ruler, pencil, small scissors and a protractor. Adult help is needed for the two interior dorsal cuts. No glue, separate fins or drawn features are required. Screen diagrams and the PDF are not full-size cutting templates.
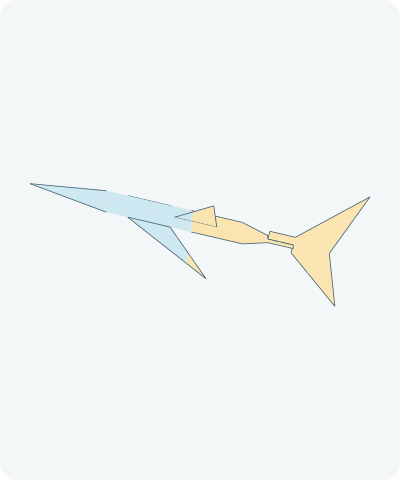
Drag to rotate · swipe sideways on touch.
Arrow keys rotate when focused.
Follow along
PreparationThe interactive guide needs JavaScript. Read every illustrated step below.
Help · controls & diagram
Play or drag the progress slider to watch a fold from 0% to 100%. Use the view buttons or drag the diagram to look from another angle.
Blue and gold track the original left and right paper halves; darker shades show their reverse. Orange dashed lines identify cuts or the current hinge as described in the step. Offcuts are set aside, never folded into hidden fins.
With the diagram focused: Space plays or pauses, ←/→ change steps, and Home resets.
Every step, at a glance
Compare your paper with each diagram after completing the action. Blue and gold track the original left and right paper halves; darker shades show their reverse. Orange dashed lines identify cuts or the current hinge as described in the step. Offcuts are set aside, never folded into hidden fins.
- 0. Prepare the rectangle
- 1. Draw the shark net
- 2. Cut out the connected net
- 3. Release the dorsal tab
- 4. Raise the dorsal fin
- 5. Lower the near pectoral fin
- 6. Lower the far pectoral fin
- 7. Release the tail-root edges
- 8. Stand the forked tail upright
- 9. Check the finished shark
PREPARATION · Original measured shark net
Prepare the rectangle
Lay the 8 × 4-inch rectangle landscape, front facing you. Lightly mark horizontal and vertical center guides with a ruler, without folding. Their crossing is (0, 0). In the coordinates below, x runs right and y runs up, in inches; negative numbers mean left or down.
Layers: One flat uncut sheet.
Check: The left and right edges are x = −4 and +4; the bottom and top are y = −2 and +2.
Explore this step ↑STEP 1 · Original measured shark net
Draw the shark net
Mark these (x, y) points in order and join consecutive points with straight pencil lines, closing 18 back to 1: 1 (−3.8, 0); 2 (−2, 0.6); 3 (−1.5, 0.6); 4 (0.5, 1.8); 5 (−0.5, 0.6); 6 (1.2, 0.6); 7 (1.8, 0.2); 8 (2.4, 0.2); 9 (3.8, 1.6); 10 (3.25, 0); 11 (3.7, −1.25); 12 (2.4, −0.2); 13 (1.8, −0.2); 14 (1.2, −0.6); 15 (−0.5, −0.6); 16 (0.5, −1.8); 17 (−1.5, −0.6); 18 (−2, −0.6).
Layers: Draw only; all paper is still present. The two large side triangles are pectoral fins.
Check: The pointed nose faces left and the notched, unequal tail lobes face right.
Explore this step ↑STEP 2 · Original measured shark net
Cut out the connected net
Cut around the complete pencil outline, including the V-shaped tail notch. Set all outside scraps aside. Do not cut across the body, fin bases or narrow tail neck. The animation lifts the offcuts only after the perimeter has been cut.
Layers: Cut through one layer. Keep one connected shark net.
Check: Both pectoral triangles and both tail lobes remain attached.
Explore this step ↑STEP 3 · Original measured shark net
Release the dorsal tab
Mark A (−0.4, 0), B (0.4, 0.5), and C (0.6, 0). Cut A–B and B–C only. Leave A–C uncut as the hinge. For an interior start, an adult can gently flex the paper at A, make a tiny starter snip on A–B, then flatten it and finish each cut with small scissors. Do not cut beyond the marks or press a sharp point toward a hand.
Layers: Two cuts in the body’s single layer; the triangular tab is not removed.
Check: The triangle lifts freely on its full 1-inch base A–C; no separate scrap comes from it.
Explore this step ↑STEP 4 · Original measured shark net
Raise the dorsal fin
Hold the body flat and lift the triangular dorsal tab toward you along A–C. Crease its base and use the protractor to leave it 90° above the body.
Layers: Only the attached dorsal triangle moves.
Check: A triangular fin stands above the body. The triangular opening below it is expected.
Explore this step ↑STEP 5 · Original measured shark net
Lower the near pectoral fin
Use the straight base from point 17 to point 15 as the hinge. Bend the large lower triangle away from you, 30° below the body plane. Keep its tip pointing toward the tail.
Layers: Move only the lower external triangle; leave the body and dorsal fin still.
Check: The fin projects sideways and slightly downward rather than lying against the belly.
Explore this step ↑STEP 6 · Original measured shark net
Lower the far pectoral fin
Bend the matching upper triangle away from you on the straight line from point 3 to point 5. Leave it 30° below the body plane as well. Support the body so the first fin is not flattened.
Layers: Move only the upper external triangle.
Check: The two pectoral tips are equally below the body, on opposite sides.
Explore this step ↑STEP 7 · Original measured shark net
Release the tail-root edges
At the narrow neck, cut from point 7 (1.8, 0.2) down to (1.8, 0). Make a second cut from point 12 (2.4, −0.2) up to (2.4, 0). Each slit is 0.2 inch long. Do not cut the horizontal center segment from (1.8, 0) to (2.4, 0): that is the attached tail hinge.
Layers: Cut the upper edge at the left end of the neck and the lower edge at the right end. The entire forked tail and upper neck strip form one moving packet.
Check: The tail is still attached along the 0.6-inch center hinge; the lower neck strip stays with the body.
Explore this step ↑STEP 8 · Original measured shark net
Stand the forked tail upright
Hold the lower neck strip still. Rotate the upper neck strip and both tail lobes together about the horizontal center hinge, lifting the upper lobe toward you. Stop at 90°. The lower lobe passes away from you through the open space beyond the neck.
Layers: Carry the complete tail, including both lobes and the upper neck strip. Do not bend only one lobe or twist the body.
Check: The tail lies in a vertical plane along the shark’s length, with a longer upper lobe and shorter lower lobe.
Explore this step ↑STEP 9 · Original measured shark net
Check the finished shark
View the model from the side and above. Check the pointed nose, flat tapered body, upright dorsal fin, two lowered pectoral fins and vertical forked tail. Keep the dorsal opening and the two tail-root slits as made; they are not mistakes to cover. Hold the body gently for display rather than forcing every fin flat onto a table.
Layers: One connected cut sheet remains, with the outside offcuts discarded. No ink is needed for its shark features.
Check: The original cut-and-fold shark is complete. Crease retention and real-paper construction remain untested.
Explore this step ↑
Sources & notes
Just Fold Paper, Original measured one-sheet shark net (2026).
About original guides and reuse ↗
This measured net, construction sequence, English text, geometry and diagrams were authored for Just Fold Paper. No external model plan, photographs, tutorial wording or artwork were copied. This is an original cut-and-fold craft, not a claimed traditional origami shark or a reproduction of a named designer’s model. No project-wide reuse license is granted.
Adaptation: Original 8 × 4-inch net with a cut triangular dorsal tab, two external pectoral triangles and an asymmetric forked tail. Two short tail-root release slits let the complete tail rotate around a longitudinal hinge while staying attached to the lower half of the neck. The dorsal opening is intentionally visible. This is distinct from the kite-base whale, pleated-tail fish and flat angelfish; it uses neither their bases nor their fold sequences.
Original instructions and diagrams, made with AI assistance. About & reuse
Accuracy notes
Real-paper follow-along and paper weight have not been tested. Diagrams illustrate the sequence, not paper thickness, contact, collisions or exact layer visibility. Retained paper and discarded offcuts account for the entire 32-square-inch blank. Each fin and the complete tail rotate rigidly on their own attached hinges. Only the declared cut edges separate. This zero-thickness teaching net has no hidden glue or added paper. The fin sweeps separate into open space; the body stays flat. Paper stiffness, crease retention, physical cutting/folding and printing have not been tested. The model is a stylized open net, not a closed-volume anatomical sculpture.