 Just Fold Paper
Cut, fold & assemble
Desktop Paper Pencil Stand
Build a floor and four walls, then add a separately folded bridge with a square pencil aperture. The bridge locates a pencil above the floor instead of leaving it loose in an open box. Follow every cut, fold and taped assembly below; load capacity is untested.
Preparation + 22 numbered steps
Materials
Light cardstock square · 8 × 8 inches
One 8 × 8-inch square (20.32 cm) of light cardstock, approximately 160–200 gsm, plus a separate 3 × 1-inch strip (7.62 × 2.54 cm) of the same card for the bridge. Ruler, pencil and scissors. Paper masking tape: four strips 3/4 × 2 3/4 inches (1.905 × 6.985 cm), plus two strips 1 × 3/4 inch (2.54 × 1.905 cm) for the bridge tabs. This paper-weight range is an untested starting choice, not a load rating. Keep the stand dry.
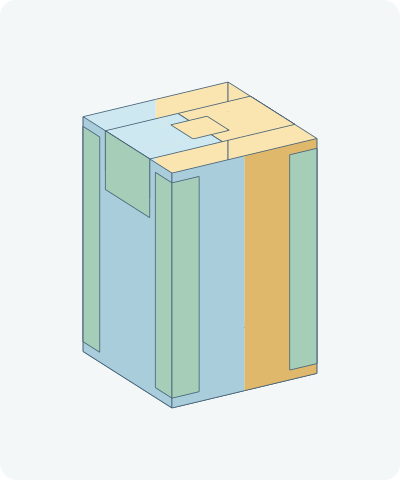
Drag to rotate · swipe sideways on touch.
Arrow keys rotate when focused.
Follow along
PreparationThe interactive guide needs JavaScript. Read every illustrated step below.
Help · controls & diagram
Play or drag the progress slider to watch a fold from 0% to 100%. Use the view buttons or drag the diagram to look from another angle.
Blue and gold track the original left and right halves of the card. Gray corners are cut-off scraps; green pieces are separate masking tape. Orange dashed lines are cuts in Step 1 and hinges in the wall folds. Solid panel boundaries in the initial layout are ruler marks, not extra cuts.
With the diagram focused: Space plays or pauses, ←/→ change steps, and Home resets.
Every step, at a glance
Compare your paper with each diagram after completing the action. Blue and gold track the original left and right halves of the card. Gray corners are cut-off scraps; green pieces are separate masking tape. Orange dashed lines are cuts in Step 1 and hinges in the wall folds. Solid panel boundaries in the initial layout are ruler marks, not extra cuts.
- 0. Mark the square
- 1. Cut away the four corners
- 2. Set the scraps aside
- 3. Raise the far wall
- 4. Raise the right wall
- 5. Raise the near wall
- 6. Raise the left wall
- 7. Crease four tape strips
- 8. Tape the near-right seam
- 9. Tape the far-right seam
- 10. Tape the far-left seam
- 11. Tape the near-left seam
- 12. Prepare the bridge strip
- 13. Fold the bridge in half
- 14. Cut the pencil aperture
- 15. Remove the notch scrap
- 16. Reopen the pierced bridge
- 17. Bend the right mounting tab down
- 18. Bend the left mounting tab down
- 19. Seat the bridge across the rim
- 20. Tape the right bridge tab
- 21. Tape the left bridge tab
- 22. Check the pencil-support path
PREPARATION · Original measured cross-net construction
Mark the square
Lay the card flat with the inside face up. On each edge, mark 3 inches and 5 inches from the same corner. Use a ruler to join opposing marks: two vertical and two horizontal lines leave a 2 × 2-inch square in the middle. Mark each 3 × 3-inch corner square as scrap.
Layers: One uncut 8-inch square. The central square will be the floor.
Check: The middle strip is 2 inches wide in both directions; the four arms are each 2 × 3 inches.
Explore this step ↑STEP 1 · Original measured cross-net construction
Cut away the four corners
Cut along the two inner sides of each marked 3-inch corner square, starting at the outer edges and stopping where the lines meet. Make eight short cuts in all. Do not cut any of the four sides of the central 2-inch square.
Layers: Cut only the eight orange segments. All four arms must remain attached to the floor.
Check: Four loose corner squares surround one connected cross-shaped blank.
Explore this step ↑STEP 2 · Original measured cross-net construction
Set the scraps aside
Lift away the four loose corner squares. Keep the cross-shaped piece flat. Save or recycle the scraps; they are not used in this holder.
Layers: The retained cross is one piece, not five separate rectangles.
Check: A 2-inch floor joins four 3-inch-long arms without slits across their roots.
Explore this step ↑STEP 3 · Original measured cross-net construction
Raise the far wall
Hold the middle square on the table. Bend the far arm upward along its 2-inch root, stopping at a right angle to the floor. Press that crease while supporting the wall.
Layers: Only the far arm moves. Keep the floor and other three arms flat.
Check: The far wall is 3 inches high and its whole bottom edge is attached.
Explore this step ↑STEP 4 · Original measured cross-net construction
Raise the right wall
Bend the right arm upward on the right edge of the floor. Stop at a right angle. Hold both walls while bringing their vertical edges together.
Layers: Move the right arm only; do not fold a corner scrap into the holder.
Check: The far and right walls meet edge to edge, without an overlapping paper flap.
Explore this step ↑STEP 5 · Original measured cross-net construction
Raise the near wall
Bend the arm nearest you upward along the near edge of the floor. Keep the floor flat on the table.
Layers: Move the near arm only. Support the already raised walls with your other hand.
Check: Three upright walls surround the same uncut floor.
Explore this step ↑STEP 6 · Original measured cross-net construction
Raise the left wall
Raise the last arm to a right angle. Bring its two side edges alongside the neighboring walls. Keep holding the walls until the tape joins are complete.
Layers: Move the left arm only. There is no hidden locking flap.
Check: Four equal walls form a 2-inch square opening above a continuous 2-inch square floor.
Explore this step ↑STEP 7 · Original measured cross-net construction
Crease four tape strips
Cut four 3/4 × 2 3/4-inch strips of paper masking tape. Gently bend each lengthwise down its middle to make an L-shaped strip with two 3/8-inch wings. Keep the adhesive on the inside of the L and avoid sticking the wings together.
Layers: These four green strips are separate tape, not extra card or hidden paper layers. They are shown spaced outside the four corners.
Check: Each strip can wrap a right-angle outside corner; its length is 1/4 inch shorter than a wall.
Explore this step ↑STEP 8 · Original measured cross-net construction
Tape the near-right seam
Hold the near and right walls edge to edge. Center one bent strip over their outside vertical seam, leaving 1/8 inch clear at both top and bottom. Press one wing to each wall, supporting the card from inside.
Layers: Apply tape only outside the corner. Each 3/8-inch wing adheres to a different wall.
Check: Both walls stay square to the floor and the tape bridges the seam from 1/8 to 2 7/8 inches above the floor.
Explore this step ↑STEP 9 · Original measured cross-net construction
Tape the far-right seam
Keep the right and far walls at right angles to the floor. Center the second bent strip along their outside meeting edge and press both wings down.
Layers: The first tape strip stays in place. Apply the second to the next outside corner.
Check: The second join has the same 1/8-inch clearance above the floor and below the rim.
Explore this step ↑STEP 10 · Original measured cross-net construction
Tape the far-left seam
Align the far and left wall edges. Apply the third bent strip over their outside seam, again leaving 1/8 inch clear at each end.
Layers: Press both tape wings while supporting the walls from inside.
Check: The third corner is joined without covering the open top.
Explore this step ↑STEP 11 · Original measured cross-net construction
Tape the near-left seam
Align the last pair of wall edges and press the fourth strip around their outside seam. Check all four joins before releasing your hand.
Layers: The fourth strip completes the four adhesive corner joints.
Check: The rim is open, every wall is joined to its neighbors, and the integral floor remains flat.
Explore this step ↑STEP 12 · Original measured cross-net construction
Prepare the bridge strip
Set the holder aside. Cut a separate 3 × 1-inch strip of card. Lay it horizontally and mark its center, plus a line 1/2 inch from each short end for the two tab roots. The diagrams show this separate strip above the holder for clarity; work on the table.
Layers: A second piece of card makes the support bridge. It is not cut from the floor.
Check: The middle span is 2 inches long; each end tab is 1/2 inch long.
Explore this step ↑STEP 13 · Original measured cross-net construction
Fold the bridge in half
Bring the right short end to the left short end, folding across the center of the 3-inch strip. Press the center crease.
Layers: Fold the entire right half over the left half.
Check: The doubled rectangle is 1 1/2 × 1 inch, with its folded edge at the right.
Explore this step ↑STEP 14 · Original measured cross-net construction
Cut the pencil aperture
On the folded edge, mark points 1/4 inch above and below its midpoint. Cut 1/4 inch inward from each mark, through both layers. Join those inner ends with a third cut parallel to the folded edge. Do not extend the cuts to either long edge.
Layers: Cut a 1/4-inch-deep, 1/2-inch-wide notch through both layers at the folded edge.
Check: The doubled notch scrap is released; two 1/4-inch-wide rails remain along the long edges.
Explore this step ↑STEP 15 · Original measured cross-net construction
Remove the notch scrap
Lift the small doubled scrap up off the card and set it aside. Do not slide it through the surrounding rails. Keep the two long-edge rails intact.
Layers: Lift both cut layers together. They are not used again.
Check: The notch passes through both layers, with no loose piece left inside.
Explore this step ↑STEP 16 · Original measured cross-net construction
Reopen the pierced bridge
Unfold the right half fully to the right. Gently flatten the center crease.
Layers: The two narrow rails keep the bridge connected around the hole.
Check: A 1/2 × 1/2-inch square aperture is centered in the 3 × 1-inch strip.
Explore this step ↑STEP 17 · Original measured cross-net construction
Bend the right mounting tab down
At the line 1/2 inch from the right short end, bend the end tab down to a right angle. Leave the central span flat.
Layers: Move the right 1/2-inch end only.
Check: The tab points down from the end of the 2-inch bridge span.
Explore this step ↑STEP 18 · Original measured cross-net construction
Bend the left mounting tab down
Bend the matching left end down on its line, also at a right angle.
Layers: Keep the central span and the first tab unchanged.
Check: The bridge has two downward tabs and one unobstructed square hole.
Explore this step ↑STEP 19 · Original measured cross-net construction
Seat the bridge across the rim
Center the bridge across the holder from left to right. Lower it until the 2-inch span rests across the two side-wall top edges. The two tabs must lie down the OUTSIDE of the left and right walls. Keep the hole above the center of the floor.
Layers: The tabs overlap the wall exteriors; do not force them inside the cavity. Hold the bridge while attaching it.
Check: The bridge sits at the 3-inch rim height, with each tab extending 1/2 inch down a side wall.
Explore this step ↑STEP 20 · Original measured cross-net construction
Tape the right bridge tab
Cut two additional 1 × 3/4-inch strips of masking tape. Place the first on the outside of the right wall with its 1-inch edge across the bridge tab. Align its top with the rim: it covers the full 1/2-inch tab and extends 1/4 inch below the tab onto the wall. Press firmly while supporting from inside.
Layers: The tape overlaps both the separate bridge tab and the wall beneath it. Do not cover the pencil hole.
Check: The right tab is fastened to the wall across its full width.
Explore this step ↑STEP 21 · Original measured cross-net construction
Tape the left bridge tab
Apply the second 1 × 3/4-inch tape strip over the left tab in the same way. Its top is level with the rim and its bottom extends 1/4 inch below the tab.
Layers: Fasten the second tab without bending the span into the cavity.
Check: Both bridge ends are attached; the square aperture remains centered above the floor.
Explore this step ↑STEP 22 · Original measured cross-net construction
Check the pencil-support path
Place the empty holder on a level, dry desk. Check that the floor lies flat, the bridge spans the rim and all six tape joints have adhered. If trying a pencil narrower than the 1/2-inch aperture, steady the holder and lower the pencil through the hole until its end reaches the floor. Do not hang it from the bridge or force a tight pencil through. Stop if the card bends, the holder leans or a seam loosens.
Layers: The perforated bridge limits sideways movement near the top; the integral floor supports the pencil end. Both are necessary parts of this design.
Check: The construction is complete: 2 inches across and 3 inches high, with one guided pencil position. Physical pencil support, stability under load and adhesive durability have not been tested.
Explore this step ↑
Sources & notes
Just Fold Paper, Original measured cross-net pencil stand (2026).
Original design and material notes ↗
The measured net, assembly sequence, explanatory text, diagrams and implementation were authored for this guide with AI assistance. This uses elementary rectangular net construction; no claim of inventing the general box-net idea or of traditional origami authorship is made. No external photographs, tutorial prose or diagram assets are reproduced. No project-wide reuse license is granted.
Adaptation: An original 8-inch square layout: four 3-inch corner squares are removed, leaving a 2-inch square floor and four 2 × 3-inch walls. Four separately creased masking-tape strips bridge the vertical outside seams. Unlike a Masu box, this construction cuts away material and requires adhesive assembly; unlike a folded pencil decoration, it has an open cavity and a floor. It is not a no-glue origami model. The distinct pencil-support mechanism is a separate 3 × 1-inch bridge with a centered 1/2-inch square aperture and two downward 1/2-inch mounting tabs. Folded-edge notch cutting creates the aperture without a knife. Two additional tape patches fasten the tabs outside the rim. The bridge restrains lateral movement while the uncut floor receives the pencil end; neither mechanism is a tested load-bearing claim.
Original instructions and diagrams, made with AI assistance. About & reuse
Accuracy notes
Real-paper follow-along and paper weight have not been tested. Diagrams illustrate the sequence, not paper thickness, contact, collisions or exact layer visibility. The card is tracked as 64 square inches: 28 in the connected holder and 36 in explicitly discarded corners. Wall hinges stay attached to the floor; corner edges meet at right angles. Tape is a separate material with its own fold and exterior approach. A separate 3-square-inch bridge retains 2.75 square inches around a 0.25-square-inch removed notch. Its two uncut rails, tab roots, exterior seating path and two adhesive attachment patches are tracked independently from the holder sheet. Zero-thickness geometry and sampled contact checks are not a load, adhesive-strength or stability test. No real-paper folding or pencil-load testing has been performed. The illustrated empty holder does not imply that it can safely carry a particular number or weight of pencils.