 Just Fold Paper
Cut, fold & assemble
Cut-and-fold Paper Helicopter
Opposed rotor blades above a narrow folded body. Watch each action, follow the complete illustrated instructions or print the one-page diagrams.
Preparation + 9 numbered steps
Materials
2 × 6-inch rectangle · Cut & fold · 2 × 6 inches
One 2 × 6-inch rectangle (5.08 × 15.24 cm) of ordinary printer paper, ruler, pencil and scissors. One small paper clip for the final ballast.
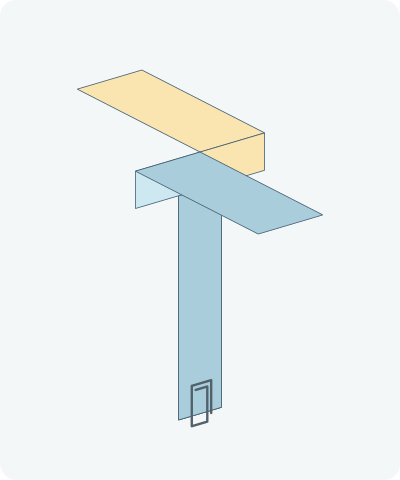
Drag to rotate · swipe sideways on touch.
Arrow keys rotate when focused.
Follow along
PreparationThe interactive guide needs JavaScript. Read every illustrated step below.
Help · controls & diagram
Play or drag the progress slider to watch a fold from 0% to 100%. Use the view buttons or drag the diagram to look from another angle.
Blue and gold identify the original left and right halves, not the literal colors of your paper. Darker shades show the reverse. Orange marks moving paper and its hinge.
With the diagram focused: Space plays or pauses, ←/→ change steps, and Home resets.
Every step, at a glance
Compare your paper with each diagram after completing the action. Blue and gold identify the original left and right halves, not the literal colors of your paper. Darker shades show the reverse. Orange marks moving paper and its hinge.
- 0. Prepare the rectangle
- 1. Crease the center
- 2. Reopen the rectangle
- 3. Cut the rotor slit
- 4. Cut the body slits
- 5. Fold the right body strip
- 6. Fold the left body strip
- 7. Fold the left blade forward
- 8. Fold the right blade backward
- 9. Attach the paper clip
PREPARATION · Linked complete photographic construction
Prepare the rectangle
Place the 2 × 6-inch rectangle vertically. If necessary, cut this blank from a larger sheet before starting.
Layers: One rectangular blank; keep the paper clip aside.
Check: The rectangle is three times as tall as it is wide.
Explore this step ↑STEP 1 · Linked complete photographic construction
Crease the center
Bring the right long edge to the left long edge.
Layers: Fold the whole rectangle lengthwise.
Check: The long edges coincide.
Explore this step ↑STEP 2 · Linked complete photographic construction
Reopen the rectangle
Open the crease completely.
Layers: Lay the same half back down.
Check: The center line runs from top to bottom.
Explore this step ↑STEP 3 · Linked complete photographic construction
Cut the rotor slit
Measure 2.5 inches down from the top along the center crease. Cut from the top edge down to that mark.
Layers: Cut only the upper center line. Keep the lower body joined.
Check: Two blade tabs share one uncut body.
Explore this step ↑STEP 4 · Linked complete photographic construction
Cut the body slits
Mark a horizontal line 3 inches down from the top, half an inch below the rotor slit’s end. Cut 2/3 inch inward from each side along this line.
Layers: Leave the middle 2/3 inch uncut. Do not join the slits.
Check: The lower side strips are released while a central bridge joins the body to the rotors.
Explore this step ↑STEP 5 · Linked complete photographic construction
Fold the right body strip
Fold the lower right strip inward on a vertical line through the inner end of its slit.
Layers: Move only the lower strip, below the horizontal cut.
Check: The right strip covers the center of the lower body.
Explore this step ↑STEP 6 · Linked complete photographic construction
Fold the left body strip
Fold the lower left strip inward through the inner end of its slit.
Layers: Move the left strip only; keep the first strip in place.
Check: The reinforced body is about 2/3 inch wide.
Explore this step ↑STEP 7 · Linked complete photographic construction
Fold the left blade forward
Bend the left blade toward you at the bottom of the center slit. Stop at a right angle.
Layers: Move only the left upper tab. Its root remains attached to the body.
Check: The left blade projects toward you.
Explore this step ↑STEP 8 · Linked complete photographic construction
Fold the right blade backward
Bend the right blade away from you at the same height. Stop at a right angle.
Layers: Move only the right upper tab. Leave the first blade still.
Check: The two blades point in opposite directions above the vertical body.
Explore this step ↑STEP 9 · Linked complete photographic construction
Attach the paper clip
Slide one small paper clip onto the bottom of the folded body. It should grip the layers without touching the rotor blades.
Layers: Add the separate clip; do not unfold the paper.
Check: The helicopter construction is complete. If you try dropping it, use a clear space and release it from hand height. Its spinning behavior is not tested here.
Explore this step ↑
Sources & notes
Origami Instructions, Origami Instructions: Cut-and-fold Paper Helicopter (web tutorial).
Photographic construction reference ↗
The reference does not identify the model designer or grant a design-reuse license. Traditional authorship is not established here. Its photographs and prose are protected and are not reproduced. These explanatory words, geometry and drawings are independently authored; no project-wide reuse license is implied.
Adaptation: Starts with the source’s 3:1 rectangular blank already cut to size. Rotor slit is 2.5 inches long, body slits are 2/3 inch each and sit 1/2 inch below the rotor root. Body reinforcement is completed before the rotor blades open, so the small cuts remain easy to reach. Right-angle blade openings are authored display settings. The paper clip is a separate object, not folded paper. Spinning and descent have not been physically tested.
Original instructions and diagrams, made with AI assistance. About & reuse
Accuracy notes
Real-paper follow-along and paper weight have not been tested. Diagrams illustrate the sequence, not paper thickness, contact, collisions or exact layer visibility. Material coordinates track the original sheet throughout the construction. Folded panels move about continuous hinges; cut seams are identified explicitly. Zero-thickness diagrams do not simulate paper thickness or prove physical foldability. Real-paper folding has not been tested.