 Just Fold Paper
Fold only
Paper Hat
Turn a rectangle into a small paper hat with a triangular crown and two folded brims. Open the bottom pocket gently to give it shape.
Preparation + 10 numbered steps
Materials
US Letter paper · 8.5 × 11 inches
One flexible US Letter sheet, 8.5 × 11 inches, portrait. This makes a small practice or toy-sized hat, not a guaranteed wearable size. For a larger version use a proportionally enlarged rectangle and check the fit yourself. No scissors or glue; a ruler is optional.
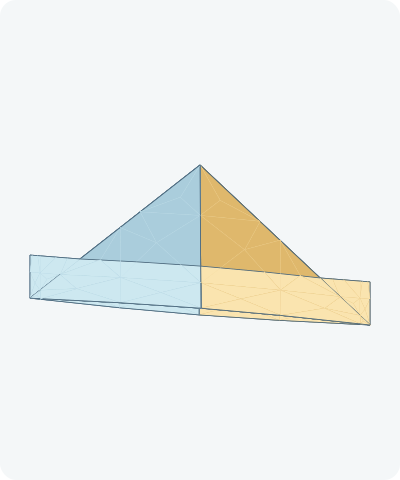
Drag to rotate · swipe sideways on touch.
Arrow keys rotate when focused.
Follow along
PreparationThe interactive guide needs JavaScript. Read every illustrated step below.
Help · controls & diagram
Play or drag the progress slider to watch a fold from 0% to 100%. Use the view buttons or drag the diagram to look from another angle.
Blue and gold track the original left and right halves. Orange outlines show the moving packet. The final shallow opening illustrates where to separate the two sides, not a fitted head shape.
With the diagram focused: Space plays or pauses, ←/→ change steps, and Home resets.
Every step, at a glance
Compare your paper with each diagram after completing the action. Blue and gold track the original left and right halves. Orange outlines show the moving packet. The final shallow opening illustrates where to separate the two sides, not a fitted head shape.
- 0. Start with a rectangle
- 1. Fold the top edge down
- 2. Find the middle
- 3. Reopen the center fold
- 4. Fold the upper right corner in
- 5. Match the upper left corner
- 6. Lift the front brim
- 7. Turn the hat over
- 8. Fold the other brim
- 9. Return to the front
- 10. Open the bottom pocket gently
PREPARATION · Traditional rectangular paper hat
Start with a rectangle
Place US Letter paper vertically with the intended outside color down.
Layers: One rectangular sheet.
Check: The short edges are at the top and bottom.
Explore this step ↑STEP 1 · Traditional rectangular paper hat
Fold the top edge down
Bring the upper short edge onto the lower short edge. Match both corners and crease across the middle.
Layers: Fold the upper half over the lower half.
Check: The resulting rectangle is wider than it is tall, with a closed edge at the top and two free edges at the bottom.
Explore this step ↑STEP 2 · Traditional rectangular paper hat
Find the middle
Fold the right side onto the left side and press a light vertical crease.
Layers: Move both layers together.
Check: The center of the wide rectangle is marked.
Explore this step ↑STEP 3 · Traditional rectangular paper hat
Reopen the center fold
Return the right side to the right. Keep the horizontal half-fold closed.
Layers: Undo only the center crease.
Check: The rectangle lies flat with a centerline.
Explore this step ↑STEP 4 · Traditional rectangular paper hat
Fold the upper right corner in
Bring the upper right corner down to the centerline, 4.25 inches below the upper edge. Crease from the upper center to the right side.
Layers: Fold both layers of the corner together.
Check: The diagonal crease reaches the right edge 1.25 inches above the bottom.
Explore this step ↑STEP 5 · Traditional rectangular paper hat
Match the upper left corner
Bring the upper left corner to the same centerline point. Press the matching diagonal.
Layers: Move both layers of the left corner.
Check: A triangular crown sits above a 1.25-inch bottom band.
Explore this step ↑STEP 6 · Traditional rectangular paper hat
Lift the front brim
Separate the front layer of the bottom band. Fold its lower edge upward around the horizontal line beneath the crown.
Layers: Lift only the front band; the rear band stays down.
Check: One rectangular brim lies on this side of the crown.
Explore this step ↑STEP 7 · Traditional rectangular paper hat
Turn the hat over
Turn the whole packet from side to side without opening its folds.
Layers: Turn all layers together.
Check: The remaining loose bottom band faces you.
Explore this step ↑STEP 8 · Traditional rectangular paper hat
Fold the other brim
Lift the remaining bottom band upward around the same horizontal line.
Layers: Only the loose band moves; the first brim stays closed behind.
Check: There is a brim on each side.
Explore this step ↑STEP 9 · Traditional rectangular paper hat
Return to the front
Turn the complete hat over.
Layers: Keep both brims folded.
Check: The crown and both brim folds are intact.
Explore this step ↑STEP 10 · Traditional rectangular paper hat
Open the bottom pocket gently
Separate the two walls at the bottom fold and ease them apart. Keep the crown creases and brims in place. Stop before forcing the paper flat in a new direction.
Layers: The two connected walls bow apart slightly; this is not a new sharp crease.
Check: You can see a shallow space between the two sides. This small model is for practice, not a promised wearable fit.
Explore this step ↑
Sources & notes
Origami-Instructions, Origami Hat (undated page).
Traditional rectangular hat photo sequence ↗
A classic rectangular folded-hat construction is used as a structural reference. Reference photos, text and video are not redistributed. These instructions, geometry, diagrams and PDF are original work made with AI assistance; no rights to the publisher’s assets are claimed.
Adaptation: Begins with an existing US Letter rectangle, omitting the source’s optional square-to-rectangle cutting. Uses an explicit center precrease and separate left/right folds. The top corners meet the centerline 4.25 inches below the folded top. Each 1.25-inch bottom band folds upward once, on its own side. Final pocket separation is a shallow flexible visualization (maximum 0.16 inch per wall), not a full wearable-fit or finite-thickness simulation. No cuts, corner tucks or tape are added.
Original instructions and diagrams, made with AI assistance. About & reuse
Accuracy notes
Real-paper follow-along and paper weight have not been tested. Diagrams illustrate the sequence, not paper thickness, contact, collisions or exact layer visibility. One 93.5-square-inch sheet; ordinary actions are rigid folds and turns. The opening uses an explicitly flexible, connected mesh. The shallow opening does not establish crease retention, fit or a finished hat size. Real-paper folding and wearing have not been tested.