 Just Fold Paper
Fold only
Paper Cup
Fold two corners across a triangle, turn the top flaps down on opposite sides, and gently separate the walls of a small paper cup.
Preparation + 8 numbered steps
Materials
Square origami paper · 6 × 6 inches
One flexible 6 × 6-inch square (15.24 cm, approximately 15.2 cm). A ruler and pencil help locate the first corner fold. No cuts or glue. Use the finished model as a dry-item paper pocket; this guide does not establish food safety, waterproofing or suitability for hot liquids.
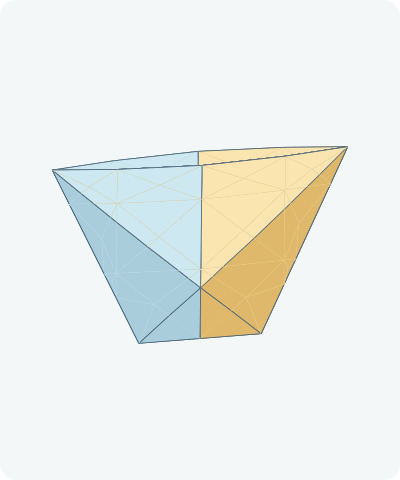
Drag to rotate · swipe sideways on touch.
Arrow keys rotate when focused.
Follow along
PreparationThe interactive guide needs JavaScript. Read every illustrated step below.
Help · controls & diagram
Play or drag the progress slider to watch a fold from 0% to 100%. Use the view buttons or drag the diagram to look from another angle.
Blue and gold track the original left and right halves. Darker tones show the reverse. Orange outlines show moving packets. The final shallow bowing shows the mouth of the pocket without claiming a rigid or watertight vessel.
With the diagram focused: Space plays or pauses, ←/→ change steps, and Home resets.
Every step, at a glance
Compare your paper with each diagram after completing the action. Blue and gold track the original left and right halves. Darker tones show the reverse. Orange outlines show moving packets. The final shallow bowing shows the mouth of the pocket without claiming a rigid or watertight vessel.
- 0. Prepare a square
- 1. Fold an upward triangle
- 2. Fold the left corner across
- 3. Fold the right corner across
- 4. Lower the front top flap
- 5. Turn to the back
- 6. Lower the back top flap
- 7. Return to the front
- 8. Ease the mouth open
PREPARATION · Traditional folded cup
Prepare a square
Place the square as a diamond with the intended outside color down.
Layers: One uncut square.
Check: All edges are equal and the side corners are level.
Explore this step ↑STEP 1 · Traditional folded cup
Fold an upward triangle
Bring the bottom corner onto the top corner. Match the side edges and press the horizontal fold.
Layers: Lift the lower half over the upper half.
Check: The base is a closed fold, with two free points at the top.
Explore this step ↑STEP 2 · Traditional folded cup
Fold the left corner across
Locate a point on the right sloping edge about 58.6% of the triangle height above the base (about 2.49 inches for this square). Bring the left corner to that point and crease.
Layers: Move both layers of the left corner together.
Check: The upper edge of the folded flap is horizontal.
Explore this step ↑STEP 3 · Traditional folded cup
Fold the right corner across
Bring the right corner to the left end of the horizontal edge created in the previous step. Crease the matching fold.
Layers: Move both layers of the right corner; leave the first flap down.
Check: The two side packets overlap across the front, forming a narrow base and a wider top.
Explore this step ↑STEP 4 · Traditional folded cup
Lower the front top flap
Separate the nearer of the two top points. Fold it down over the horizontal upper edge of the side flaps.
Layers: Move only the front triangular layer.
Check: The front flap covers the crossing side packets; the rear top point stays upright.
Explore this step ↑STEP 5 · Traditional folded cup
Turn to the back
Turn the whole cup over from side to side.
Layers: Keep the folded corners and front flap closed.
Check: The remaining upright top point faces you.
Explore this step ↑STEP 6 · Traditional folded cup
Lower the back top flap
Fold the remaining top point down over the same horizontal level, onto this outside face.
Layers: Move the remaining top layer only. Do not tuck it inside.
Check: Both top flaps are down on opposite sides.
Explore this step ↑STEP 7 · Traditional folded cup
Return to the front
Turn the whole model over again.
Layers: Keep every fold closed.
Check: The overlapping side flaps are at the front.
Explore this step ↑STEP 8 · Traditional folded cup
Ease the mouth open
Slide a finger between the two walls at the upper edge and gently separate them. Keep the folded corner packets together.
Layers: The walls bow apart slightly while the joined base and side folds remain connected.
Check: There is an opening at the top for small dry items. Hold the cup; do not flatten a new base or add liquids.
Explore this step ↑
Sources & notes
Peter Saydak / Origami.me, How to Make an Easy Origami Cup (undated page; 2024–2025 diagram/photo sequence).
Traditional cup folding sequence ↗
The reference identifies the design as traditional. Its diagrams are credited to Kelly Tan and are not reproduced. This guide independently constructs its geometry, illustrations, English text and PDF. No reference photos, diagrams, prose or code are included, and no permission to redistribute them is implied.
Adaptation: Uses a 6-inch square. Instead of the source’s temporary pinch fold, locate the first target about 58.6% of the triangle height above the base on the opposite sloping edge; this is the same geometric reference. Fold the second corner to the opposite end of the first flap’s horizontal top edge. Top flaps go down on separate outside faces, with explicit turns rather than a hidden mountain fold. The final opening is deliberately shallow (at most 0.16 inch per wall), with a connected flexible mesh. We do not flatten a standing base or use the source’s optional inward flap tuck; the result is a held paper pocket, not a freestanding or tested drinking cup.
Original instructions and diagrams, made with AI assistance. About & reuse
Accuracy notes
Real-paper follow-along and paper weight have not been tested. Diagrams illustrate the sequence, not paper thickness, contact, collisions or exact layer visibility. One 36-square-inch sheet with rigid corner/lip folds and a bounded flexible opening; the same material is retained throughout. The model is a zero-thickness teaching guide, not proof of liquid retention, food suitability or a stable flat base. Real-paper folding has not been tested.