 Just Fold Paper
Fold only
Origami Jumping Frog
Collapse the top of a rectangle into a triangle, shape two front flaps, and fold a zigzag spring underneath a simple paper frog.
Preparation + 18 numbered steps
Materials
US Letter · 8.5 × 11 inches
One 8.5 × 11-inch US Letter sheet (21.59 × 27.94 cm), portrait. Ordinary copy paper is a useful starting point. Optional pen for eyes. No cuts or glue. This guide uses Letter proportions, not A4 or the more elaborate square-paper frog.
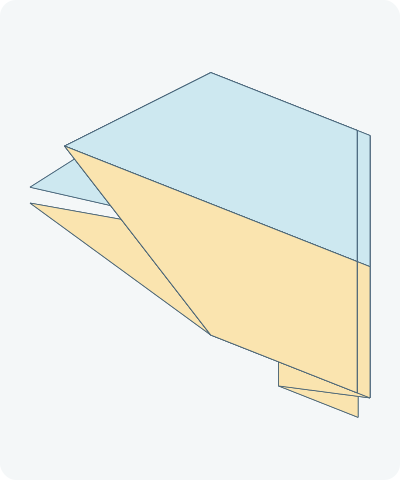
Drag to rotate · swipe sideways on touch.
Arrow keys rotate when focused.
Follow along
PreparationThe interactive guide needs JavaScript. Read every illustrated step below.
Help · controls & diagram
Play or drag the progress slider to watch a fold from 0% to 100%. Use the view buttons or drag the diagram to look from another angle.
Blue and gold track the original left and right halves; darker tones show the reverse. Orange outlines mark moving paper. Keep connected layers together when lifting a flap.
With the diagram focused: Space plays or pauses, ←/→ change steps, and Home resets.
Every step, at a glance
Compare your paper with each diagram after completing the action. Blue and gold track the original left and right halves; darker tones show the reverse. Orange outlines mark moving paper. Keep connected layers together when lifting a flap.
- 0. Prepare a rectangle
- 1. Mark the center
- 2. Open the sheet
- 3. Make the first diagonal
- 4. Open the first diagonal
- 5. Make the second diagonal
- 6. Open the second diagonal
- 7. Crease backward through the X
- 8. Open the horizontal crease
- 9. Collapse the triangular top
- 10. Raise the left front flap
- 11. Raise the right front flap
- 12. Narrow the left side
- 13. Narrow the right side
- 14. Raise the bottom edge
- 15. Fold the spring back
- 16. Ease the feet away
- 17. Turn the frog over
- 18. Try your paper frog
PREPARATION · Simple rectangular jumping frog
Prepare a rectangle
Place Letter paper upright, short edge at the top and intended outside color facing down.
Layers: One uncut sheet.
Check: The sheet is taller than it is wide.
Explore this step ↑STEP 1 · Simple rectangular jumping frog
Mark the center
Bring the right long edge onto the left long edge and crease.
Layers: Fold the whole right half over the left.
Check: The long edges match.
Explore this step ↑STEP 2 · Simple rectangular jumping frog
Open the sheet
Open the center fold completely.
Layers: Return the right half to the table.
Check: A vertical center guide divides the sheet.
Explore this step ↑STEP 3 · Simple rectangular jumping frog
Make the first diagonal
Bring the top-left corner across to the right edge, folding a diagonal from the top-right corner. Match the top edge to the right edge.
Layers: Lift the entire top-left corner.
Check: The folded corner touches the right edge 8.5 inches below the top.
Explore this step ↑STEP 4 · Simple rectangular jumping frog
Open the first diagonal
Unfold the corner completely.
Layers: Keep the diagonal crease.
Check: The rectangle lies flat again.
Explore this step ↑STEP 5 · Simple rectangular jumping frog
Make the second diagonal
Bring the top-right corner across to the left edge. Match the top edge to the left edge.
Layers: Lift the entire top-right corner.
Check: The second diagonal crosses the first on the center guide.
Explore this step ↑STEP 6 · Simple rectangular jumping frog
Open the second diagonal
Unfold the corner completely.
Layers: Return all layers to the table.
Check: An X marks the top square of the rectangle.
Explore this step ↑STEP 7 · Simple rectangular jumping frog
Crease backward through the X
Fold the top section away from you along a horizontal line through the center of the X.
Layers: Move the full width above the crossing to the back.
Check: The top edge reaches the lower ends of the two diagonals.
Explore this step ↑STEP 8 · Simple rectangular jumping frog
Open the horizontal crease
Unfold that backward fold.
Layers: Leave the two diagonals and horizontal guide in place.
Check: The top square is flat and ready to collapse.
Explore this step ↑STEP 9 · Simple rectangular jumping frog
Collapse the triangular top
Push the left and right ends of the horizontal crease inward and downward. Let the top edge come toward you and flatten the resulting triangle.
Layers: The side triangles tuck between the front and rear triangular layers. Keep the lower rectangle flat.
Check: A broad triangle sits above an untouched rectangle, with free layered corners at its base.
Explore this step ↑STEP 10 · Simple rectangular jumping frog
Raise the left front flap
Lift the left free corner of the front triangle to its top point and crease.
Layers: Carry both connected layers of this front flap. Leave the rear triangle and lower rectangle down.
Check: The left corner reaches the apex; its new crease runs from the base center to the middle of the left slope.
Explore this step ↑STEP 11 · Simple rectangular jumping frog
Raise the right front flap
Bring the right front corner to the same top point.
Layers: Move its two connected layers, keeping the first flap and rear triangle still.
Check: The two front flaps form a diamond.
Explore this step ↑STEP 12 · Simple rectangular jumping frog
Narrow the left side
Fold the left outside edge to the vertical center guide.
Layers: Move the whole side packet, including the small triangle beside the diamond. Keep the diamond flaps in place.
Check: The new left edge is vertical below the diamond shoulder.
Explore this step ↑STEP 13 · Simple rectangular jumping frog
Narrow the right side
Fold the right outside edge to the center guide.
Layers: Carry the full right side packet; keep the left fold closed.
Check: The long folded edges meet beneath the diamond.
Explore this step ↑STEP 14 · Simple rectangular jumping frog
Raise the bottom edge
Fold the bottom section upward until its free edge meets the horizontal level of the two diamond shoulders. Press the new horizontal crease.
Layers: Move every layer in the bottom section together.
Check: The raised edge crosses the middle of the diamond, leaving its upper triangle visible.
Explore this step ↑STEP 15 · Simple rectangular jumping frog
Fold the spring back
Fold the raised section back down in half, bringing its free edge to the bottom crease made in the previous step.
Layers: Move only the raised section, not the body behind it.
Check: A short rectangular band sits below the exposed diamond; the two folds make a zigzag.
Explore this step ↑STEP 16 · Simple rectangular jumping frog
Ease the feet away
Gently ease the two front flaps and the two spring folds a little away from the body. Use their existing creases, without adding new folds.
Layers: Keep each layered flap together. The animation opens each crease by 20 degrees to show the spaces.
Check: The front tips and rear spring stand slightly clear of the body.
Explore this step ↑STEP 17 · Simple rectangular jumping frog
Turn the frog over
Turn the whole frog over so the flaps and spring are underneath, then rotate it so its pointed front faces left.
Layers: Turn and rotate the whole model together; do not unfold it.
Check: The body is above the two front flaps and rear zigzag.
Explore this step ↑STEP 18 · Simple rectangular jumping frog
Try your paper frog
Add eyes if you like. On a firm flat surface, press the rear of the body gently and slide your fingertip off to try a jump.
Layers: Keep the front flaps and rear spring beneath the body.
Check: Results depend on paper and creasing; jumping is not simulated or tested here.
Explore this step ↑
Sources & notes
Origami-Fun and Origami Way, Simple rectangular jumping frog (undated tutorials).
Rectangular frog diagrams ↗ · Letter-paper photo sequence ↗
This is the familiar simple rectangular frog, distinct from the square four-legged variant. Design authorship and redistribution rights have not been independently established. The references are used to check the folding sequence; their photographs, diagrams, wording and code are not reproduced. This guide uses original text, geometry, diagrams and PDF.
Adaptation: Uses the Letter size explicitly supported by Origami Way. Adds a center precrease from Origami-Fun, separates paired folds and unfolds into individual actions, and aligns the bottom edge exactly to the two shoulders of the front diamond. The final stance reopens the existing spring creases and front flaps by 20 degrees for visibility; this is an illustrative angle, not a measured jumping setting. The animation does not simulate pressing, elastic release or a jump.
Original instructions and diagrams, made with AI assistance. About & reuse
Accuracy notes
Real-paper follow-along and paper weight have not been tested. Diagrams illustrate the sequence, not paper thickness, contact, collisions or exact layer visibility. One 93.5-square-inch sheet, with rigid hinges and a connected six-panel top collapse. Original material and hidden flap layers are retained. Zero-thickness teaching geometry, not a paper-thickness, contact or spring-force simulation. Physical folding and jumping have not been tested.