 Just Fold Paper
Fold & tape
Standing Desk Name Card
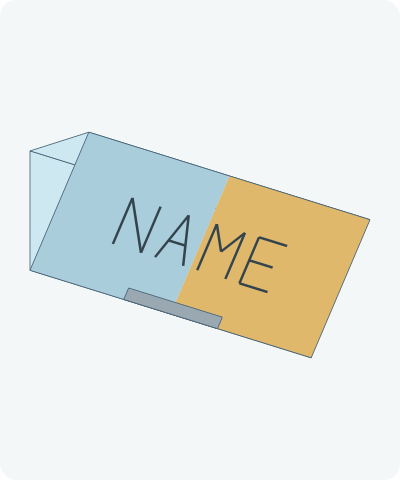
Make a desk or place-name display from three equal panels. Two sloping faces meet above a broad rectangular base; a short piece of tape closes the bottom seam below the name.
Preparation + 8 numbered steps
Materials
6 × 9-inch rectangle · 6 × 9 inches
One prepared 6 × 9-inch rectangle (15.24 × 22.86 cm) of firm paper, a ruler, pencil or pen, and one 2 × 1/2-inch strip of adhesive tape. Trim the rectangle before starting if needed. No cuts in the folding sequence. Ordinary paper may sag; light card can be harder to crease.
Drag to rotate · swipe sideways on touch.
Arrow keys rotate when focused.
Follow along
PreparationThe interactive guide needs JavaScript. Read every illustrated step below.
Help · controls & diagram
Play or drag the progress slider to watch a fold from 0% to 100%. Use the view buttons or drag the diagram to look from another angle.
Blue and gold identify the original left and right halves of one sheet. Darker shades show the reverse. Orange marks the moving paper. Gray is separate adhesive tape, not an extra paper flap. NAME is example pen lettering on the writing face.
With the diagram focused: Space plays or pauses, ←/→ change steps, and Home resets.
Every step, at a glance
Compare your paper with each diagram after completing the action. Blue and gold identify the original left and right halves of one sheet. Darker shades show the reverse. Orange marks the moving paper. Gray is separate adhesive tape, not an extra paper flap. NAME is example pen lettering on the writing face.
- 0. Mark three equal panels
- 1. Crease the upper line
- 2. Reopen the upper panel
- 3. Crease the lower line
- 4. Reopen the floor
- 5. Bend the name panel inward
- 6. Close the triangular body
- 7. Tape the bottom seam
- 8. Display the name
PREPARATION · Original measured triangular-prism construction
Mark three equal panels
Lay the 9-inch length vertically. Measure 3 inches and 6 inches from the bottom along both sides and lightly connect each pair of marks. Write a name on the REVERSE of the top panel, with the tops of the letters toward its marked crease, not the free top edge. Return to this marked side facing up before folding.
Layers: One uncut rectangle; the name faces the table.
Check: Three horizontal panels each measure 6 × 3 inches. The bottom panel will be the floor; the top panel will show the name.
Explore this step ↑STEP 1 · Original measured triangular-prism construction
Crease the upper line
Fold the top 3-inch panel down on the upper marked line. Its free edge meets the lower marked line. Press a straight crease.
Layers: Move only the upper third.
Check: The top panel covers the middle panel exactly.
Explore this step ↑STEP 2 · Original measured triangular-prism construction
Reopen the upper panel
Open the last fold completely.
Layers: Return the same upper third.
Check: The rectangle is flat again, with its upper crease visible.
Explore this step ↑STEP 3 · Original measured triangular-prism construction
Crease the lower line
Bring the bottom 3-inch panel up on the lower marked line. Its free edge meets the upper crease. Press firmly.
Layers: Move only the bottom third; the middle and top panels stay flat.
Check: The floor panel covers the middle panel exactly.
Explore this step ↑STEP 4 · Original measured triangular-prism construction
Reopen the floor
Open the bottom panel completely and keep the marked side up.
Layers: Return the same bottom third.
Check: Both parallel creases are ready; the sheet is still one piece.
Explore this step ↑STEP 5 · Original measured triangular-prism construction
Bend the name panel inward
Raise the top panel on its crease and lean it toward the middle panel. Leave a 60-degree inside angle between these two panels: the bend from flat is 120 degrees. Hold this angle for the next step.
Layers: Only the top third moves; keep the other two thirds flat.
Check: The name panel rises above the sheet rather than passing underneath it.
Explore this step ↑STEP 6 · Original measured triangular-prism construction
Close the triangular body
Keep the bottom floor panel flat. Lift the middle panel on the lower crease, carrying the already bent name panel with it. Continue until the original top edge meets the original bottom edge. Hold the two edges together without overlapping them.
Layers: Move the middle and name panels as one hinged packet; do not change their 60-degree inside angle.
Check: Viewed from either open end, three equal sides form a triangle. The name faces outward, and the entire bottom panel forms a 6 × 3-inch floor.
Explore this step ↑STEP 7 · Original measured triangular-prism construction
Tape the bottom seam
While holding the edges together, lift the display enough to reach underneath. Center the 2-inch tape strip along the bottom seam below the name. Press half its width onto the outside name panel, then bend the remaining half around the edge and press it under the floor. Return the floor to the desk. The gray strip shows this separate tape piece.
Layers: Keep all three paper panels fixed while attaching the tape. No paper enters a pocket.
Check: The seam is joined externally, with no gap or overlapping paper. Tape holds the triangular cross-section closed.
Explore this step ↑STEP 8 · Original measured triangular-prism construction
Display the name
Set the full rectangular floor on a level desk, with the name facing the reader. Check that the taped seam stays closed and both triangular ends remain open. If the card leans or springs open, press the creases again and secure the tape before use.
Layers: The writing face, rear support and floor remain one connected sheet.
Check: A standing name display has two sloping faces and an actual base, not just an upside-down V. The base is 6 inches wide and 3 inches deep.
Explore this step ↑
Sources & notes
Just Fold Paper, Original measured desk-name-card construction (2026).
The dimensions, teaching sequence, English text, diagrams and code were independently authored for this guide. The elementary triangular-prism structure is not claimed as a novel invention or as a named traditional origami design. No external photographs, tutorial prose or diagrams are reproduced.
Adaptation: Original 6 × 9-inch layout: three 6 × 3-inch panels, two 120-degree bends, and an explicit external tape join below the name. The two end edges meet without overlap or a hidden tuck. Tape is required to hold this closed prism; it is not a fold-only lock. The animation shows a pre-bent tape strip approaching the seam, not adhesive physics. Example NAME lettering rides the reverse of the original top third; it represents pen ink.
Original instructions and diagrams, made with AI assistance. About & reuse
Accuracy notes
Real-paper follow-along and paper weight have not been tested. Diagrams illustrate the sequence, not paper thickness, contact, collisions or exact layer visibility. One connected 54-square-inch sheet retains rigid panels and continuous hinges. The final 6 × 3-inch floor is level, the ridge is 3√3/2 inches high, and both free 6-inch edges meet at the bottom seam below the name. Zero-thickness geometry and a schematic tape application do not model paper spring-back, tape strength or finite thickness. Physical folding and stability have not been tested.