 Just Fold Paper
Cut, fold & assemble
Woven Paper Bookmark
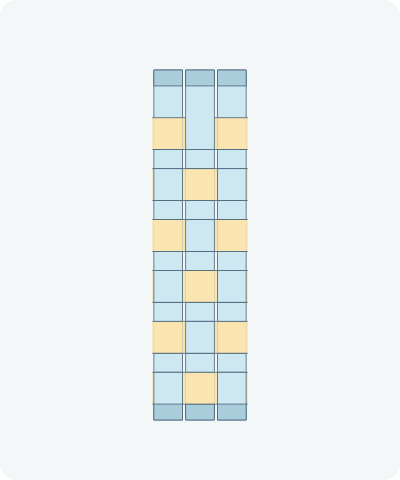
Make a long checkerboard bookmark by sliding six short strips alternately over and under three long ones. Flatten the weave, fold the two ends, and glue the crossings so the separate strips stay together.
Preparation + 11 numbered steps
Materials
Nine prepared paper strips · 1.5 × 6 inches
Thin paper in two colors, scissors, ruler, pencil and a small amount of paper glue. Cut three long strips 0.45 × 6 inches (about 11.4 × 152.4 mm) and six cross strips 0.5 × 1.5 inches (12.7 × 38.1 mm). Use thin 70–90 gsm paper rather than card. The guide starts with these nine cut strips; no further cuts are needed.
Drag to rotate · swipe sideways on touch.
Arrow keys rotate when focused.
Follow along
PreparationThe interactive guide needs JavaScript. Read every illustrated step below.
Help · controls & diagram
Play or drag the progress slider to watch a fold from 0% to 100%. Use the view buttons or drag the diagram to look from another angle.
Blue identifies the three long strips; gold identifies the six separate cross strips. Darker shades are reverse faces. Narrow connecting ramps are folds, not cuts. All nine pieces remain in the diagrams, including cross strips waiting on the right.
With the diagram focused: Space plays or pauses, ←/→ change steps, and Home resets.
Every step, at a glance
Compare your paper with each diagram after completing the action. Blue identifies the three long strips; gold identifies the six separate cross strips. Darker shades are reverse faces. Narrow connecting ramps are folds, not cuts. All nine pieces remain in the diagrams, including cross strips waiting on the right.
- 0. Prepare and mark nine strips
- 1. Open alternating weaving channels
- 2. Weave cross strip 1
- 3. Weave cross strip 2
- 4. Weave cross strip 3
- 5. Weave cross strip 4
- 6. Weave cross strip 5
- 7. Weave cross strip 6
- 8. Flatten and secure the weave
- 9. Fold the bottom end hems
- 10. Fold the top end hems
- 11. Let it dry before using
PREPARATION · Original nine-strip plain-weave layout
Prepare and mark nine strips
Cut the nine strips listed above. On each long strip, measure from the bottom: mark 0.25 and 5.75 inches for the end hems. Mark the five narrow ramp pairs at 1.0/1.3, 1.8/2.1, 2.6/2.9, 3.4/3.7 and 4.2/4.5 inches. Keep the three long strips parallel with 0.05-inch gaps. Lay the six cross strips to their right, ready to slide left.
Layers: Three long blue strips and six separate gold cross strips; nothing is joined yet.
Check: All three long strips are 6 inches long. Each short strip spans the full 1.5-inch bookmark width.
Explore this step ↑STEP 1 · Original nine-strip plain-weave layout
Open alternating weaving channels
Gently bend each marked ramp pair into a shallow step. On the outer long strips, the first crossing land near the bottom is high, the next low, then high, low, high, low. Reverse that pattern on the middle strip. Keep the lands level; open about a 0.2-inch height difference between high and low lands. The animation opens the bends together; work up one strip at a time.
Layers: Each long strip remains one continuous piece. The middle strip bends opposite to the outer two.
Check: At every row there is an open horizontal channel between the high and low long strips.
Explore this step ↑STEP 2 · Original nine-strip plain-weave layout
Weave cross strip 1
Slide the lowest short strip from right to left through its channel, centered on the 0.75-inch mark measured along the long strips. Pass UNDER the right outer strip, OVER the middle, then UNDER the left outer strip. Stop when both ends project equally beyond the outer strips. Keep the earlier rows in place.
Layers: Move this complete cross strip horizontally; do not push it through a long strip or close the bends yet.
Check: 1 cross strip is in place. This row reverses the crossing order of its neighbor.
Explore this step ↑STEP 3 · Original nine-strip plain-weave layout
Weave cross strip 2
Slide the second short strip from right to left through its channel, centered on the 1.55-inch mark measured along the long strips. Pass OVER the right outer strip, UNDER the middle, then OVER the left outer strip. Stop when both ends project equally beyond the outer strips. Keep the earlier rows in place.
Layers: Move this complete cross strip horizontally; do not push it through a long strip or close the bends yet.
Check: 2 cross strips are in place. This row reverses the crossing order of its neighbor.
Explore this step ↑STEP 4 · Original nine-strip plain-weave layout
Weave cross strip 3
Slide the third short strip from right to left through its channel, centered on the 2.35-inch mark measured along the long strips. Pass UNDER the right outer strip, OVER the middle, then UNDER the left outer strip. Stop when both ends project equally beyond the outer strips. Keep the earlier rows in place.
Layers: Move this complete cross strip horizontally; do not push it through a long strip or close the bends yet.
Check: 3 cross strips are in place. This row reverses the crossing order of its neighbor.
Explore this step ↑STEP 5 · Original nine-strip plain-weave layout
Weave cross strip 4
Slide the fourth short strip from right to left through its channel, centered on the 3.15-inch mark measured along the long strips. Pass OVER the right outer strip, UNDER the middle, then OVER the left outer strip. Stop when both ends project equally beyond the outer strips. Keep the earlier rows in place.
Layers: Move this complete cross strip horizontally; do not push it through a long strip or close the bends yet.
Check: 4 cross strips are in place. This row reverses the crossing order of its neighbor.
Explore this step ↑STEP 6 · Original nine-strip plain-weave layout
Weave cross strip 5
Slide the fifth short strip from right to left through its channel, centered on the 3.95-inch mark measured along the long strips. Pass UNDER the right outer strip, OVER the middle, then UNDER the left outer strip. Stop when both ends project equally beyond the outer strips. Keep the earlier rows in place.
Layers: Move this complete cross strip horizontally; do not push it through a long strip or close the bends yet.
Check: 5 cross strips are in place. This row reverses the crossing order of its neighbor.
Explore this step ↑STEP 7 · Original nine-strip plain-weave layout
Weave cross strip 6
Slide the top short strip from right to left through its channel, centered on the 4.75-inch mark measured along the long strips. Pass OVER the right outer strip, UNDER the middle, then OVER the left outer strip. Stop when both ends project equally beyond the outer strips. Keep the earlier rows in place.
Layers: Move this complete cross strip horizontally; do not push it through a long strip or close the bends yet.
Check: 6 cross strips are in place. This row reverses the crossing order of its neighbor.
Explore this step ↑STEP 8 · Original nine-strip plain-weave layout
Flatten and secure the weave
Check all eighteen crossings before closing the shallow bends. Add a tiny dab of paper glue between the two layers at each crossing, lifting just enough to reach the contact. Gently flatten the long-strip bends while allowing each cross strip to shift lengthwise with its row. Press lightly and let the glue set as its label directs. Do not glue the bookmark to your work surface.
Layers: The over-under order stays unchanged. The animation shows closing and row movement; it does not depict glue application or drying.
Check: The six rows alternate. Small even gaps remain between rows and between long strips.
Explore this step ↑STEP 9 · Original nine-strip plain-weave layout
Fold the bottom end hems
Fold the bottom 0.25 inch of each long strip upward toward the front along its marked line. Work across the three strips separately. Use a tiny dab of glue under each hem and press it against its own long strip.
Layers: Only the three short bottom tails move. The first cross strip stays in place immediately above them.
Check: Three folded ends form the bottom edge; no strip is cut off.
Explore this step ↑STEP 10 · Original nine-strip plain-weave layout
Fold the top end hems
Fold the top 0.25 inch of each long strip downward toward the front along the 5.75-inch mark. Glue and press each hem to its own strip. Keep the woven rows flat.
Layers: Only the three top tails move; all eighteen crossings stay unchanged.
Check: Both ends now have folded hems. The finished bookmark is about 1.5 × 5.5 inches.
Explore this step ↑STEP 11 · Original nine-strip plain-weave layout
Let it dry before using
Let the glue dry fully according to its label, then check that every cross strip and hem is secure and no sticky areas remain. Place the long bookmark between pages with its top projecting slightly. Do not attach it to a page or force a thick glued patch into a tightly bound book.
Layers: Nine separate strips are now held by the woven crossing order and glue; there is no hidden pocket or tuck.
Check: A long, flat checkerboard bookmark has six woven rows and folded top and bottom ends.
Explore this step ↑
Sources & notes
Just Fold Paper, Original nine-strip plain-weave bookmark layout (2026).
This measured layout, English teaching text, diagrams and code are original to this guide. Plain over-under weaving is a general craft technique; no historical priority or exclusive ownership of that technique is claimed. No reference photographs, text, templates or code are reproduced. No project-wide reuse license is granted.
Adaptation: An original open-grid bookmark, not an adaptation of the corner-bookmark pocket fold. Three 0.45-inch warp strips and six 0.5-inch weft strips produce eighteen alternating crossings. Shallow paired creases open insertion channels, then flatten; quarter-inch hems finish only the long-strip ends. Glue is required to secure the crossings and hems. The small gaps are intentional, not missing paper. This is a cut, weave, fold and glue craft, not single-sheet origami.
Original instructions and diagrams, made with AI assistance. About & reuse
Accuracy notes
Real-paper follow-along and paper weight have not been tested. Diagrams illustrate the sequence, not paper thickness, contact, collisions or exact layer visibility. Nine continuous strips retain 12.6 square inches of paper. The five narrow ramps in each long strip shorten in projection while preserving their actual lengths. Every cross strip travels through an open alternating shed, then the weave closes without changing crossing order. End hems rotate on attached hinges. The diagrams retain a small layer separation for clarity and use zero-thickness panels. Glue volume, finite paper thickness, friction and drying are not simulated. Automated geometry and browser checks are not physical folding or durability tests; this bookmark has not been physically tested.