 Just Fold Paper
Fold only
Suzanne Paper Airplane
Make crossed diagonal guides, layered leading edges and broad wings. This Letter-paper version of John Collins’ Suzanne uses a small folded tab instead of tape.
Preparation + 21 numbered steps
Materials
US Letter, portrait · 8.5 × 11 inches
One flexible 8½ × 11-inch Letter sheet. A ruler and pencil can help locate the tab hinge. No cutting, tape or glue. Follow these proportions with Letter, not A4.
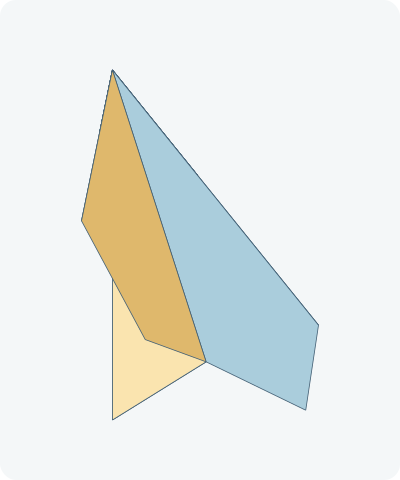
Drag to rotate · swipe sideways on touch.
Arrow keys rotate when focused.
Follow along
PreparationThe interactive guide needs JavaScript. Read every illustrated step below.
Help · controls & diagram
Play or drag the progress slider to watch a fold from 0% to 100%. Use the view buttons or drag the diagram to look from another angle.
Blue and gold track the original left and right halves of one sheet. Dark shades show reverse faces. Orange outlines identify moving paper and dashed orange lines identify hinges. Existing panel lines are not extra folds to make.
With the diagram focused: Space plays or pauses, ←/→ change steps, and Home resets.
Every step, at a glance
Compare your paper with each diagram after completing the action. Blue and gold track the original left and right halves of one sheet. Dark shades show reverse faces. Orange outlines identify moving paper and dashed orange lines identify hinges. Existing panel lines are not extra folds to make.
- 0. Prepare the sheet
- 1. Crease the center
- 2. Reopen the center
- 3. Make the first diagonal guide
- 4. Open the first diagonal
- 5. Make the crossing diagonal
- 6. Open the second diagonal
- 7. Bring the right side to its guide
- 8. Match the left side
- 9. Fold the upper packet down
- 10. Fold the left shoulder inward
- 11. Fold the right shoulder inward
- 12. Raise the exposed tab
- 13. Turn to the plain face
- 14. Close the body
- 15. Fold the first broad wing
- 16. Turn for the other wing
- 17. Match the second wing
- 18. Open the first wing
- 19. Open the second wing
- 20. Hold the body below the wings
- 21. Check your Suzanne
PREPARATION · Suzanne · Letter tab-finish variant
Prepare the sheet
Put a short edge at the top. Keep this end at the top of the early diagrams as the future nose.
Layers: One whole portrait Letter sheet.
Check: The sheet is 8½ inches wide and 11 inches tall.
Explore this step ↑STEP 1 · Suzanne · Letter tab-finish variant
Crease the center
Bring the left long edge onto the right and press the lengthwise fold.
Layers: The complete left half moves.
Check: Both long edges match.
Explore this step ↑STEP 2 · Suzanne · Letter tab-finish variant
Reopen the center
Open the sheet fully onto the table.
Layers: Undo only the center fold.
Check: The full rectangle is flat.
Explore this step ↑STEP 3 · Suzanne · Letter tab-finish variant
Make the first diagonal guide
Bring the top edge onto the left long edge. The crease starts at the upper-left corner and reaches the right edge 8½ inches below the top.
Layers: Move the large upper-right triangle.
Check: The old upper-right corner touches the left edge.
Explore this step ↑STEP 4 · Suzanne · Letter tab-finish variant
Open the first diagonal
Unfold that triangle completely.
Layers: Return the same triangle to the table.
Check: One diagonal guide remains.
Explore this step ↑STEP 5 · Suzanne · Letter tab-finish variant
Make the crossing diagonal
Bring the top edge onto the right long edge. Keep the upper-right corner at the end of the crease.
Layers: Move the large upper-left triangle.
Check: The two guides cross on the centerline, 4¼ inches below the top.
Explore this step ↑STEP 6 · Suzanne · Letter tab-finish variant
Open the second diagonal
Unfold completely before making the narrower side folds.
Layers: Return the upper-left triangle.
Check: The rectangle is flat with an X across its upper square.
Explore this step ↑STEP 7 · Suzanne · Letter tab-finish variant
Bring the right side to its guide
Fold the upper part of the right long edge onto the diagonal running from upper left to lower right. Keep their common point on the right edge fixed.
Layers: Fold the single right-side triangle.
Check: The long raw edge lies along the diagonal guide.
Explore this step ↑STEP 8 · Suzanne · Letter tab-finish variant
Match the left side
Fold the upper part of the left long edge onto the other diagonal. Leave the first flap down.
Layers: Only the left triangle folds; the right flap stays flat.
Check: Two sloping sides surround a short flat top.
Explore this step ↑STEP 9 · Suzanne · Letter tab-finish variant
Fold the upper packet down
Find the crossing of the original X, using the back of the sheet if needed. Make a horizontal fold through that crossing and bring the whole upper packet down.
Layers: Carry all layers above the crossing together.
Check: A downward trapezoid lies over the backing. Its diagonal guides continue the exposed edges below.
Explore this step ↑STEP 10 · Suzanne · Letter tab-finish variant
Fold the left shoulder inward
Use the diagonal from the new top midpoint toward the left side as the hinge. Fold the complete upper-left corner inward.
Layers: Move every layer on the upper-left side of that diagonal.
Check: The short upper edge turns onto the centerline.
Explore this step ↑STEP 11 · Suzanne · Letter tab-finish variant
Fold the right shoulder inward
Repeat along the matching diagonal on the right. Keep the left packet closed.
Layers: Move the whole upper-right packet.
Check: The two edges meet at the center; a small trapezoid tab remains exposed below them.
Explore this step ↑STEP 12 · Suzanne · Letter tab-finish variant
Raise the exposed tab
Find where each free side of the downward tab meets a lower edge of the corner flaps. Join these two points with a horizontal crease and fold the tab upward over the flaps. The line is about 0.51 inch below the center junction.
Layers: Only the exposed tab moves. Keep the broad backing and both corner flaps still.
Check: The tab covers the bottom of both flaps without shortening the backing sheet.
Explore this step ↑STEP 13 · Suzanne · Letter tab-finish variant
Turn to the plain face
Turn the entire packet over with the nose still at the top.
Layers: All layers turn together.
Check: The tab is underneath.
Explore this step ↑STEP 14 · Suzanne · Letter tab-finish variant
Close the body
Fold on the original center crease, taking the original left half over the right. After the turn, this moving half appears on your right.
Layers: Move one entire half, including its share of the tab.
Check: Both outlines match and the tab is outside the body.
Explore this step ↑STEP 15 · Suzanne · Letter tab-finish variant
Fold the first broad wing
Fold the outside wing away from the other half. Start the hinge at the nose. Lower the wing until its short raw side edge near the rear passes through the rear corner of the centerfold. Do not align the sloping leading edge to the body.
Layers: Move every layer of the first wing, leaving a wedge of body beside the centerfold.
Check: The raw rear-side edge touches the rear body corner; the leading edge passes beyond the centerfold.
Explore this step ↑STEP 16 · Suzanne · Letter tab-finish variant
Turn for the other wing
Turn the entire folded plane over to expose the second wing.
Layers: Keep the first wing folded.
Check: The uncreased wing faces you.
Explore this step ↑STEP 17 · Suzanne · Letter tab-finish variant
Match the second wing
Repeat the nose-to-rear alignment on this side, matching the first root crease.
Layers: Fold only the second complete wing packet.
Check: Both wing outlines and root creases match.
Explore this step ↑STEP 18 · Suzanne · Letter tab-finish variant
Open the first wing
Hold the body shut and lift the first wing back a little beyond a right angle from its flat folded position.
Layers: Open the complete saved wing packet.
Check: The wing stands away from the body; the nose layers remain together.
Explore this step ↑STEP 19 · Suzanne · Letter tab-finish variant
Open the second wing
Open the other wing by the same amount on the opposite side.
Layers: Keep the centerfold closed.
Check: Both wings extend to opposite sides of the body.
Explore this step ↑STEP 20 · Suzanne · Letter tab-finish variant
Hold the body below the wings
Rotate the entire plane so the narrow body hangs beneath the wings. This is handling, not a new crease.
Layers: Move the whole connected sheet.
Check: The wings rise gently toward their outer edges.
Explore this step ↑STEP 21 · Suzanne · Letter tab-finish variant
Check your Suzanne
Compare the two wings from the front and check the small tab underneath. Keep both wing roots matched and the center body closed. This completes the uncurled, fold-only Letter version.
Layers: One sheet makes both wings, the layered nose, body and tab.
Check: The fold sequence is complete; flight and tab retention are untested.
Explore this step ↑
Sources & notes
John Collins (Suzanne designer); LA County Library (Letter tab-finish reference), Paper Airplanes: Learning to Fly (2020).
Letter tab-finish sequence, pages 4–6 ↗ · Collins on Suzanne’s folds and wing alignment ↗ · Letter construction photographs, without the tab finish ↗
Suzanne is credited to John Collins, not described as traditional or public domain. A design-reuse license has not been established. The reference text, photographs and diagrams have separate rights. These English instructions, geometric diagrams and code are independently authored with AI assistance; no reference artwork, template or wording is reproduced.
Adaptation: This is the library’s Letter-paper, edge-to-crease, raised-tab variant. Collins’ record-setting construction used different paper and tape; this is not an exact replica or a flight-distance claim. We add an early center precrease and separate paired actions and handling turns. The tab hinge joins the two intersections of its free sides with the lower corner-packet edges (about 0.51 inch below their center junction); this makes the library’s unmeasured hinge explicit. The wing roots pass through the nose and place the raw side edge on the rear center corner, rather than placing the sloping leading edge on the centerfold. Opening each folded wing by 100° is an authored display setting for raised wings. The source’s later optional flight-tuning curl is not part of this uncurled construction.
Original instructions and diagrams, made with AI assistance. About & reuse
Accuracy notes
Real-paper follow-along and paper weight have not been tested. Diagrams illustrate the sequence, not paper thickness, contact, collisions or exact layer visibility.