 Just Fold Paper
Cut, fold & assemble
Flat Paper Pinwheel
Make a flat, four-vaned pinwheel decoration from one square. Cut four diagonal slits, fold alternate tips to the center, then secure them with tape. This creased display version has no axle and is not a wind-powered spinner.
Preparation + 6 numbered steps
Materials
6-inch square · 6 × 6 inches
One 6 × 6-inch square (15.24 × 15.24 cm) of thin paper, ruler, pencil, scissors and one 1 × 1-inch square of adhesive tape. Prepare the tape patch separately. No pin, bead or handle is needed. Children need help with scissors.
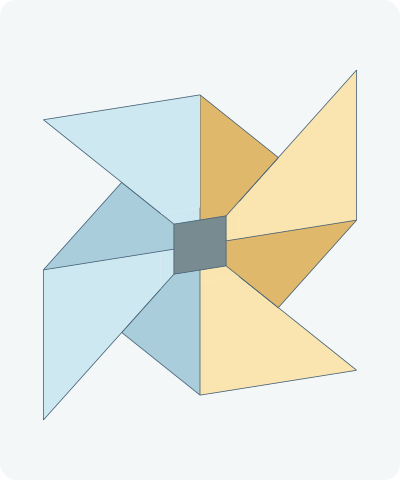
Drag to rotate · swipe sideways on touch.
Arrow keys rotate when focused.
Follow along
PreparationThe interactive guide needs JavaScript. Read every illustrated step below.
Help · controls & diagram
Play or drag the progress slider to watch a fold from 0% to 100%. Use the view buttons or drag the diagram to look from another angle.
Blue and gold track the original left and right halves of the sheet. Orange marks the active cut or fold. The gray central square is a separate tape patch, not paper. Subdivision lines are not extra creases.
With the diagram focused: Space plays or pauses, ←/→ change steps, and Home resets.
Every step, at a glance
Compare your paper with each diagram after completing the action. Blue and gold track the original left and right halves of the sheet. Orange marks the active cut or fold. The gray central square is a separate tape patch, not paper. Subdivision lines are not extra creases.
- 0. Prepare and mark the square
- 1. Cut four stopped slits
- 2. Fold the top vane tip
- 3. Fold the right vane tip
- 4. Fold the bottom vane tip
- 5. Fold the left vane tip
- 6. Fasten the four tips
PREPARATION · Original flat pinwheel adaptation; see source notes
Prepare and mark the square
Lay the square flat with level edges. Lightly draw both diagonals to locate the center. On each diagonal, mark a stop point 3/4 inch horizontally and 3/4 inch vertically from the center. These four points form a small square around the center.
Layers: One uncut square. Keep the separate tape patch aside.
Check: The four stop points are equally spaced around the center; none is at the center.
Explore this step ↑STEP 1 · Original flat pinwheel adaptation; see source notes
Cut four stopped slits
Cut from each outer corner toward the center along its diagonal. Stop at the corresponding marked point. Do not connect the cuts or remove any paper.
Layers: Cut one layer at each corner. Leave the central square and all four vane roots joined.
Check: Four slits release alternate corner tips; the sheet is still one connected piece.
Explore this step ↑STEP 2 · Original flat pinwheel adaptation; see source notes
Fold the top vane tip
Find the midpoint of the top edge. On the upper-right slit, mark the point 1 1/2 inches horizontally and vertically from the center. Fold the top vane’s right-hand tip inward on the straight line joining these two marks, until the tip meets the center. Press flat.
Layers: Move only the top side of the upper-right slit. Leave the right side of that slit on the table.
Check: The tip is at the center. A triangular flap lies above and to the right of the center.
Explore this step ↑STEP 3 · Original flat pinwheel adaptation; see source notes
Fold the right vane tip
Turn your attention clockwise to the right edge without turning the sheet. Join its midpoint to the point 1 1/2 inches from both center axes on the lower-right slit. Fold the right vane’s lower tip to the center along this line.
Layers: Move only the right side of the lower-right slit. Keep the first folded triangle in place.
Check: Two alternate tips meet at the center, with no tip laid over the other.
Explore this step ↑STEP 4 · Original flat pinwheel adaptation; see source notes
Fold the bottom vane tip
Join the bottom-edge midpoint to the matching 1 1/2-inch mark on the lower-left slit. Fold the bottom vane’s left tip to the center. Press the new diagonal crease.
Layers: Move only the bottom side of the lower-left slit. The other vanes stay still.
Check: Three pointed triangular flaps now meet at the center.
Explore this step ↑STEP 5 · Original flat pinwheel adaptation; see source notes
Fold the left vane tip
Join the left-edge midpoint to the matching 1 1/2-inch mark on the upper-left slit. Fold the left vane’s upper tip inward to the center and press flat.
Layers: Move only the left side of the upper-left slit. Leave its upper side unfolded.
Check: All four alternate tips meet at one center, surrounded by four broad vanes.
Explore this step ↑STEP 6 · Original flat pinwheel adaptation; see source notes
Fasten the four tips
Hold all four tips at the center. Center the 1 × 1-inch tape patch over their meeting point, adhesive side down, with its edges parallel to the original square. Press it onto all four triangular flaps.
Layers: The tape is a separate fastener spanning all four tips. No extra paper appears and no pin is inserted.
Check: All four tips extend beneath the patch. The flat decoration is complete. Keep it as a flat display; it has no axle and is not intended to spin in wind.
Explore this step ↑
Sources & notes
Just Fold Paper; construction comparison: wikiHow / Amy Guerrero, Original flat adaptation; comparison with How to Make a Pinwheel (2026; reference updated May 11, 2025).
Curved pinwheel construction comparison ↗
This flat crease-and-tape construction, its exact landmarks, text, diagrams and code are independently authored. The linked article is a construction comparison, not a license for its text or images. No source photographs, illustrations or wording are reproduced. The inventor of the general cut pinwheel is not established here; no public-domain or project-wide reuse license is asserted.
Adaptation: Retains the familiar square, four stopped diagonal slits and alternate-corner arrangement. Unlike the linked curved, overlapping, pin-mounted spinner, this original flat adaptation makes four straight 180-degree creases, brings the four tips exactly to the center without overlapping one another, and secures them with a one-inch tape patch. Each slit stops three-quarters of an inch away from each center axis (about 1.06 inches from the center along the diagonal). It has no axle or rotating demonstration; decorative rotation and adhesive retention have not been physically tested.
Original instructions and diagrams, made with AI assistance. About & reuse
Accuracy notes
Real-paper follow-along and paper weight have not been tested. Diagrams illustrate the sequence, not paper thickness, contact, collisions or exact layer visibility. One connected 36-square-inch paper sheet is tracked through explicit cut seams and four rigid single-layer hinges. A separate tape patch translates onto the final tips. Zero-thickness material, seam and sampled contact checks are engineering evidence only. Paper thickness, adhesive strength and physical folding or rotation have not been verified.