 Just Fold Paper
Fold & assemble
Folded Paper Sled Kite
Build a small tethered kite with raised side panels, two lightweight spars, a two-leg bridle, flying string and twin paper tails. This original measured construction has not been flight-tested.
Preparation + 9 numbered steps
Materials
US Letter sail · 8.5 × 11 inches
One 8.5 × 11-inch sheet of light paper (about 60–80 gsm); two prepared 10-inch lightweight bamboo spars about 1/16 inch thick with blunt ends; two prepared 1/2 × 11-inch tissue-paper tail strips; clear tape about 1/2 inch wide; 30 inches of thin cotton bridle string; a separate 6-foot cotton flying line; ruler, pencil and scissors for tape/string. An adult should prepare and blunt the spars. Do not substitute heavy pencils or sharp skewers.
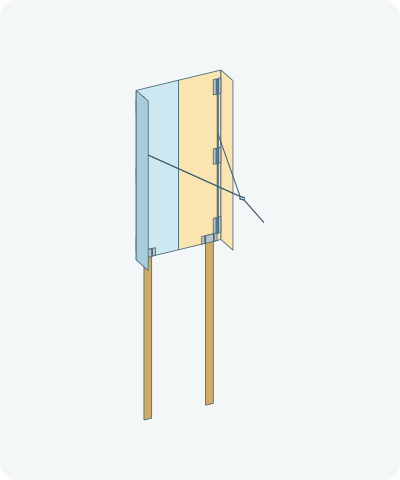
Drag to rotate · swipe sideways on touch.
Arrow keys rotate when focused.
Follow along
PreparationThe interactive guide needs JavaScript. Read every illustrated step below.
Help · controls & diagram
Play or drag the progress slider to watch a fold from 0% to 100%. Use the view buttons or drag the diagram to look from another angle.
Blue and gold track the original sail halves; darker colors show the reverse. Brown strips are separate spars, gray patches are tape, and dark lines are string. The complete tail strips are separate paper. Knot details are schematic; read the tying instructions.
With the diagram focused: Space plays or pauses, ←/→ change steps, and Home resets.
Every step, at a glance
Compare your paper with each diagram after completing the action. Blue and gold track the original sail halves; darker colors show the reverse. Brown strips are separate spars, gray patches are tape, and dark lines are string. The complete tail strips are separate paper. Knot details are schematic; read the tying instructions.
- 0. Prepare and mark the sail
- 1. Raise the right side panel
- 2. Raise the left side panel
- 3. Tie the two bridle ends to the spars
- 4. Tape the right spar onto the front
- 5. Tape the left spar onto the front
- 6. Measure and tie the central bridle loop
- 7. Attach the flying string
- 8. Tape on both paper tails
- 9. Check the completed kite
PREPARATION · Original rectangular two-spar construction
Prepare and mark the sail
Lay the Letter sheet portrait, with its front facing you. Mark lines 1.5 inches inward from each long edge. Mark a small dot 4 inches down from the top on each line 1.75 inches inward from a long edge; these two dots locate the spar ties. Keep the 10-inch spars, string and two tail strips separate.
Layers: One uncut rectangular sail; the tail strips are additional prepared paper.
Check: The fold lines are 5.5 inches apart; the tie dots are 5 inches apart.
Explore this step ↑STEP 1 · Original rectangular two-spar construction
Raise the right side panel
Hold a ruler on the right fold line. Lift the 1.5-inch-wide right strip toward you, crease its base, and leave it at a right angle to the center sail.
Layers: Move the complete right strip only; the wide center stays flat.
Check: A straight wall stands along the right side.
Explore this step ↑STEP 2 · Original rectangular two-spar construction
Raise the left side panel
Lift the matching left strip toward you along its marked line. Crease and leave it at a right angle too. The sail now resembles a shallow open channel.
Layers: Move only the left strip. Keep the right wall and center still.
Check: Both walls are 1.5 inches high, with the same front face inside the channel.
Explore this step ↑STEP 3 · Original rectangular two-spar construction
Tie the two bridle ends to the spars
Use one 30-inch piece of cotton string. On each spar mark a point 3.5 inches from its top. Wrap one string end around that mark, cross the short end over the long part, pass it through the resulting loop and pull snug. Repeat this half hitch once more around the long part. Leave a 1-inch short end. Tie the other string end to the second spar in the same way. A tiny tape wrap over each knot keeps it from sliding along the spar.
Layers: The string and spars are separate accessories. Tie both ends before placing the spars on the sail.
Check: Each spar has two tightened half hitches at its mark. The long string joins the two spars.
Explore this step ↑STEP 4 · Original rectangular two-spar construction
Tape the right spar onto the front
Place the right spar inside the channel, parallel to and 1/4 inch inward from the right fold. Leave 1/2 inch between each spar end and the corresponding sail edge. Its tie sits on the right dot, 4 inches below the sail top. Press three 1-inch-long pieces of 1/2-inch-wide tape lengthwise over the spar near its top, middle and bottom. Press both long tape edges onto the sail; stop at the side fold without crossing it. Keep the bridle free above the sail.
Layers: Add one separate spar and its fastening tape. Do not flatten the side wall.
Check: The full 10-inch spar is supported; the tie is between tape patches.
Explore this step ↑STEP 5 · Original rectangular two-spar construction
Tape the left spar onto the front
Place the second spar symmetrically, 1/4 inch inward from the left fold, with its tie on the left dot. Tape it down with three matching pieces. Pull the joining string gently forward so it is not trapped under tape.
Layers: Add the second spar; the sheet and first spar stay still.
Check: The spars are parallel, 5 inches apart, and both ties are at the same height.
Explore this step ↑STEP 6 · Original rectangular two-spar construction
Measure and tie the central bridle loop
Measure 8 inches of free string from each spar tie toward the middle. Pinch the two 8-inch marks together; any remaining string makes a small doubled loop beyond them. Holding both strands together at the marks, make a loop in the doubled string, pass its folded end through that loop, and tighten an overhand loop knot. Keep the two free legs equal. Undo and retie if either leg is shorter.
Layers: Two equal free legs run from the spar ties to one central knot; the small loop projects beyond it.
Check: Each free leg measures 8 inches from its spar to the central knot. The loop is on the open, front side of the sail.
Explore this step ↑STEP 7 · Original rectangular two-spar construction
Attach the flying string
Pass one end of the separate 6-foot flying line through the small central bridle loop. Wrap that end around the long flying line, pass it through the new loop and tighten; repeat for a second half hitch. Leave a 1-inch end. Wind the unused flying line onto a small piece of scrap card held in your hand. The diagram shows only its first short section.
Layers: The flying line is separate from the bridle. Do not tie it directly to the paper or only one spar.
Check: A gentle pull loads both bridle legs equally; neither knot slides.
Explore this step ↑STEP 8 · Original rectangular two-spar construction
Tape on both paper tails
Place the top 1/2 inch of each prepared 1/2 × 11-inch tissue strip over the bottom of the center sail. Center each tail 1/2 inch inward toward the middle from its nearest spar, so the tails are 4 inches apart. Secure each overlap with a 1-inch piece of tape across it; press the tape ends onto the sail on either side of the tail. Let the remaining 10.5 inches hang freely below the bottom edge.
Layers: Two additional complete paper strips; do not cut tails from the sail.
Check: Both tails have the same overlap and free length. They are not knotted together.
Explore this step ↑STEP 9 · Original rectangular two-spar construction
Check the completed kite
Check the two right-angle side folds, six spar tape patches, equal 8-inch bridle legs, tightened knots, separate flying line and two tails. Hold the line so the open channel and bridle face you. This is a complete experimental kite construction; its flight is untested. If trying it outdoors, use a clear open area in light wind, away from roads, people, trees and power lines. Never fly in a storm, and never wind string around fingers.
Layers: All paper and accessories remain attached as taught; no extra fold or hidden fastener is required.
Check: Stop if the sail tears, tape peels or a knot slips. No flight height, stability or wind-range claim is made.
Explore this step ↑
Sources & notes
Just Fold Paper, Original measured rectangular sled construction; general kite background from NASA Glenn (2026).
NASA Glenn: kite types, frames and flying lines ↗
The rectangular proportions, folded side panels, spar placements, assembly sequence, English instructions and diagrams were authored for this guide. Sled kites and two-leg bridles are established general mechanisms; no claim to inventing them is made. NASA is background information, not evidence that this particular design flies. No external photographs, plans or wording are reproduced; no project-wide reuse license is implied.
Adaptation: An original Letter-paper construction, not the MBK 1-Skewer Sled or an airplane variant. Two 1.5-inch side panels stand at right angles to a 5.5-inch center sail. Two 10-inch spars sit on the front, 1.75 inches from the original long edges. The bridle is tied around the spars before taping them down; no holes in the sail are required. Two equal 8-inch free bridle legs meet above a point 4 inches below the top. Knot allowances, a separate flying line and two complete 11-inch tails are explicitly supplied.
Original instructions and diagrams, made with AI assistance. About & reuse
Accuracy notes
Real-paper follow-along and paper weight have not been tested. Diagrams illustrate the sequence, not paper thickness, contact, collisions or exact layer visibility. Rigid sail panels retain their original material and continuous hinges. Spars, tape, tail strips and the bridle have separate identities. Assembly is a teaching placement animation; small knot loops and the remaining coiled flying line are schematic, not a rope-physics simulation. Flight, stability, spar strength, tape adhesion, knot security and real-paper follow-along have not been physically tested. Do not infer aerodynamic performance from the preview.