 Just Fold Paper
Cut & fold
Cut-and-fold Paper Giraffe
Draw one connected giraffe outline, cut two leg slits and bend four real leg tabs to opposite sides. The long neck and small horned head identify the animal without drawn spots.
Preparation + 8 numbered steps
Materials
Light card rectangle · 6 × 9 inches
One 6 × 9-inch rectangle (15.24 × 22.86 cm) of light card, about 160–200 gsm; ruler, pencil, scissors and a protractor. No glue or separate pieces. Adult help for the small horn cuts. The suggested card weight and standing stability have not been physically tested.
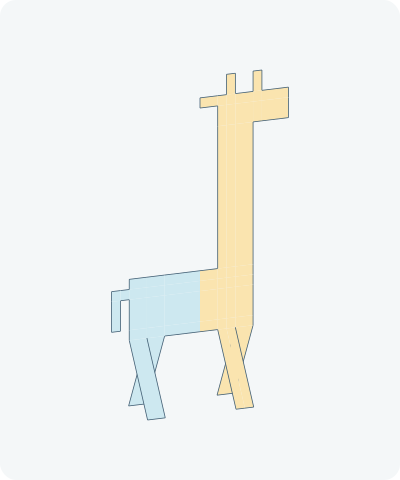
Drag to rotate · swipe sideways on touch.
Arrow keys rotate when focused.
Follow along
PreparationThe interactive guide needs JavaScript. Read every illustrated step below.
Help · controls & diagram
Play or drag the progress slider to watch a fold from 0% to 100%. Use the view buttons or drag the diagram to look from another angle.
Blue and gold track the original left and right parts of one sheet. Gray is discarded card. Orange marks cuts or the moving leg and hinge. Cutting is a tracing schematic; folds show continuous rigid paper motion. No spots or eyes are needed.
With the diagram focused: Space plays or pauses, ←/→ change steps, and Home resets.
Every step, at a glance
Compare your paper with each diagram after completing the action. Blue and gold track the original left and right parts of one sheet. Gray is discarded card. Orange marks cuts or the moving leg and hinge. Cutting is a tracing schematic; folds show continuous rigid paper motion. No spots or eyes are needed.
- 0. Mark the body and long neck
- 1. Complete the measured outline
- 2. Cut out the connected giraffe
- 3. Split the two leg blanks
- 4. Bend the outer rear leg forward
- 5. Bend the inner rear leg backward
- 6. Bend the inner front leg forward
- 7. Bend the outer front leg backward
- 8. Present the complete giraffe
PREPARATION · Original measured cut-and-fold design
Mark the body and long neck
Place the 6-inch edge horizontally. All measurements are inches from the bottom-left corner: x goes right, y goes up. Lightly draw a torso rectangle from (1, 2.5) to (4.5, 4), and a neck rectangle from (3.5, 4) to (4.5, 7.5). Keep their shared edge uncut. The diagrams are not full-size templates.
Layers: One flat 6 × 9-inch rectangle. Draw shapes on the same sheet, not separate pieces.
Check: The neck is 3.5 inches long above the 1.5-inch-high torso.
Explore this step ↑STEP 1 · Original measured cut-and-fold design
Complete the measured outline
Add these rectangles by opposite corners: head (3.5, 7.5)–(5.5, 8.25); horns (3.75, 8.25)–(4, 8.75) and (4.5, 8.25)–(4.75, 8.75); ear (3, 8)–(3.5, 8.25); rear leg blank (1, 0.5)–(2, 2.5); front leg blank (3.5, 0.5)–(4.5, 2.5); tail top (0.5, 3.5)–(1, 3.75); tail drop (0.5, 2.75)–(0.75, 3.5). Trace only the outside boundary of this joined shape. Erase internal rectangle edges except the two hip lines at y = 2.5.
Layers: Every rectangle joins an adjoining rectangle along an edge; none is pasted on.
Check: One connected outline has two broad leg blanks, a tall neck, a right-pointing head and two small horns.
Explore this step ↑STEP 2 · Original measured cut-and-fold design
Cut out the connected giraffe
Cut around the outside outline, including between the horns and between the two leg blanks. Discard the surrounding gray card. Do not cut the neck root, the head connection, either hip line or the tail joints. Work slowly around the small head details.
Layers: One retained piece plus discarded scraps. The fading gray area is a cutting schematic, not a folding motion.
Check: The head, neck, torso, tail and both broad leg blanks are still one piece.
Explore this step ↑STEP 3 · Original measured cut-and-fold design
Split the two leg blanks
Cut straight upward from (1.5, 0.5) to (1.5, 2.5), then from (4, 0.5) to (4, 2.5). Stop precisely at the hip lines. Each 1-inch-wide blank becomes two 0.5-inch-wide legs. Do not extend either slit into the torso.
Layers: Four single-layer tabs remain joined along their top edges. No strip is removed by these slits.
Check: There are four separate 2-inch-long leg tabs, each with an uncut half-inch hip.
Explore this step ↑STEP 4 · Original measured cut-and-fold design
Bend the outer rear leg forward
Hold the torso flat with the head pointing right. Bend the far-left leg tab, x = 1 to 1.5, toward you along its horizontal hip at y = 2.5. Use a protractor to stop at 25 degrees from the original sheet plane.
Layers: Move only that half-inch-wide rear tab; keep the adjacent rear tab and torso still.
Check: The tab projects toward you, with its full hip edge still attached.
Explore this step ↑STEP 5 · Original measured cut-and-fold design
Bend the inner rear leg backward
Bend the adjacent rear tab, x = 1.5 to 2, away from you by 25 degrees at the same hip height. Do not bend both tabs together.
Layers: Move only the second rear tab. The first tab stays forward.
Check: The rear pair opens to opposite sides of the torso.
Explore this step ↑STEP 6 · Original measured cut-and-fold design
Bend the inner front leg forward
At the front of the body, bend the tab from x = 3.5 to 4 toward you by 25 degrees on its hip at y = 2.5. Match the first rear leg.
Layers: Move one front tab only; keep the long neck straight.
Check: The two forward legs have equal length and equal fold angles.
Explore this step ↑STEP 7 · Original measured cut-and-fold design
Bend the outer front leg backward
Bend the remaining tab, x = 4 to 4.5, away from you by 25 degrees. Match the rear backward leg. Keep the head, horns and neck in the original plane.
Layers: Move only the last single-layer leg tab.
Check: Four actual legs extend on alternating sides; no legs are drawn onto the torso.
Explore this step ↑STEP 8 · Original measured cut-and-fold design
Present the complete giraffe
Hold the torso upright, with the neck above the body and the four feet below. Try resting all four lower leg edges on a level surface; recheck equal angles if it rocks. Do not add a crease through the neck. The cut horns, projecting muzzle, long neck and four legs complete the giraffe without spots.
Layers: One connected cut-and-fold model. This display check adds no fold.
Check: All four mathematical foot edges are level. Real-card standing balance and crease retention have not been tested.
Explore this step ↑
Sources & notes
Just Fold Paper, Original split-leg giraffe construction (2026).
Original measured construction below ↗
This measured cut-and-fold design, English instructions and diagrams were authored for Just Fold Paper with AI assistance. No external design, photos, diagrams or prose were copied. It is not attributed as traditional origami. No project-wide reuse license is granted.
Adaptation: An original rectilinear cut-paper animal, not a reconstruction of a traditional folded giraffe. The neck, muzzle, horns and tail are cut silhouette features. Two broad leg blanks are each slit into two tabs, then folded 25 degrees in opposed directions. All four tabs stay connected to the same torso. Cuts are schematic traces with fading scraps; the retained material does not stretch or teleport. Physical folding and balance remain untested.
Original instructions and diagrams, made with AI assistance. About & reuse
Accuracy notes
Real-paper follow-along and paper weight have not been tested. Diagrams illustrate the sequence, not paper thickness, contact, collisions or exact layer visibility. Tracks the entire 54-square-inch rectangle, including discarded scraps, in immutable material coordinates. Only the four cut-released leg tabs rotate; their complete hip edges remain attached. Single-layer, zero-thickness panels. The leg slits release otherwise incompatible seams, and the four equal leg folds give a common mathematical floor. This is not a paper-thickness, crease-retention or physical stability certificate.