 Just Fold Paper
Cut & fold
Cut-and-fold Collared Shirt
A flat shirt decoration with a folded collar and sloping shoulders. Watch each action, follow the complete illustrated instructions or print the one-page diagrams.
Preparation + 7 numbered steps
Materials
US Letter · Cut & fold · 8.5 × 11 inches
One portrait US Letter sheet, 8.5 × 11 inches (21.59 × 27.94 cm), ruler, pencil and scissors. Optional pen for buttons. No glue is needed for the shirt itself.
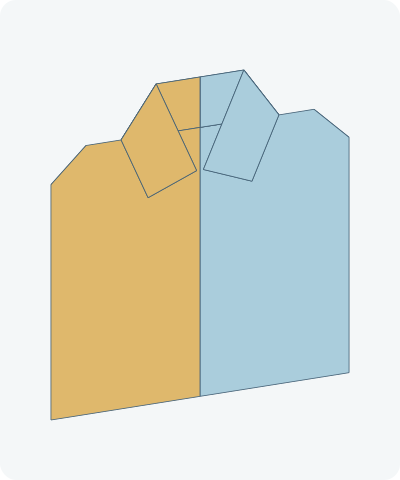
Drag to rotate · swipe sideways on touch.
Arrow keys rotate when focused.
Follow along
PreparationThe interactive guide needs JavaScript. Read every illustrated step below.
Help · controls & diagram
Play or drag the progress slider to watch a fold from 0% to 100%. Use the view buttons or drag the diagram to look from another angle.
Blue and gold identify the original left and right halves, not the literal colors of your paper. Darker shades show the reverse. Orange marks moving paper and its hinge.
With the diagram focused: Space plays or pauses, ←/→ change steps, and Home resets.
Every step, at a glance
Compare your paper with each diagram after completing the action. Blue and gold identify the original left and right halves, not the literal colors of your paper. Darker shades show the reverse. Orange marks moving paper and its hinge.
- 0. Prepare a portrait sheet
- 1. Fold the top band
- 2. Cut the two collar slits
- 3. Turn the sheet over
- 4. Fold the right collar
- 5. Fold the left collar
- 6. Slope the right shoulder
- 7. Slope the left shoulder
PREPARATION · Linked complete photographic construction
Prepare a portrait sheet
Place the rectangle with its short edge at the top and the reverse side facing you.
Layers: One sheet.
Check: It measures 8.5 inches across and 11 inches tall.
Explore this step ↑STEP 1 · Linked complete photographic construction
Fold the top band
Measure 1.5 inches down from the top. Fold the top strip toward you along that line.
Layers: Move the full top strip.
Check: The band is 1.5 inches deep, and its free edge lies 3 inches below the original top.
Explore this step ↑STEP 2 · Linked complete photographic construction
Cut the two collar slits
On the lower edge of the folded band, mark 2 inches inward from each side. Cut from each outer edge to its mark, through the backing sheet along the band edge. Stop at the marks.
Layers: Cut two horizontal slits only. Do not cut across the central connection or remove a piece.
Check: The band ends can move independently of the shoulders below them.
Explore this step ↑STEP 3 · Linked complete photographic construction
Turn the sheet over
Turn the whole sheet from side to side.
Layers: Keep the hem folded on the back.
Check: The plain front faces you, with a slit on each side.
Explore this step ↑STEP 4 · Linked complete photographic construction
Fold the right collar
On the shortened top edge, mark a point 3 inches in from the right. Fold the right band end inward on the diagonal from this point to the inner end of the right slit.
Layers: Move both layers of the band above the slit. Leave the shoulder below the slit still.
Check: A doubled collar flap points down toward the center.
Explore this step ↑STEP 5 · Linked complete photographic construction
Fold the left collar
Make the matching mark 3 inches from the left along the top edge. Fold from that mark to the inner end of the left slit.
Layers: Move both layers of the left band end only.
Check: Two collar flaps frame a small central neck opening.
Explore this step ↑STEP 6 · Linked complete photographic construction
Slope the right shoulder
Below the right slit, mark 1 inch inward along the shoulder edge and 1 inch down the side. Fold the small corner away from you along the diagonal between these marks.
Layers: Move only the body corner below the cut; leave the collar still.
Check: The right shoulder slopes down from the collar.
Explore this step ↑STEP 7 · Linked complete photographic construction
Slope the left shoulder
Repeat the 1-inch diagonal corner fold behind the left shoulder. Press the finished shirt flat. Add drawn buttons if you wish.
Layers: Move only the body corner below the left slit.
Check: The complete flat shirt has two collar flaps, sloped shoulders and a straight lower edge.
Explore this step ↑
Sources & notes
Origami Instructions, Origami Instructions: Cut-and-fold Collared Shirt (web tutorial).
Photographic construction reference ↗
The reference does not identify the model designer or grant a design-reuse license. Traditional authorship is not established here. Its photographs and prose are protected and are not reproduced. These explanatory words, geometry and drawings are independently authored; no project-wide reuse license is implied.
Adaptation: Uses the source’s complete cut-and-fold shirt; the separate tie and greeting-card assembly are not included. The hem is 1.5 inches, each slit is 2 inches. Collar hinges run from the inner slit ends to points 3 inches inward along the shortened top edge. Shoulder triangles have 1-inch legs. These exact collar/shoulder landmarks are authored choices for the source’s approximate shaping.
Original instructions and diagrams, made with AI assistance. About & reuse
Accuracy notes
Real-paper follow-along and paper weight have not been tested. Diagrams illustrate the sequence, not paper thickness, contact, collisions or exact layer visibility. Material coordinates track the original sheet throughout the construction. Folded panels move about continuous hinges; cut seams are identified explicitly. Zero-thickness diagrams do not simulate paper thickness or prove physical foldability. Real-paper folding has not been tested.