 Just Fold Paper
Fold only
Flat Origami Witch Hat
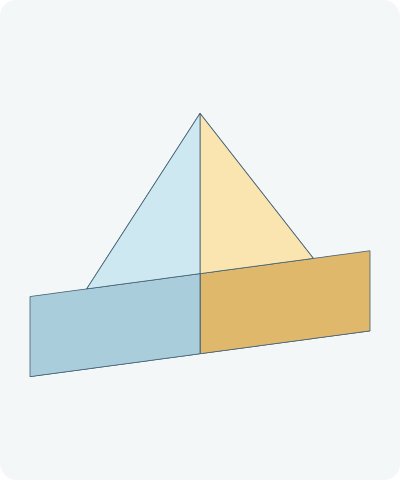
A pointed crown above a broad reverse-side brim. Follow every fold, compare the front and back, and finish a small flat paper decoration.
Preparation + 9 numbered steps
Materials
6-inch square · 6 × 6 inches
One 6 × 6-inch square (15.24 × 15.24 cm) of thin origami paper. Ruler and pencil for the marked shaping folds; optional pen for decoration. No scissors or glue.
Drag to rotate · swipe sideways on touch.
Arrow keys rotate when focused.
Follow along
PreparationThe interactive guide needs JavaScript. Read every illustrated step below.
Help · controls & diagram
Play or drag the progress slider to watch a fold from 0% to 100%. Use the view buttons or drag the diagram to look from another angle.
Blue and gold identify the original left and right halves, not the literal colors of your paper. Darker shades show the reverse. Orange marks moving paper and its hinge.
With the diagram focused: Space plays or pauses, ←/→ change steps, and Home resets.
Every step, at a glance
Compare your paper with each diagram after completing the action. Blue and gold identify the original left and right halves, not the literal colors of your paper. Darker shades show the reverse. Orange marks moving paper and its hinge.
- 0. Prepare the square
- 1. Crease across the middle
- 2. Open the square
- 3. Make the brim band
- 4. Turn to the plain face
- 5. Crease the vertical center
- 6. Open the rectangle
- 7. Shape the right crown
- 8. Shape the left crown
- 9. Show the finished hat
PREPARATION · Source-linked flat decoration
Prepare the square
Place the square with horizontal top and bottom edges. Use dark paper on both sides if you want a single-color hat.
Layers: One flat sheet.
Check: All four corners are square.
Explore this step ↑STEP 1 · Source-linked flat decoration
Crease across the middle
Bring the bottom edge up to the top edge and press the fold.
Layers: Move the complete lower half.
Check: The horizontal edges coincide.
Explore this step ↑STEP 2 · Source-linked flat decoration
Open the square
Lower the folded half fully.
Layers: Open the same half.
Check: A horizontal center crease remains.
Explore this step ↑STEP 3 · Source-linked flat decoration
Make the brim band
Bring the bottom edge up to the center crease. The fold is 1.5 inches above the original bottom edge.
Layers: Fold the lower quarter of the sheet.
Check: The free edge rests on the center line.
Explore this step ↑STEP 4 · Source-linked flat decoration
Turn to the plain face
Turn the entire paper over from side to side. Keep the band at the bottom.
Layers: Carry the band with the whole sheet.
Check: The folded band is now underneath.
Explore this step ↑STEP 5 · Source-linked flat decoration
Crease the vertical center
Bring the right edge across to the left edge.
Layers: Fold the entire packet, including the band.
Check: The top corners meet.
Explore this step ↑STEP 6 · Source-linked flat decoration
Open the rectangle
Return the right half to its original position.
Layers: Open the complete packet.
Check: The vertical center marks the midpoint of the top edge.
Explore this step ↑STEP 7 · Source-linked flat decoration
Shape the right crown
Fold the upper right corner inward. The hinge joins the top midpoint to the lower right corner of the shortened rectangle.
Layers: Move the front corner only. Keep the reverse-side brim band flat.
Check: A long sloping edge runs down from the top midpoint.
Explore this step ↑STEP 8 · Source-linked flat decoration
Shape the left crown
Repeat on the left, joining the top midpoint to the lower left corner.
Layers: Move the left front corner; leave the reverse brim still.
Check: The crown is a centered triangle.
Explore this step ↑STEP 9 · Source-linked flat decoration
Show the finished hat
Turn the complete model over. Smooth the folds for a flat display.
Layers: Turn all layers together.
Check: A broad straight brim sits below a pointed crown.
Explore this step ↑
Sources & notes
Traditional model family; photographic tutorial by Origami Guide, Origami Guide: Flat Origami Witch Hat (web tutorial).
Reference photographs and instructions ↗ · Source attribution and copyright information ↗
Origami Guide labels the reference Traditional. That attribution is separate from rights in its photographs and text. No reference photographs, diagrams or prose are reproduced here. These instructions, geometry and drawings are original; no project-wide reuse license is implied.
Adaptation: Uses the flat square-paper hat, not the separately authored pointy hat. Each paired fold is shown separately. The crown hinges join the top midpoint to the lower corners of the shortened rectangle. This is a small flat decoration, not a wearable hat.
Original instructions and diagrams, made with AI assistance. About & reuse
Accuracy notes
Real-paper follow-along and paper weight have not been tested. Diagrams illustrate the sequence, not paper thickness, contact, collisions or exact layer visibility. Rigid-axis teaching folds retain the material coordinates of one uncut square. Exact shaping landmarks are authored adaptations. Zero-thickness diagrams do not simulate paper thickness or prove physical foldability. Real-paper folding has not been tested.