 Just Fold Paper
Fold only
Two-Sheet Origami Cat
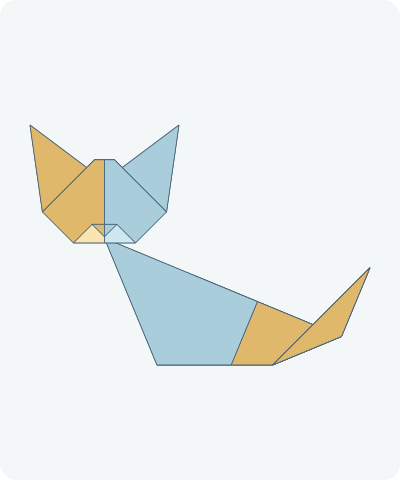
Fold a smaller head and a separate kite-base body, then place them together to make a complete flat cat with a raised tail. This guide uses the source’s simple flat option.
Preparation + 24 numbered steps
Materials
6-inch body square + 4.5-inch head square · 6 × 6 inches
Two thin squares: 6 × 6 inches (15.24 cm) for the body and 4.5 × 4.5 inches (11.43 cm) for the head. Ruler and pencil for shaping marks; optional pen for eyes and whiskers. No cuts or glue for this flat arrangement.
Drag to rotate · swipe sideways on touch.
Arrow keys rotate when focused.
Follow along
PreparationThe interactive guide needs JavaScript. Read every illustrated step below.
Help · controls & diagram
Play or drag the progress slider to watch a fold from 0% to 100%. Use the view buttons or drag the diagram to look from another angle.
Blue and gold track the original left and right halves of each separate sheet. Darker shades show the reverse. Orange highlights moving paper. Head-only and body-only diagrams are focus views; the set-aside sheet is preserved.
With the diagram focused: Space plays or pauses, ←/→ change steps, and Home resets.
Every step, at a glance
Compare your paper with each diagram after completing the action. Blue and gold track the original left and right halves of each separate sheet. Darker shades show the reverse. Orange highlights moving paper. Head-only and body-only diagrams are focus views; the set-aside sheet is preserved.
- 0. Prepare the two squares
- 1. Head: crease the vertical center
- 2. Head: open the first crease
- 3. Head: crease horizontally
- 4. Head: open the cross creases
- 5. Head: lower the top point
- 6. Head: fold down the upper half
- 7. Head: lower the right corner
- 8. Head: lower the left corner
- 9. Head: flatten the forehead
- 10. Head: lift the right ear
- 11. Head: lift the left ear
- 12. Head: turn to the face
- 13. Head: raise the chin
- 14. Head: lower the nose tip
- 15. Body: take the larger square
- 16. Body: crease horizontally
- 17. Body: reopen the diamond
- 18. Body: fold the upper edge in
- 19. Body: fold the lower edge in
- 20. Body: close the kite
- 21. Body: raise the tail
- 22. Level the body
- 23. Place the head over the neck
- 24. Finish the full cat
PREPARATION · Make-Origami Easy Cat, flat two-sheet option
Prepare the two squares
Use a 4.5-inch square for the head and a separate 6-inch square for the body. Place both light side up. The next diagrams focus on the smaller head sheet; keep the body sheet aside.
Layers: Two separate uncut squares.
Check: The head sheet has three quarters of the body sheet’s side length.
Explore this step ↑STEP 1 · Make-Origami Easy Cat, flat two-sheet option
Head: crease the vertical center
Bring the right point of the smaller diamond to its left point.
Layers: Move the whole right half of the head sheet.
Check: The side points meet.
Explore this step ↑STEP 2 · Make-Origami Easy Cat, flat two-sheet option
Head: open the first crease
Unfold completely.
Layers: Return the same half.
Check: The head sheet is flat again.
Explore this step ↑STEP 3 · Make-Origami Easy Cat, flat two-sheet option
Head: crease horizontally
Bring its top point down to the bottom point.
Layers: Move the complete upper half.
Check: The top and bottom points meet.
Explore this step ↑STEP 4 · Make-Origami Easy Cat, flat two-sheet option
Head: open the cross creases
Unfold completely.
Layers: Return the same half.
Check: Two creases meet at the head-sheet center.
Explore this step ↑STEP 5 · Make-Origami Easy Cat, flat two-sheet option
Head: lower the top point
Bring the top point to the center crossing.
Layers: Move the top corner only.
Check: A flat upper edge replaces the top point.
Explore this step ↑STEP 6 · Make-Origami Easy Cat, flat two-sheet option
Head: fold down the upper half
Fold the entire upper section down along the horizontal center crease.
Layers: Carry the first top flap along with the upper half.
Check: A broad triangle has a layered band across its top.
Explore this step ↑STEP 7 · Make-Origami Easy Cat, flat two-sheet option
Head: lower the right corner
Bring the right point down to the bottom point.
Layers: Carry both layers of the right corner, including the band.
Check: The old top edge lies along the center.
Explore this step ↑STEP 8 · Make-Origami Easy Cat, flat two-sheet option
Head: lower the left corner
Bring the left point to the same bottom point.
Layers: Carry the complete left packet.
Check: A small diamond has two loose corner packets below.
Explore this step ↑STEP 9 · Make-Origami Easy Cat, flat two-sheet option
Head: flatten the forehead
Fold the small top point down along a horizontal line 0.25 inches below it. Do this before lifting the ears.
Layers: Move the complete small upper corner.
Check: The forehead has a short level edge.
Explore this step ↑STEP 10 · Make-Origami Easy Cat, flat two-sheet option
Head: lift the right ear
Mark the center line 0.80 inches below the original top of the small diamond. Fold the right loose packet up along the line from this mark to the diamond’s right corner.
Layers: Move only the complete right corner packet.
Check: A pointed ear rises above the forehead.
Explore this step ↑STEP 11 · Make-Origami Easy Cat, flat two-sheet option
Head: lift the left ear
Use the same center mark and the left corner to mirror the ear fold.
Layers: Move only the complete left corner packet.
Check: The two pointed ears match.
Explore this step ↑STEP 12 · Make-Origami Easy Cat, flat two-sheet option
Head: turn to the face
Turn the entire smaller packet over from side to side.
Layers: Turn every head layer together.
Check: The ear return folds are behind the face.
Explore this step ↑STEP 13 · Make-Origami Easy Cat, flat two-sheet option
Head: raise the chin
On the face, fold the bottom point up along a horizontal line 2.39 inches below the original top of the small diamond.
Layers: Move the front lower triangle; keep the rear band still.
Check: A light muzzle rises above a level chin.
Explore this step ↑STEP 14 · Make-Origami Easy Cat, flat two-sheet option
Head: lower the nose tip
Fold the raised muzzle tip down along a horizontal line 1.91 inches below the original top of the small diamond.
Layers: Move only the raised muzzle tip.
Check: A small folded nose lies on the muzzle. Set the finished head aside.
Explore this step ↑STEP 15 · Make-Origami Easy Cat, flat two-sheet option
Body: take the larger square
Now use the separate 6-inch square, light side up, with a point to the right. The completed head is set aside, not unfolded.
Layers: Only the body sheet is shown in the next folding diagrams.
Check: The larger square starts completely flat.
Explore this step ↑STEP 16 · Make-Origami Easy Cat, flat two-sheet option
Body: crease horizontally
Bring the top point down to the bottom point.
Layers: Move the complete upper half of the body sheet.
Check: The left and right corners stay fixed.
Explore this step ↑STEP 17 · Make-Origami Easy Cat, flat two-sheet option
Body: reopen the diamond
Unfold completely.
Layers: Return the same upper half.
Check: A horizontal center crease remains.
Explore this step ↑STEP 18 · Make-Origami Easy Cat, flat two-sheet option
Body: fold the upper edge in
Bring the slope from the right point to the top point onto the horizontal center crease.
Layers: Move the whole upper corner flap.
Check: The long kite point stays on the right.
Explore this step ↑STEP 19 · Make-Origami Easy Cat, flat two-sheet option
Body: fold the lower edge in
Match the slope from the right point to the bottom point to the center crease.
Layers: Move the whole lower corner flap.
Check: Both folded edges meet in a right-pointing kite.
Explore this step ↑STEP 20 · Make-Origami Easy Cat, flat two-sheet option
Body: close the kite
Bring the upper half down over the lower half along the center crease.
Layers: Carry the upper half and its folded-in flap together. Leave the lower half still.
Check: A narrow triangular body has a long point on its right.
Explore this step ↑STEP 21 · Make-Origami Easy Cat, flat two-sheet option
Body: raise the tail
On the long closed top edge mark 2.33 inches right of the original center. Fold the pointed right packet up and left on a 45-degree line through this mark, rising to the right.
Layers: Carry all tail layers together. Use the source’s simple ordinary upfold; do not open or reverse the tail.
Check: The pointed tail rises on the right of the body.
Explore this step ↑STEP 22 · Make-Origami Easy Cat, flat two-sheet option
Level the body
Rotate the whole folded body clockwise by about 22.5 degrees, until its long lower edge is horizontal. This is handling, not a new crease.
Layers: Carry the entire body and tail together; the head stays aside.
Check: The body’s base is level and its tail points upward.
Explore this step ↑STEP 23 · Make-Origami Easy Cat, flat two-sheet option
Place the head over the neck
Slide the finished smaller head above the broad left end of the body. Overlap its chin slightly over the neck point. Keep the head on top of the body.
Layers: Move the whole separate head without opening its folds. Do not tuck or glue it.
Check: The two sheets form a complete flat cat; the raised tail remains visible.
Explore this step ↑STEP 24 · Make-Origami Easy Cat, flat two-sheet option
Finish the full cat
Keep the arrangement flat. Add optional eyes and whiskers to the head if you like.
Layers: No new fold. The head and body remain separate pieces and may move if lifted.
Check: Pointed ears, a folded muzzle, a full body and a raised tail complete the cat.
Explore this step ↑
Sources & notes
Make-Origami.com; model designer unestablished, Easy Origami Cat (undated photo tutorial).
Complete two-sheet cat photo tutorial ↗
The public tutorial does not establish the original designer or a design-reuse license. No reference photographs, prose or code are reproduced. These English instructions, material geometry and diagrams are original; no project-wide reuse license is implied.
Adaptation: Uses the explicitly offered flat option after source step 12/photo 17, before its optional reverse-fold tail and standing opening. The head sheet is exactly three quarters the body-sheet side length. Forehead shaping is moved before ear lifting so the ears are not accidentally carried; marked ear, muzzle and tail positions are authored ruler landmarks. The body is leveled after the tail rather than before it. Assembly places the complete finished head over the neck as a flat arrangement, without glue or hidden insertion; it is not mechanically locked. No standing or retention performance is promised.
Original instructions and diagrams, made with AI assistance. About & reuse
Accuracy notes
Real-paper follow-along and paper weight have not been tested. Diagrams illustrate the sequence, not paper thickness, contact, collisions or exact layer visibility.