 Just Fold Paper
Fold only
Traditional Origami Swan
Make a traditional swan from one square. Narrow the paper, fold a short head, then gently lift the neck and beak while holding both sides together.
Preparation + 13 numbered steps
Materials
6-inch square · 6 × 6 inches
One 6 × 6-inch square (15.24 × 15.24 cm), preferably thin origami paper. A ruler and pencil help mark the head fold. No cuts or glue.
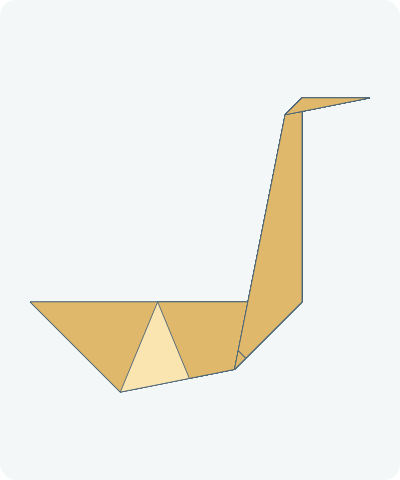
Drag to rotate · swipe sideways on touch.
Arrow keys rotate when focused.
Follow along
PreparationThe interactive guide needs JavaScript. Read every illustrated step below.
Help · controls & diagram
Play or drag the progress slider to watch a fold from 0% to 100%. Use the view buttons or drag the diagram to look from another angle.
Blue and gold track the original left and right halves of one sheet, not its front and back colors. Darker shades show the reverse. Orange marks ordinary folds.
With the diagram focused: Space plays or pauses, ←/→ change steps, and Home resets.
Every step, at a glance
Compare your paper with each diagram after completing the action. Blue and gold track the original left and right halves of one sheet, not its front and back colors. Darker shades show the reverse. Orange marks ordinary folds.
- 0. Prepare the diamond
- 1. Crease the center
- 2. Open the diamond
- 3. Fold the lower right edge
- 4. Complete the kite
- 5. Turn the kite over
- 6. Narrow the right side
- 7. Narrow the left side
- 8. Raise the long point
- 9. Rotate to the left
- 10. Fold the short head
- 11. Close the body behind
- 12. Lift the neck
- 13. Lift the beak and finish
PREPARATION · Traditional swan
Prepare the diamond
Place the square with a corner pointing down and the intended outside color facing down.
Layers: One uncut sheet.
Check: Top and bottom corners align vertically.
Explore this step ↑STEP 1 · Traditional swan
Crease the center
Bring the right corner to the left corner and match the edges. Press the vertical crease.
Layers: Move the entire right half.
Check: The top and bottom corners remain fixed.
Explore this step ↑STEP 2 · Traditional swan
Open the diamond
Open the same half all the way back to the table.
Layers: Keep the center crease.
Check: The sheet is square again.
Explore this step ↑STEP 3 · Traditional swan
Fold the lower right edge
Bring the lower right sloping edge to the center line. Press from the bottom tip upward.
Layers: Move the right corner flap.
Check: The old lower right edge follows the center crease.
Explore this step ↑STEP 4 · Traditional swan
Complete the kite
Bring the lower left edge to the center line beside the first edge.
Layers: Move the left corner flap.
Check: A long narrow point faces down.
Explore this step ↑STEP 5 · Traditional swan
Turn the kite over
Turn the whole kite over from side to side. Keep the long point down.
Layers: Turn every layer together.
Check: The smooth back faces you.
Explore this step ↑STEP 6 · Traditional swan
Narrow the right side
Bring the lower right edge to the center again, pinching all its layers together.
Layers: Carry the complete outer right packet, including the earlier flap.
Check: The new right crease ends at the long bottom tip.
Explore this step ↑STEP 7 · Traditional swan
Narrow the left side
Bring the matching lower left edge to the center. Press both sides flat.
Layers: Carry every layer in the left packet.
Check: The long point is now much narrower.
Explore this step ↑STEP 8 · Traditional swan
Raise the long point
Lift the bottom tip to meet the top tip. Fold across the halfway level.
Layers: Move all layers below the new crease.
Check: The long point lies over the upper body.
Explore this step ↑STEP 9 · Traditional swan
Rotate to the left
Rotate the whole flat model a quarter turn counterclockwise on the table.
Layers: Do not open or add any fold.
Check: Both aligned tips now point left.
Explore this step ↑STEP 10 · Traditional swan
Fold the short head
Measure from the left tip to the right folded base along the center line. Mark one quarter of that length from the tip (about 1.06 inches or 2.69 cm). Fold only the raised tip rightward at that mark.
Layers: Fold every layer of the raised tip; leave the back body point still.
Check: A short pointed flap faces right over the long neck.
Explore this step ↑STEP 11 · Traditional swan
Close the body behind
Fold the upper half away from you along the horizontal center line. Bring it behind the lower half.
Layers: Carry the body, neck and short head together.
Check: The two body halves align, with the neck on the outside.
Explore this step ↑STEP 12 · Traditional swan
Lift the neck
Hold the body and gently loosen its two sides. Lift the long neck until its center line is perpendicular to the body center line. Refold both lower neck creases together, then flatten.
Layers: Move both neck walls and all their inner layers together; the short head travels with them. The attachment changes its crease instead of tearing away from the body.
Check: The tail points left and the long neck stands upright in the side view.
Explore this step ↑STEP 13 · Traditional swan
Lift the beak and finish
Gently lift the short head outward. Refold both sides together until the beak center line is parallel to the body center line and points right. Flatten the model.
Layers: Adjust both head walls without pulling them off the neck.
Check: A pointed beak extends right from the upright neck. Your basic swan is complete.
Explore this step ↑
Sources & notes
Traditional design; Florent Fabre tutorial and Nick Robinson diagrams at Origami.me, How to Fold an Easy Origami Swan (undated web tutorial).
Traditional swan reference ↗ · Traditional swan photo crosscheck ↗
Both references identify the design as Traditional. Origami.me separately credits Florent Fabre for the tutorial and Nick Robinson for diagrams. Reference prose, photos, diagrams and printable files have separate rights and are not reproduced. These English instructions, numerical geometry, SVG diagrams and PDF are original; attribution does not grant a project-wide license.
Adaptation: Follows all ten operations in the current Origami.me body, despite its eight-step page title. Center reopening and paired folds are separated. The head crease is one quarter of the raised point-to-base length from the tip; the neck finishes perpendicular to the body center line and the beak parallel to it. These fixed landmarks are authored choices where the source allows adjustment. The swivels use a symmetric, slightly opened zero-thickness model with continuously shifting creases, carrying all layers together. Optional wing spreading and curved decorative shaping are omitted. Origami Guide corroborates the same neck/head sequence.
Original instructions and diagrams, made with AI assistance. About & reuse
Accuracy notes
Real-paper follow-along and paper weight have not been tested. Diagrams illustrate the sequence, not paper thickness, contact, collisions or exact layer visibility. A connected 36-square-inch sheet. Paired swivel walls share center rays while their creases move continuously; this is an idealized teaching motion, not a fixed-crease rigid linkage. Paper thickness and contact forces are not simulated. Real-paper folding and standing stability have not been tested.