 Just Fold Paper
Cut & fold
Flat Paper Seal
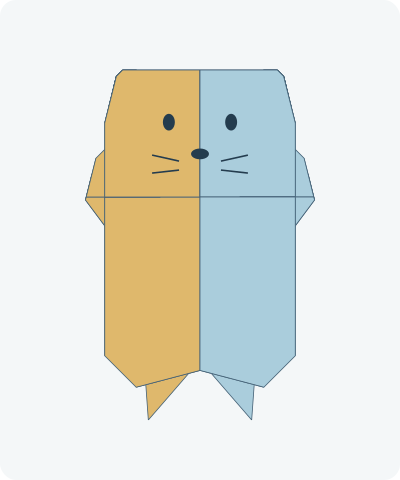
Make a flat upright seal with a broad head, two side flippers and a split hind-flipper end. One short scissors slit lets the two hind flippers fold independently. This is a cut-and-fold display model, not the fish-base seal or the earlier sea otter.
Preparation + 22 numbered steps
Materials
6-inch square · 6 × 6 inches
One 6 × 6-inch square (15.24 × 15.24 cm) of thin paper, a ruler, pencil and scissors. Optional pen for the face. Start with the intended finished color facing down. Help younger folders with the scissors. No glue.
Drag to rotate · swipe sideways on touch.
Arrow keys rotate when focused.
Follow along
PreparationThe interactive guide needs JavaScript. Read every illustrated step below.
Help · controls & diagram
Play or drag the progress slider to watch a fold from 0% to 100%. Use the view buttons or drag the diagram to look from another angle.
Blue and gold identify the original left and right halves. Darker shades show the reverse. Orange marks moving paper and its hinge. The red line in the cutting step is a real scissors slit; the final face is optional ink.
With the diagram focused: Space plays or pauses, ←/→ change steps, and Home resets.
Every step, at a glance
Compare your paper with each diagram after completing the action. Blue and gold identify the original left and right halves. Darker shades show the reverse. Orange marks moving paper and its hinge. The red line in the cutting step is a real scissors slit; the final face is optional ink.
- 0. Prepare the square
- 1. Crease the vertical diagonal
- 2. Open the diamond
- 3. Crease the horizontal diagonal
- 4. Open the cross guides
- 5. Fold the right side across
- 6. Return the right flipper
- 7. Fold the left side across
- 8. Return the left flipper
- 9. Fold down the head
- 10. Round the right head corner
- 11. Round the left head corner
- 12. Shape the right flipper edge
- 13. Shape the left flipper edge
- 14. Cut the short tail slit
- 15. Lift the left hind flipper
- 16. Return the left hind flipper
- 17. Lift the right hind flipper
- 18. Return the right hind flipper
- 19. Soften the right flipper tip
- 20. Soften the left flipper tip
- 21. Turn to the plain seal
- 22. Add an optional face
PREPARATION · Mittsu no Origami Seal · measured cut-and-fold adaptation
Prepare the square
Place the square as a diamond with its intended finished color facing down. Keep a ruler and scissors nearby.
Layers: One square, not yet cut.
Check: The top and bottom points line up.
Explore this step ↑STEP 1 · Mittsu no Origami Seal · measured cut-and-fold adaptation
Crease the vertical diagonal
Bring the right point to the left point and press the center crease.
Layers: Move the full right half.
Check: The side points coincide.
Explore this step ↑STEP 2 · Mittsu no Origami Seal · measured cut-and-fold adaptation
Open the diamond
Unfold completely.
Layers: Open the same half.
Check: A vertical center guide remains.
Explore this step ↑STEP 3 · Mittsu no Origami Seal · measured cut-and-fold adaptation
Crease the horizontal diagonal
Bring the bottom point to the top point and crease across the middle.
Layers: Move the full lower half.
Check: The top and bottom points coincide.
Explore this step ↑STEP 4 · Mittsu no Origami Seal · measured cut-and-fold adaptation
Open the cross guides
Return the sheet fully flat. Use the crossing as the ruler origin for the next marks.
Layers: Open the same lower half.
Check: Both diagonals are visible.
Explore this step ↑STEP 5 · Mittsu no Origami Seal · measured cut-and-fold adaptation
Fold the right side across
Measure 1.59 inches right of center. Fold the right corner inward along a vertical line through that mark.
Layers: Move the entire right corner.
Check: Its tip passes the center and stops 1.06 inches to the left.
Explore this step ↑STEP 6 · Mittsu no Origami Seal · measured cut-and-fold adaptation
Return the right flipper
Mark a vertical line 0.66 inches right of center. Fold the inner tip of the right folded packet outward across this line.
Layers: Move only the right packet inside the mark.
Check: The returned tip projects to the right of the body.
Explore this step ↑STEP 7 · Mittsu no Origami Seal · measured cut-and-fold adaptation
Fold the left side across
Repeat the inward fold on a vertical line 1.59 inches left of center.
Layers: Move the complete left corner.
Check: The new tip reaches 1.06 inches right of center.
Explore this step ↑STEP 8 · Mittsu no Origami Seal · measured cut-and-fold adaptation
Return the left flipper
Fold the left packet outward on a vertical line 0.66 inches left of center.
Layers: Move only the left folded packet.
Check: Two matching flippers frame a long central body.
Explore this step ↑STEP 9 · Mittsu no Origami Seal · measured cut-and-fold adaptation
Fold down the head
Bring the top point down to the center crossing.
Layers: Carry all layers of the top point.
Check: A flat-topped head flap points down the front.
Explore this step ↑STEP 10 · Mittsu no Origami Seal · measured cut-and-fold adaptation
Round the right head corner
Mark 0.30 inches inward along each edge from the upper right head corner. Fold the small corner inward on the diagonal between the marks.
Layers: Move the full small corner packet.
Check: The right head corner is beveled.
Explore this step ↑STEP 11 · Mittsu no Origami Seal · measured cut-and-fold adaptation
Round the left head corner
Mirror the small diagonal fold on the left.
Layers: Carry all layers in that corner.
Check: The head has two matching short sloping corners.
Explore this step ↑STEP 12 · Mittsu no Origami Seal · measured cut-and-fold adaptation
Shape the right flipper edge
On the upper sloping edge of the right flipper, mark 0.35 inches inward from its outer tip. Fold the lower edge inward on the line from this mark to the lower inner root of the flipper.
Layers: Move the returned flipper only; its lower inner root stays fixed.
Check: A narrow folded margin follows the flipper’s lower edge.
Explore this step ↑STEP 13 · Mittsu no Origami Seal · measured cut-and-fold adaptation
Shape the left flipper edge
Make the matching diagonal edge fold on the left.
Layers: Move only the returned left flipper.
Check: Both side flippers have folded margins.
Explore this step ↑STEP 14 · Mittsu no Origami Seal · measured cut-and-fold adaptation
Cut the short tail slit
Measure 1.35 inches up the center crease from the bottom tip and mark the stop. With scissors, cut from the bottom tip up to this mark only. Do not cut into the body above it.
Layers: Cut the single layer at the pointed bottom. No paper is removed.
Check: The two lower tips can now separate, but the body remains one connected sheet.
Explore this step ↑STEP 15 · Mittsu no Origami Seal · measured cut-and-fold adaptation
Lift the left hind flipper
Bring the left cut tip up to the lower inner root of the left side flipper. Press the diagonal crease without pulling on the uncut body.
Layers: Move only the left cut half below the new hinge.
Check: The tip meets the left flipper root; the right cut tip remains down.
Explore this step ↑STEP 16 · Mittsu no Origami Seal · measured cut-and-fold adaptation
Return the left hind flipper
Mark the center line 0.10 inches above the top of the slit. Draw a guide through it rising 0.10 inches for every inch to the left. Fold only the lifted tail flap down and outward where this guide crosses it.
Layers: Move the lifted left tail packet, not the connected body at the guide mark.
Check: A triangular hind flipper projects down and left below the body.
Explore this step ↑STEP 17 · Mittsu no Origami Seal · measured cut-and-fold adaptation
Lift the right hind flipper
Bring the remaining cut tip up to the lower inner root of the right side flipper.
Layers: Move only the right cut half. Keep the completed left hind flipper still.
Check: The tip meets the right flipper root.
Explore this step ↑STEP 18 · Mittsu no Origami Seal · measured cut-and-fold adaptation
Return the right hind flipper
Use the matching guide through the same center mark, rising 0.10 inches for every inch to the right. Fold the lifted flap down and outward.
Layers: Move only the lifted right tail packet.
Check: Two separate hind flippers project below the body.
Explore this step ↑STEP 19 · Mittsu no Origami Seal · measured cut-and-fold adaptation
Soften the right flipper tip
At the height of the original center crossing, mark 1.90 inches to the right. Fold the outer tip inward on a line that leans slightly left as it rises: one quarter inch left for each inch up.
Layers: Carry the complete outer flipper tip only.
Check: The right side flipper is shorter and less pointed.
Explore this step ↑STEP 20 · Mittsu no Origami Seal · measured cut-and-fold adaptation
Soften the left flipper tip
Mirror the last small fold on the left.
Layers: Move the complete matching tip.
Check: The two side flippers match.
Explore this step ↑STEP 21 · Mittsu no Origami Seal · measured cut-and-fold adaptation
Turn to the plain seal
Turn the entire model over from side to side. Keep the head at the top.
Layers: Carry the head, body and all flippers together.
Check: The plain front shows a broad head, two side flippers and a split hind-flipper end.
Explore this step ↑STEP 22 · Mittsu no Origami Seal · measured cut-and-fold adaptation
Add an optional face
Draw two eyes, a small nose and short whiskers on the head if desired. Keep the paper flat for display.
Layers: No paper moves; the face is optional ink.
Check: The upright flat paper seal is complete.
Explore this step ↑
Sources & notes
みっつのおりがみ (Mittsu no Origami), video tutorial publisher, かわいい♪アザラシの折り方 / Origami seal (2022).
Complete seal video (uses scissors) ↗
The video is published by みっつのおりがみ. Original model-design authorship and design-reuse permission have not been independently established. This guide does not claim traditional or public-domain status. No source footage, photographs, wording or code are reproduced; instructions, geometry, diagrams and pen face are original.
Adaptation: Based on the upright cut-and-fold seal in the complete video, not the fish-base seal or the raised-paw sea otter. Uses a 6-inch square instead of 150 mm. Ruler marks replace the video’s preliminary guide-fold sequence; the teaching orientation keeps the head at the top. The side pleats retain the source’s fractional layout. Small shaping folds and hind-flipper return angles use authored measurements. The single-layer slit is 1.35 inches long on this square (rounded), ending where the two hind-flipper hinges meet the center. Both tail halves fold upward and then return outward/down, making two attached hind flippers. Cutting is a discrete scissors step, not an animated paper fold. The optional face uses original pen marks; no swimming or standing claim.
Original instructions and diagrams, made with AI assistance. About & reuse
Accuracy notes
Real-paper follow-along and paper weight have not been tested. Diagrams illustrate the sequence, not paper thickness, contact, collisions or exact layer visibility.