 Just Fold Paper
Fold only
Origami Sea Gull
Make a sea gull with long banded wings. Offset folds expose a narrow paper-color border; a little pleat shapes the head before you fold and spread the two wings.
Preparation + 15 numbered steps
Materials
6-inch square · 6 × 6 inches
One 6 × 6-inch square (15.24 × 15.24 cm), preferably thin paper with contrasting sides. Ruler and pencil for the small measured folds; optional pen for eyes. No cuts or glue.
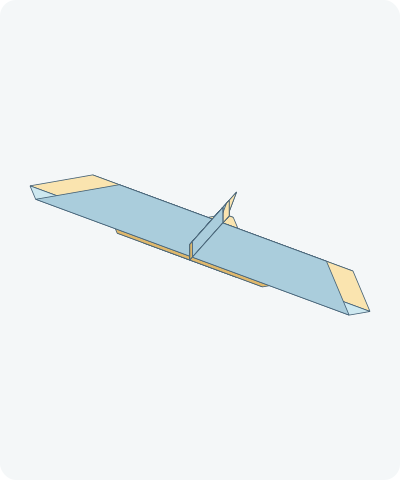
Drag to rotate · swipe sideways on touch.
Arrow keys rotate when focused.
Follow along
PreparationThe interactive guide needs JavaScript. Read every illustrated step below.
Help · controls & diagram
Play or drag the progress slider to watch a fold from 0% to 100%. Use the view buttons or drag the diagram to look from another angle.
Blue and gold identify the original left and right halves, not the literal colors of your paper. Darker shades show reverse faces. Orange highlights moving paper and its crease.
With the diagram focused: Space plays or pauses, ←/→ change steps, and Home resets.
Every step, at a glance
Compare your paper with each diagram after completing the action. Blue and gold identify the original left and right halves, not the literal colors of your paper. Darker shades show reverse faces. Orange highlights moving paper and its crease.
- 0. Prepare the diamond
- 1. Crease vertically
- 2. Open the diamond
- 3. Crease horizontally
- 4. Reopen the square
- 5. Make the offset fold
- 6. Fold the long strip behind
- 7. Fold the head point left
- 8. Start the head pleat
- 9. Return the head tip
- 10. Turn the gull over
- 11. Close the body
- 12. Raise the front wing
- 13. Raise the rear wing
- 14. Spread the front wing
- 15. Spread the rear wing and finish
PREPARATION · Origami Club Sea Gull
Prepare the diamond
Set the square with points up and down. For contrasting wing bands, put the darker side facing up.
Layers: One uncut sheet.
Check: The left and right corners are level.
Explore this step ↑STEP 1 · Origami Club Sea Gull
Crease vertically
Bring the left point to the right point and press.
Layers: Move the whole left half.
Check: The crease joins the upper and lower points.
Explore this step ↑STEP 2 · Origami Club Sea Gull
Open the diamond
Return the left half fully to the table.
Layers: Open the same half.
Check: The square is flat again.
Explore this step ↑STEP 3 · Origami Club Sea Gull
Crease horizontally
Bring the bottom point to the top point.
Layers: Move the whole lower half.
Check: The two center creases cross at the square center.
Explore this step ↑STEP 4 · Origami Club Sea Gull
Reopen the square
Lower the folded half completely.
Layers: Open the same lower half.
Check: Both diagonals are visible.
Explore this step ↑STEP 5 · Origami Club Sea Gull
Make the offset fold
Mark a vertical line 0.30 inches left of the center crease. Fold the left side rightward on this line.
Layers: Carry the full left packet.
Check: Its tip stops 0.60 inches short of the right point, leaving a border.
Explore this step ↑STEP 6 · Origami Club Sea Gull
Fold the long strip behind
Mark a vertical line 0.90 inches right of the original center crease. Fold the entire section to its left backward toward the right.
Layers: Carry every layer in the long left strip behind the remaining triangle.
Check: A narrow band runs along each long sloping wing edge.
Explore this step ↑STEP 7 · Origami Club Sea Gull
Fold the head point left
Mark a vertical line 2.20 inches right of the original center crease. Fold the rightmost point leftward.
Layers: Move all layers beyond the mark, leaving the tall wings still.
Check: The short triangle points left beyond the long wing edge.
Explore this step ↑STEP 8 · Origami Club Sea Gull
Start the head pleat
Mark a vertical line 0.65 inches right of the original center crease. Fold the left tip of the small head triangle rightward on this line.
Layers: Move only the head triangle, not the long wings behind it.
Check: The head tip points right for this intermediate fold.
Explore this step ↑STEP 9 · Origami Club Sea Gull
Return the head tip
Make a second vertical crease 0.10 inches right of the last crease. Fold the head tip back left.
Layers: Move only the small packet from the previous fold.
Check: The shortened head still projects beyond the long wing edge.
Explore this step ↑STEP 10 · Origami Club Sea Gull
Turn the gull over
Turn the whole model over from side to side. Keep its long axis vertical.
Layers: Turn all layers together.
Check: The head pleat is underneath.
Explore this step ↑STEP 11 · Origami Club Sea Gull
Close the body
Fold the upper half down behind the lower half along the horizontal center.
Layers: Move the entire upper wing and its half of the head.
Check: The long wing tips meet below the small head.
Explore this step ↑STEP 12 · Origami Club Sea Gull
Raise the front wing
Mark a horizontal line 0.40 inches below the closed top edge. Fold the front wing upward on this line.
Layers: Move the complete front wing, including its folded border. Leave the rear wing down.
Check: One long wing points up and the other down.
Explore this step ↑STEP 13 · Origami Club Sea Gull
Raise the rear wing
Fold the remaining rear wing up on the same horizontal line, toward the back.
Layers: Move the whole rear wing and its border away from the front wing.
Check: The two long wings now align above a narrow body.
Explore this step ↑STEP 14 · Origami Club Sea Gull
Spread the front wing
Hold the narrow body. Lower the front wing halfway from its folded-up position, opening its existing root to a right angle.
Layers: Move every front-wing layer together. Do not add a crease or pull out its border.
Check: The front wing extends out from the body.
Explore this step ↑STEP 15 · Origami Club Sea Gull
Spread the rear wing and finish
Open the rear wing halfway toward the opposite side. Keep both roots at right angles to the body. Optionally draw small eyes on the head.
Layers: Move all rear-wing layers together. Eyes are optional ink, not extra paper.
Check: The two banded wings extend to opposite sides of the narrow body.
Explore this step ↑
Sources & notes
Origami Club; diagram copyright credit: Fumiaki Shingu, A Sea Gull (undated web diagram).
Sea Gull construction diagram ↗
The reference diagram credits Fumiaki Shingu. That credit does not establish the model designer or a design-reuse license. This guide does not label the design traditional or public domain. No source media, wording or code is reproduced; these English instructions, numerical geometry, SVG diagrams and PDF are original.
Adaptation: Follows the offset center fold, backward strip fold, head fold and pleat, whole turn, body closure and separate wings. Exact 0.30/0.90/2.20-inch landmarks and 0.10-inch head pleat are authored choices where the source shows unmeasured dotted lines. The shortened head projects beyond the long wing edge. Paired folds and reopening are separated. The final wing bend is taught as two straight 90-degree openings along the existing wing roots rather than the source’s hand-curved wing surfaces. No curved deformation or flight behavior is claimed.
Original instructions and diagrams, made with AI assistance. About & reuse
Accuracy notes
Real-paper follow-along and paper weight have not been tested. Diagrams illustrate the sequence, not paper thickness, contact, collisions or exact layer visibility. One uncut 36-square-inch sheet, split at rigid hinges. Both wing packets retain their inner border layers. Final wings open at existing roots rather than being replaced by a silhouette. Zero-thickness teaching geometry does not simulate paper thickness or contact forces. Real-paper folding, wing stiffness and flight have not been tested.