 Just Fold Paper
Fold only
Flat Origami Pear
Fold a tall kite into a broad-bottomed pear, then return its upper point to make a narrow neck. Optional dots and stem coloring are pen marks; the pear outline is folded paper.
Preparation + 12 numbered steps
Materials
6-inch square · 6 × 6 inches
One 6 × 6-inch square (15.24 × 15.24 cm) of thin origami paper. Ruler and pencil for shaping marks; optional pen for dots and stem coloring. No cuts or glue.
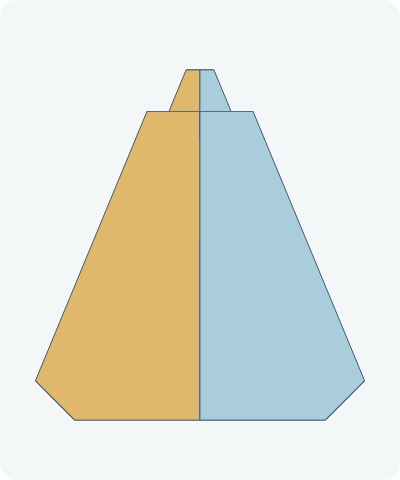
Drag to rotate · swipe sideways on touch.
Arrow keys rotate when focused.
Follow along
PreparationThe interactive guide needs JavaScript. Read every illustrated step below.
Help · controls & diagram
Play or drag the progress slider to watch a fold from 0% to 100%. Use the view buttons or drag the diagram to look from another angle.
Blue and gold identify the original halves of one sheet, not literal fruit colors. Darker shades show the reverse. Orange marks moving paper and its hinge.
With the diagram focused: Space plays or pauses, ←/→ change steps, and Home resets.
Every step, at a glance
Compare your paper with each diagram after completing the action. Blue and gold identify the original halves of one sheet, not literal fruit colors. Darker shades show the reverse. Orange marks moving paper and its hinge.
- 0. Prepare the diamond
- 1. Crease the center
- 2. Open the diamond
- 3. Fold the upper right edge in
- 4. Fold the upper left edge in
- 5. Close the lower triangle
- 6. Lower the top point
- 7. Return the neck upward
- 8. Shorten the neck tip
- 9. Bevel the lower right corner
- 10. Bevel the lower left corner
- 11. Turn over the pear
- 12. Finish the flat pear
PREPARATION · OrigamiOK flat pear photos; measured shaping adaptation
Prepare the diamond
Place one point at the top with the intended pear color facing down.
Layers: One uncut square.
Check: The top and bottom points line up.
Explore this step ↑STEP 1 · OrigamiOK flat pear photos; measured shaping adaptation
Crease the center
Bring the right point across to the left point.
Layers: Move the complete right half.
Check: The side points coincide.
Explore this step ↑STEP 2 · OrigamiOK flat pear photos; measured shaping adaptation
Open the diamond
Return the right half completely to the table.
Layers: Open the same half.
Check: A vertical center guide remains.
Explore this step ↑STEP 3 · OrigamiOK flat pear photos; measured shaping adaptation
Fold the upper right edge in
Bring the upper-right sloping edge onto the center crease.
Layers: Move the complete right corner flap.
Check: Its old upper edge rests on the center.
Explore this step ↑STEP 4 · OrigamiOK flat pear photos; measured shaping adaptation
Fold the upper left edge in
Match the upper-left sloping edge to the same center crease.
Layers: Move the complete left corner flap.
Check: A tall kite points upward.
Explore this step ↑STEP 5 · OrigamiOK flat pear photos; measured shaping adaptation
Close the lower triangle
Fold the bottom point upward on the horizontal line joining the two widest corners of the kite.
Layers: Carry all paper below that line.
Check: A triangular flap lies over the lower body, and the base is straight.
Explore this step ↑STEP 6 · OrigamiOK flat pear photos; measured shaping adaptation
Lower the top point
Bring the top point down to meet the tip of the raised lower triangle.
Layers: Carry every layer of the upper point, including the two folded kite flaps.
Check: The body has a short horizontal shoulder edge.
Explore this step ↑STEP 7 · OrigamiOK flat pear photos; measured shaping adaptation
Return the neck upward
Make a horizontal crease 0.36 inches below the new shoulder edge. Fold the lowered upper point back up along this line.
Layers: Move only the complete lowered shoulder packet; keep the body backing still.
Check: A narrow point projects above the shoulders.
Explore this step ↑STEP 8 · OrigamiOK flat pear photos; measured shaping adaptation
Shorten the neck tip
Fold the small top point down on a horizontal line 0.46 inches below its tip.
Layers: Carry all layers of the small projecting point.
Check: A short flat top replaces the sharp tip.
Explore this step ↑STEP 9 · OrigamiOK flat pear photos; measured shaping adaptation
Bevel the lower right corner
On the base, mark a point 0.76 inches inward from the right corner. Make a 45-degree crease rising to the right through the mark and fold the corner inward.
Layers: Carry the complete lower-right corner, including the raised base flap.
Check: A short diagonal rounds the right base corner.
Explore this step ↑STEP 10 · OrigamiOK flat pear photos; measured shaping adaptation
Bevel the lower left corner
Mirror the same 0.76-inch mark and diagonal fold on the left.
Layers: Carry every layer in the matching corner.
Check: The broad lower body has two equal bevels.
Explore this step ↑STEP 11 · OrigamiOK flat pear photos; measured shaping adaptation
Turn over the pear
Turn the entire model over from side to side. Keep the narrow neck at the top.
Layers: Carry every layer together.
Check: A narrow folded neck sits above a broad, tapered pear body.
Explore this step ↑STEP 12 · OrigamiOK flat pear photos; measured shaping adaptation
Finish the flat pear
Smooth the folds. You may color the middle of the neck as a stem and add a few small dots with a pen.
Layers: No extra paper or new fold; any coloring is optional ink.
Check: The broad lower body and narrow neck remain visible without decoration.
Explore this step ↑
Sources & notes
OrigamiOK; tutorial author Bella; photography collaborator Tomas credited in the author bio, How to Fold an Easy Origami Pear (web tutorial).
Complete flat pear photo tutorial ↗ · Publisher copyright information ↗
The source credits its tutorial author and photography collaboration, but does not establish the model designer or a design-reuse license. No traditional or public-domain status is asserted. No source photos, prose or code are reproduced. Our English instructions, material geometry and diagrams are independently authored.
Adaptation: Follows the upper kite, raised lower triangle, top-to-tip fold, neck return, top shortening, lower corner folds and turnover in source steps 1–8. Step 9 is optional learner-drawn ink. A six-inch square replaces the source’s 15 cm square. The free neck return is fixed 0.36 inches below the shoulder hinge, its tip is shortened on a line 0.46 inches below the returned point, and the lower bevel marks are 0.76 inches in from the base corners. Paired folds are separated; these measurements are authored rather than asserted photo measurements.
Original instructions and diagrams, made with AI assistance. About & reuse
Accuracy notes
Real-paper follow-along and paper weight have not been tested. Diagrams illustrate the sequence, not paper thickness, contact, collisions or exact layer visibility. One uncut square retains original material coordinates, including both folded kite layers in the neck pleat and the complete lower-corner packets. The original upper corner forms the neck; the lower corner closes the base. Zero-thickness teaching geometry does not certify finite thickness or general contact. Real-paper folding has not been tested.