 Just Fold Paper
Fold only
Origami Mushroom
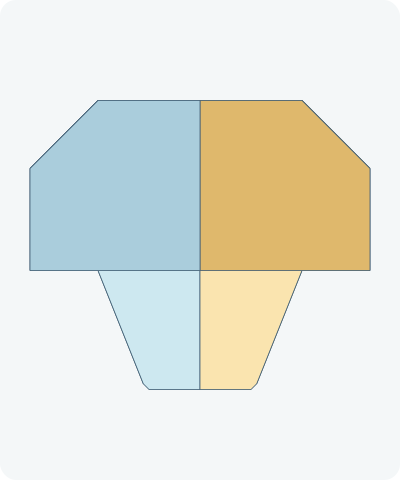
Fold a flat mushroom with a broad cap and a short tapered stem. This variation uses open, visible shaping folds instead of pocket squashes. Add drawn spots if you like.
Preparation + 14 numbered steps
Materials
6-inch square · 6 × 6 inches
One thin 6 × 6-inch square (15.24 cm), preferably colored on one side. Begin with the cap color down. Ruler and pencil for light guide marks; optional pen for spots. No cuts or glue.
Drag to rotate · swipe sideways on touch.
Arrow keys rotate when focused.
Follow along
PreparationThe interactive guide needs JavaScript. Read every illustrated step below.
Help · controls & diagram
Play or drag the progress slider to watch a fold from 0% to 100%. Use the view buttons or drag the diagram to look from another angle.
Blue and gold track the original halves of one sheet. Darker shades show the reverse. Orange outlines indicate moving paper. Optional spots are ink, not extra folded paper.
With the diagram focused: Space plays or pauses, ←/→ change steps, and Home resets.
Every step, at a glance
Compare your paper with each diagram after completing the action. Blue and gold track the original halves of one sheet. Darker shades show the reverse. Orange outlines indicate moving paper. Optional spots are ink, not extra folded paper.
- 0. Prepare the diamond
- 1. Mark the vertical guide
- 2. Open the vertical guide
- 3. Mark the horizontal guide
- 4. Open the horizontal guide
- 5. Bring the right point to center
- 6. Bring the top point to center
- 7. Bring the left point to center
- 8. Fold down the broad cap
- 9. Taper the right backing
- 10. Taper the left backing
- 11. Flatten the stem base
- 12. Bevel the right cap corner
- 13. Bevel the left cap corner
- 14. Finish the flat mushroom
PREPARATION · Photographed mushroom base; original tapered-stem adaptation
Prepare the diamond
Place the square with one corner up and the cap color down.
Layers: One uncut sheet.
Check: The side points are level.
Explore this step ↑STEP 1 · Photographed mushroom base; original tapered-stem adaptation
Mark the vertical guide
Bring the right point to the left point and crease.
Layers: Fold the whole right half.
Check: Opposite points coincide.
Explore this step ↑STEP 2 · Photographed mushroom base; original tapered-stem adaptation
Open the vertical guide
Return the right half to the table.
Layers: Open the same half completely.
Check: The square lies flat.
Explore this step ↑STEP 3 · Photographed mushroom base; original tapered-stem adaptation
Mark the horizontal guide
Bring the top point down to the bottom point and crease.
Layers: Fold the whole upper half.
Check: The crease runs between the side points.
Explore this step ↑STEP 4 · Photographed mushroom base; original tapered-stem adaptation
Open the horizontal guide
Return the upper half to the table.
Layers: Open the same half completely.
Check: The two guides cross at the center.
Explore this step ↑STEP 5 · Photographed mushroom base; original tapered-stem adaptation
Bring the right point to center
Fold the right point onto the crossing of the guides.
Layers: Move the right corner flap.
Check: Its point touches the center.
Explore this step ↑STEP 6 · Photographed mushroom base; original tapered-stem adaptation
Bring the top point to center
Fold the top point down to the same crossing.
Layers: Move the complete upper corner.
Check: A straight horizontal edge replaces the top point.
Explore this step ↑STEP 7 · Photographed mushroom base; original tapered-stem adaptation
Bring the left point to center
Fold the left point to the crossing.
Layers: Move the complete left corner.
Check: Three folded corners surround the center; the bottom point remains free.
Explore this step ↑STEP 8 · Photographed mushroom base; original tapered-stem adaptation
Fold down the broad cap
Fold the upper half toward you and down on the original horizontal guide.
Layers: Carry all paper above the guide.
Check: A broad rectangular cap covers the upper part of the remaining point.
Explore this step ↑STEP 9 · Photographed mushroom base; original tapered-stem adaptation
Taper the right backing
Viewed from the front, mark the lower-right diagonal two thirds of the way from the cap rim to the bottom point. Fold the backing behind along the line from this mark to the right end of the top cap hinge. In the Back view shown, this right-hand packet appears on your left.
Layers: Move all backing layers outside this line; do not carry the front cap.
Check: The lower right side narrows beneath the cap.
Explore this step ↑STEP 10 · Photographed mushroom base; original tapered-stem adaptation
Taper the left backing
Make the matching two-thirds mark on the lower-left diagonal as seen from the front. Fold the backing behind along the line from this mark to the left end of the cap hinge. This packet appears on your right in the Back view.
Layers: Move all selected left backing layers; leave the front cap still.
Check: The stem narrows symmetrically toward its bottom.
Explore this step ↑STEP 11 · Photographed mushroom base; original tapered-stem adaptation
Flatten the stem base
Fold the bottom point behind on a horizontal line 3.61 inches below the cap hinge.
Layers: Move every layer of the small bottom tip.
Check: A short level edge replaces the pointed stem.
Explore this step ↑STEP 12 · Photographed mushroom base; original tapered-stem adaptation
Bevel the right cap corner
Mark the top edge 1.27 inches right of its midpoint. Fold the top-right corner behind on a 45-degree line through this mark, sloping down toward the right.
Layers: Carry every layer at the corner, including attached backing.
Check: The right side of the cap slopes down toward its wide rim.
Explore this step ↑STEP 13 · Photographed mushroom base; original tapered-stem adaptation
Bevel the left cap corner
Mirror the same mark and diagonal fold on the left.
Layers: Carry every layer at the left corner.
Check: The cap has a short level crown and two matching sloping shoulders.
Explore this step ↑STEP 14 · Photographed mushroom base; original tapered-stem adaptation
Finish the flat mushroom
Smooth the cap and stem. Add a few drawn spots to the cap if you like. Keep the mushroom flat for a card or picture.
Layers: No new fold; spots are optional ink.
Check: The wide cap overhangs both sides of the tapered stem.
Explore this step ↑
Sources & notes
Origami-Instructions.com (tutorial publisher; model designer not established), Origami Mushroom Folding Instructions (undated photographed tutorial).
Photographed mushroom construction ↗ · Publisher terms of use ↗
The source does not establish the designer or a design-reuse license. Its photographs, wording and layout are not reproduced. These English instructions, material geometry and diagrams are independently authored; no public-domain or project-wide license is asserted.
Adaptation: Preserves the source cross-creases, right/top/left corner-to-center base and upper-half cap fold. Replaces the source turnover and pocket/squash stem sequence with two ordinary backward taper folds through the cap-hinge endpoints. Each taper line runs from a cap-hinge end to a guide 0.42 inches from the original bottom point at its height. The lower tip folds behind at 85% of the original diamond half-height below the cap hinge, and the cap corners are beveled on 45-degree lines through marks 1.27 inches from the top midpoint. These measured positions and tapered rather than flared stem are original adaptations, not source measurements or a claim to reproduce its squash-fold variant. The finished piece is flat, not self-standing.
Original instructions and diagrams, made with AI assistance. About & reuse
Accuracy notes
Real-paper follow-along and paper weight have not been tested. Diagrams illustrate the sequence, not paper thickness, contact, collisions or exact layer visibility. One uncut 36-square-inch sheet with continuous rigid hinges. The cap remains attached along its complete hinge while both taper folds carry all selected backing layers. Zero-thickness teaching diagrams do not certify paper thickness, retention or physical foldability. Real-paper folding has not been tested.