 Just Fold Paper
Fold only
Origami Mount Fuji
A snow-capped paper mountain with a folded rear support. Follow the moving layers, read the complete illustrated steps or print the one-page diagrams.
Preparation + 8 numbered steps
Materials
6-inch square · 6 × 6 inches
One 6 × 6-inch square (15.24 × 15.24 cm) of thin origami paper. Ruler and pencil for the marked distances. No scissors or glue.
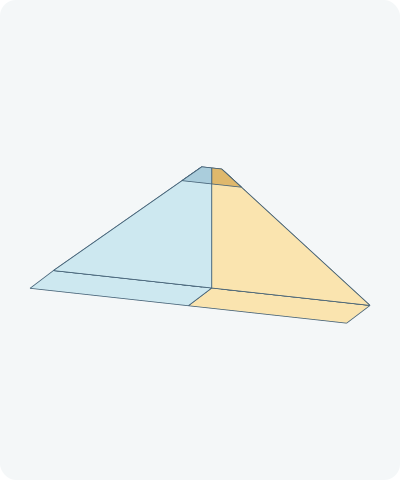
Drag to rotate · swipe sideways on touch.
Arrow keys rotate when focused.
Follow along
PreparationThe interactive guide needs JavaScript. Read every illustrated step below.
Help · controls & diagram
Play or drag the progress slider to watch a fold from 0% to 100%. Use the view buttons or drag the diagram to look from another angle.
Blue and gold identify the original left and right halves, not the literal colors of your paper. Darker shades show the reverse. Orange marks moving paper and its hinge.
With the diagram focused: Space plays or pauses, ←/→ change steps, and Home resets.
Every step, at a glance
Compare your paper with each diagram after completing the action. Blue and gold identify the original left and right halves, not the literal colors of your paper. Darker shades show the reverse. Orange marks moving paper and its hinge.
- 0. Prepare the square
- 1. Fold the snow band
- 2. Turn the paper over
- 3. Find the new halfway line
- 4. Open the rectangle
- 5. Shape the right slope
- 6. Shape the left slope
- 7. Show the mountain face
- 8. Fold the rear support
PREPARATION · Linked photographic construction
Prepare the square
Place the square with level edges and the mountain color facing up. White on the reverse will become the snow cap.
Layers: One flat sheet.
Check: The top edge is horizontal.
Explore this step ↑STEP 1 · Linked photographic construction
Fold the snow band
Measure 3/8 inch down from the top edge. Fold that narrow strip toward you along a horizontal line. Press it flat.
Layers: Move only the top strip.
Check: A narrow reverse-color band runs across the top.
Explore this step ↑STEP 2 · Linked photographic construction
Turn the paper over
Turn the whole sheet over from side to side, keeping the band at the top.
Layers: Carry the narrow band with the sheet.
Check: The snow band is now on the underside.
Explore this step ↑STEP 3 · Linked photographic construction
Find the new halfway line
Bring the shortened top edge down to the bottom edge. Crease the rectangle in half.
Layers: Move the complete upper packet, including the hidden hem.
Check: The new top and bottom edges coincide.
Explore this step ↑STEP 4 · Linked photographic construction
Open the rectangle
Lift the upper packet back to the table until the rectangle is completely open.
Layers: Open the same packet fully.
Check: A horizontal crease bisects the shortened rectangle.
Explore this step ↑STEP 5 · Linked photographic construction
Shape the right slope
Fold the upper right side inward so its vertical outer edge rests along the horizontal halfway crease. Start the diagonal hinge where the crease meets the right edge.
Layers: Carry the right corner and its attached piece of snow hem.
Check: The folded outer edge lies on the halfway line.
Explore this step ↑STEP 6 · Linked photographic construction
Shape the left slope
Repeat on the left, aligning the outer edge with the same halfway crease. Press both diagonal folds.
Layers: Carry the complete left corner and its snow hem.
Check: A narrow, flat-topped triangle points upward, with the rear rectangle below.
Explore this step ↑STEP 7 · Linked photographic construction
Show the mountain face
Turn the complete sheet over from side to side. Keep the peak at the top.
Layers: Turn the triangle, its folded slopes and the lower rectangle together.
Check: The plain mountain face has a horizontal snow cap across its top.
Explore this step ↑STEP 8 · Linked photographic construction
Fold the rear support
Hold the triangular mountain still. Bend the lower rectangle away from you on the existing halfway crease. Stop with about a 60-degree opening between it and the mountain; do not flatten the support.
Layers: Move the lower rectangle only. The snow-capped face stays unchanged.
Check: The support sits behind the mountain. Rest its lower edge and the mountain base on a surface, adjusting the opening if needed. Standing stability is not tested.
Explore this step ↑
Sources & notes
Origami Instructions, Origami Instructions: Origami Mount Fuji (web tutorial).
Photographic construction reference ↗
The reference does not identify a designer or establish a design-reuse license. Traditional authorship is not verified here. Its photographs and prose remain protected and are not reproduced. All instructions, geometry and drawings here are independently authored; no project-wide reuse license is implied.
Adaptation: The complete six-step reference is shown with its working orientation rotated 180 degrees, so the peak stays at the top. The snow hem is 3/8 inch deep. The new rectangle is halved, not the original square. Both side folds carry the attached snow hem. The rear support closes 120 degrees, leaving a 60-degree opening; this authored display angle does not establish standing stability. Blue/gold remain material identifiers: use colored/white paper for actual snow.
Original instructions and diagrams, made with AI assistance. About & reuse
Accuracy notes
Real-paper follow-along and paper weight have not been tested. Diagrams illustrate the sequence, not paper thickness, contact, collisions or exact layer visibility. Rigid-axis teaching folds retain the material coordinates of one uncut square. Exact shaping landmarks are authored adaptations. Zero-thickness diagrams do not simulate paper thickness or prove physical foldability. Real-paper folding has not been tested.