 Just Fold Paper
Fold only
Origami Masu Box
Make the traditional square Masu box without cuts or glue. Raise two walls, collapse the paired corners, then wrap each end flap over its corner layers and onto the floor. This guide makes one open box, without a lid.
Preparation + 25 numbered steps
Materials
6-inch square · 6 × 6 inches
One 6 × 6-inch square (15.24 × 15.24 cm) of thin origami paper. The ideal finished box is about 2.12 inches across and 1.06 inches high. No scissors or glue.
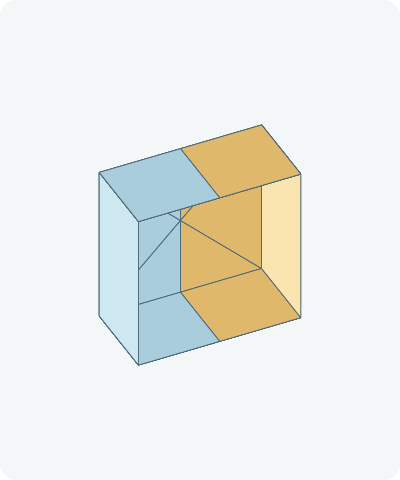
Drag to rotate · swipe sideways on touch.
Arrow keys rotate when focused.
Follow along
PreparationThe interactive guide needs JavaScript. Read every illustrated step below.
Help · controls & diagram
Play or drag the progress slider to watch a fold from 0% to 100%. Use the view buttons or drag the diagram to look from another angle.
Blue and gold track the original left and right halves of one sheet, not separate pieces. Darker shades indicate the reverse. Orange marks moving folds.
With the diagram focused: Space plays or pauses, ←/→ change steps, and Home resets.
Every step, at a glance
Compare your paper with each diagram after completing the action. Blue and gold track the original left and right halves of one sheet, not separate pieces. Darker shades indicate the reverse. Orange marks moving folds.
- 0. Prepare the square
- 1. First center crease
- 2. Open the first crease
- 3. Second center crease
- 4. Open the square
- 5. Right corner to center
- 6. Left corner to center
- 7. Top corner to center
- 8. Bottom corner to center
- 9. Crease the upper wall
- 10. Open the upper wall
- 11. Crease the lower wall
- 12. Open the lower wall
- 13. Open the top point
- 14. Open the bottom point
- 15. Crease the right wall
- 16. Open the right wall
- 17. Crease the left wall
- 18. Open the left wall
- 19. Raise the side walls
- 20. Collapse the top corners
- 21. Bend the top tip
- 22. Wrap the top end
- 23. Collapse the bottom corners
- 24. Bend the remaining tip
- 25. Wrap and finish
PREPARATION · Traditional lidless Masu box
Prepare the square
Put the intended outside color face down, with a corner pointing up.
Layers: One uncut square.
Check: Opposite corners line up vertically.
Explore this step ↑STEP 1 · Traditional lidless Masu box
First center crease
Bring the lower-right sloping edge to the upper-left sloping edge. Match the corners and press the fold through the center.
Layers: Move the complete lower-right half sheet.
Check: Opposite edges meet in a rectangle.
Explore this step ↑STEP 2 · Traditional lidless Masu box
Open the first crease
Return the folded half fully to the table.
Layers: Open the same half.
Check: The square is flat.
Explore this step ↑STEP 3 · Traditional lidless Masu box
Second center crease
Bring the upper-right sloping edge to the lower-left sloping edge. Match both corners and press.
Layers: Move the complete upper-right half sheet.
Check: The two center creases cross at the middle.
Explore this step ↑STEP 4 · Traditional lidless Masu box
Open the square
Unfold completely. The crease crossing marks the center.
Layers: One flat sheet.
Check: All four corners are visible.
Explore this step ↑STEP 5 · Traditional lidless Masu box
Right corner to center
Bring the right corner to the crease crossing. Press the straight fold halfway between them.
Layers: Only the right corner flap.
Check: The tip meets the center.
Explore this step ↑STEP 6 · Traditional lidless Masu box
Left corner to center
Bring the left corner to the same center point.
Layers: Only the left corner flap.
Check: The two tips meet without overlap.
Explore this step ↑STEP 7 · Traditional lidless Masu box
Top corner to center
Bring the upper corner down to the center.
Layers: Only the upper corner flap.
Check: Its point meets the first two tips.
Explore this step ↑STEP 8 · Traditional lidless Masu box
Bottom corner to center
Bring the bottom corner up to the center.
Layers: Only the bottom corner flap.
Check: Four tips meet inside a smaller square.
Explore this step ↑STEP 9 · Traditional lidless Masu box
Crease the upper wall
Fold the upper horizontal edge down to the center.
Layers: Carry every layer above the new fold.
Check: The edge meets the center line.
Explore this step ↑STEP 10 · Traditional lidless Masu box
Open the upper wall
Unfold that edge to the smaller square.
Layers: Open the same packet.
Check: The new crease remains halfway to the center.
Explore this step ↑STEP 11 · Traditional lidless Masu box
Crease the lower wall
Fold the lower edge up to the center.
Layers: Carry every layer below the fold.
Check: The edge meets the center line.
Explore this step ↑STEP 12 · Traditional lidless Masu box
Open the lower wall
Return that packet to the smaller square.
Layers: Open the same packet.
Check: Two parallel wall creases are visible.
Explore this step ↑STEP 13 · Traditional lidless Masu box
Open the top point
Unfold the original top corner all the way out.
Layers: Open the top corner flap, keeping the left and right corners folded in.
Check: A long pointed end extends upward.
Explore this step ↑STEP 14 · Traditional lidless Masu box
Open the bottom point
Unfold the original bottom corner all the way out.
Layers: Keep the left and right corner flaps in place.
Check: A long pointed end extends downward too.
Explore this step ↑STEP 15 · Traditional lidless Masu box
Crease the right wall
Fold the right straight edge to the center.
Layers: Move all layers to the right of the crease, including the ends.
Check: The straight edge meets the center.
Explore this step ↑STEP 16 · Traditional lidless Masu box
Open the right wall
Unfold the right packet.
Layers: Open every layer just folded.
Check: The pointed strip is flat again.
Explore this step ↑STEP 17 · Traditional lidless Masu box
Crease the left wall
Fold the left straight edge to the center.
Layers: Move the complete left packet.
Check: The edge meets the center.
Explore this step ↑STEP 18 · Traditional lidless Masu box
Open the left wall
Unfold that packet.
Layers: Keep both original side corner flaps folded inward.
Check: The central square is marked by four wall creases.
Explore this step ↑STEP 19 · Traditional lidless Masu box
Raise the side walls
Lift the left and right long sides until they stand upright. Keep the central square flat.
Layers: Both side walls rise together with their attached end material.
Check: The walls stand at right angles to the floor.
Explore this step ↑STEP 20 · Traditional lidless Masu box
Collapse the top corners
Lift the top end while pushing its two corner areas inward along their diagonals. Let both corners move together.
Layers: The paired triangular gussets stay attached to the side walls and top end.
Check: The top end stands upright; its corner triangles meet toward the middle.
Explore this step ↑STEP 21 · Traditional lidless Masu box
Bend the top tip
At the existing crease one wall-height above the rim, bend the triangular tip away from the box to a right angle.
Layers: Only the outer tip beyond that crease.
Check: A short horizontal triangle points away from the cavity.
Explore this step ↑STEP 22 · Traditional lidless Masu box
Wrap the top end
Fold the tall end flap inward over the rim, covering the collapsed corner triangles. Lower its bent tip onto the floor.
Layers: Carry the complete end packet. Keep the side walls and corner gussets in place.
Check: The inner end wall is covered and the original tip reaches the floor center.
Explore this step ↑STEP 23 · Traditional lidless Masu box
Collapse the bottom corners
Lift the remaining pointed end and push both of its corners inward together.
Layers: Move the remaining two attached corner gussets. Hold the completed end still.
Check: All four outside walls now stand upright.
Explore this step ↑STEP 24 · Traditional lidless Masu box
Bend the remaining tip
Bend the outer triangle away from the cavity on its existing crease, one wall-height above the rim.
Layers: Only the remaining outer tip.
Check: It makes the same right-angle bend as the first end.
Explore this step ↑STEP 25 · Traditional lidless Masu box
Wrap and finish
Fold the last tall flap inward over its rim and corner triangles. Set its tip onto the floor center and gently press the box square.
Layers: The final flap covers the gussets and lies above the floor backing.
Check: An open square box is complete. The four original corners meet at the floor center; no lid is included.
Explore this step ↑
Sources & notes
Traditional design; Peter Saydak tutorial and Nick Robinson diagrams at Origami.me, How to Make an Origami Box With Lid (updated March 2026).
Primary Masu box instructions ↗ · Origami Guide photo crosscheck ↗
Both references identify the Masu design as traditional. Their text, diagrams, photographs and videos have separate rights and are not reproduced here. These instructions, diagrams, geometry and printable guide are original. No project-wide reuse license is granted.
Adaptation: Uses the primary one-sheet lidless box. We keep the square in a diamond orientation, separate paired folds and reopenings, and separate each end closure into corner collapse, a right-angle bend of the outer tip away from the cavity, and a wrap over the rim. The tip bend follows the existing crease and makes the floor landing visible; it is an authored teaching sequence rather than an extra pressed crease. Origami Guide starts its initial cross creases on the other face and rotates the working box; its lid beginning at step 22 is excluded.
Original instructions and diagrams, made with AI assistance. About & reuse
Accuracy notes
Real-paper follow-along and paper weight have not been tested. Diagrams illustrate the sequence, not paper thickness, contact, collisions or exact layer visibility. One 36-square-inch sheet with rigid face metrics, shared corner hinges and complete end-flap packets. The finished box has a square floor and four raised walls. Zero-thickness teaching geometry; paper thickness, friction and physical retention are not simulated. Real-paper folding has not been tested.