 Just Fold Paper
Fold only
Flat Origami Ice Cream Cone
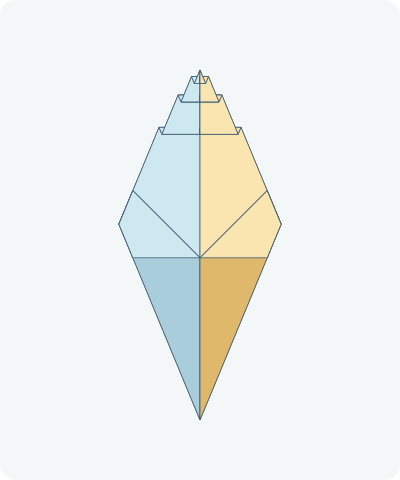
A pointed cone beneath three folded soft-serve ridges. Follow the moving paper, read every illustrated step or print the one-page guide.
Preparation + 19 numbered steps
Materials
6-inch square · 6 × 6 inches
One 6-inch square (15.24 cm) of thin paper with contrasting sides. Ruler and pencil for the small pleats. Optional pen for decoration. No scissors or glue.
Drag to rotate · swipe sideways on touch.
Arrow keys rotate when focused.
Follow along
PreparationThe interactive guide needs JavaScript. Read every illustrated step below.
Help · controls & diagram
Play or drag the progress slider to watch a fold from 0% to 100%. Use the view buttons or drag the diagram to look from another angle.
Blue and gold identify the original left and right halves, not the literal colors of your paper. Darker shades show the reverse. Orange identifies the moving layers and hinge.
With the diagram focused: Space plays or pauses, ←/→ change steps, and Home resets.
Every step, at a glance
Compare your paper with each diagram after completing the action. Blue and gold identify the original left and right halves, not the literal colors of your paper. Darker shades show the reverse. Orange identifies the moving layers and hinge.
- 0. Prepare a diamond
- 1. Crease the vertical diagonal
- 2. Open the diamond
- 3. Fold the left cone edge
- 4. Fold the right cone edge
- 5. Open the right cream flap outward
- 6. Open the left cream flap outward
- 7. Turn the model over
- 8. Tidy the right projecting edge
- 9. Tidy the left projecting edge
- 10. Narrow the upper right edge
- 11. Narrow the upper left edge
- 12. Turn to the cream side
- 13. Start the broad cream pleat
- 14. Return the point upward
- 15. Make the middle ridge
- 16. Return the middle point
- 17. Make the smallest ridge
- 18. Raise the final tip
- 19. Finish the cream side
PREPARATION · Linked complete construction reference
Prepare a diamond
Place the square with a corner pointing upward and the cone color underneath. The reverse face will become the cream.
Layers: One uncut square.
Check: The top and bottom points lie on a vertical line.
Explore this step ↑STEP 1 · Linked complete construction reference
Crease the vertical diagonal
Bring the right corner across to the left corner.
Layers: Move the full right half.
Check: The diagonal from the top to bottom point is creased.
Explore this step ↑STEP 2 · Linked complete construction reference
Open the diamond
Open the paper completely.
Layers: Return the same half.
Check: The center crease is visible.
Explore this step ↑STEP 3 · Linked complete construction reference
Fold the left cone edge
Bring the lower left sloping edge onto the vertical center crease.
Layers: Move the entire left corner triangle.
Check: The bottom point stays fixed.
Explore this step ↑STEP 4 · Linked complete construction reference
Fold the right cone edge
Bring the lower right edge onto the same center crease.
Layers: Move the right corner triangle.
Check: The two long folded edges meet to form a kite.
Explore this step ↑STEP 5 · Linked complete construction reference
Open the right cream flap outward
On the raised right flap, fold its upper inner corner down and outward. Use a 45-degree diagonal through its outer shoulder so the flap’s top horizontal edge becomes vertical.
Layers: Move only the raised right flap; keep the backing still.
Check: The returned flap makes a square corner at the right shoulder.
Explore this step ↑STEP 6 · Linked complete construction reference
Open the left cream flap outward
Mirror the right return on the left, turning its horizontal top edge into a vertical outer edge.
Layers: Move only the raised left flap.
Check: Two broad cream flaps meet above the pointed cone.
Explore this step ↑STEP 7 · Linked complete construction reference
Turn the model over
Turn the complete kite from side to side.
Layers: Keep both returned flaps folded.
Check: Small flap ends project beyond the long cone edges.
Explore this step ↑STEP 8 · Linked complete construction reference
Tidy the right projecting edge
Fold the small projecting right flap inward along the long sloping outline of the cone behind it.
Layers: Move only the paper outside that outline.
Check: The right edge is straight.
Explore this step ↑STEP 9 · Linked complete construction reference
Tidy the left projecting edge
Fold the matching left projection inward along the cone outline.
Layers: Leave the broad central paper still.
Check: Both lower edges are tidy.
Explore this step ↑STEP 10 · Linked complete construction reference
Narrow the upper right edge
Bring the upper right sloping edge to the vertical center, keeping the top point fixed.
Layers: Carry the complete upper right corner packet.
Check: The upper half is narrower on the right.
Explore this step ↑STEP 11 · Linked complete construction reference
Narrow the upper left edge
Bring the upper left sloping edge to the same center line.
Layers: Carry the complete left corner packet.
Check: The upper edges meet at the center.
Explore this step ↑STEP 12 · Linked complete construction reference
Turn to the cream side
Turn the entire model over.
Layers: Keep all existing folds closed.
Check: A tall cream-colored point rises above the cone.
Explore this step ↑STEP 13 · Linked complete construction reference
Start the broad cream pleat
Measure 2.14 inches down from the top tip. Fold the whole upper point down along a horizontal line at that mark.
Layers: Carry every layer of the upper point.
Check: A horizontal edge forms the lowest broad cream ridge.
Explore this step ↑STEP 14 · Linked complete construction reference
Return the point upward
On the lowered point, measure 0.15 inch below its new top folded edge. Fold the lower part back upward there.
Layers: Move only the point lowered in the previous step.
Check: A narrow zigzag pleat leaves the point facing upward.
Explore this step ↑STEP 15 · Linked complete construction reference
Make the middle ridge
Measure 1.14 inches down from the raised tip. Fold that upper portion down horizontally.
Layers: Carry the whole raised point, leaving the first pleat still.
Check: A smaller horizontal ridge sits above the first.
Explore this step ↑STEP 16 · Linked complete construction reference
Return the middle point
Make another return fold 0.15 inch below the newest folded edge, lifting the tip upward.
Layers: Move only the point just lowered.
Check: Two paired pleats are complete.
Explore this step ↑STEP 17 · Linked complete construction reference
Make the smallest ridge
Measure 0.44 inch down from the raised tip and fold the upper portion down.
Layers: Keep the two lower ridges still.
Check: The smallest ridge is above the middle ridge.
Explore this step ↑STEP 18 · Linked complete construction reference
Raise the final tip
Fold the tip upward once more on a line 0.15 inch below the newest folded edge.
Layers: Move only the latest lowered tip packet.
Check: A small point rises above three graduated cream ridges.
Explore this step ↑STEP 19 · Linked complete construction reference
Finish the cream side
Keep this cream side facing you and press the three ridges gently. Add drawn sprinkles if you wish.
Layers: Keep all existing folds closed; do not pull the pleats apart.
Check: The finished flat decoration has a pointed cone and a stepped soft-serve top. It is not a container.
Explore this step ↑
Sources & notes
Origami Way, Origami Way: Flat Origami Ice Cream Cone (web tutorial).
The linked publisher documents this construction; it does not identify its original designer. This guide does not claim traditional authorship or a license to reuse the reference photographs or prose. The instructions, diagrams and animation here are independently authored. No reference media is reproduced.
Adaptation: Scales the reference’s 7-inch square to 6 inches. The complete kite, outward flaps, side cleanups and narrowed upper edges precede three paired pleats. Each pleat loses 0.3 inch of height; its return crease is 0.15 inch from its closing crease. Exact ruler landmarks replace approximate photo spacing. Optional drawn facial features are omitted from the diagrams. For the final display, keep the clean cream side facing forward rather than following the reference text’s last turnover, which exposes the folded cleanup flaps in this construction.
Original instructions and diagrams, made with AI assistance. About & reuse
Accuracy notes
Real-paper follow-along and paper weight have not been tested. Diagrams illustrate the sequence, not paper thickness, contact, collisions or exact layer visibility. Continuous rigid hinges preserve the original material coordinates, including hidden layers. Display openings and measured shaping landmarks are specified in the instructions. Zero-thickness teaching diagrams do not simulate paper thickness or certify physical foldability. Physical folding and stability have not been tested.