 Just Fold Paper
Fold only
Origami Flower Stem and Leaf
Fold a pointed stem and leaf from another square, then place them beside a separately folded flower head on a flat surface. This complete companion guide uses a coupled inside reverse fold; it does not attach or lock into the tulip head.
Preparation + 12 numbered steps
Materials
6-inch square · 6 × 6 inches
One separate 6 × 6-inch square (15.24 × 15.24 cm), preferably thin origami paper. No cuts or glue are needed for the stem itself. Use another sheet for a flower head; place the two pieces together rather than assuming an attachment.
Drag to rotate · swipe sideways on touch.
Arrow keys rotate when focused.
Make a two-sheet flower arrangement
Fold the head and stem from separate squares. Place the head beside the upper stem tip on a flat surface; these pieces do not lock together.
Fold the tulip flower head → · Companion PDF

Follow along
PreparationThe interactive guide needs JavaScript. Read every illustrated step below.
Help · controls & diagram
Play or drag the progress slider to watch a fold from 0% to 100%. Use the view buttons or drag the diagram to look from another angle.
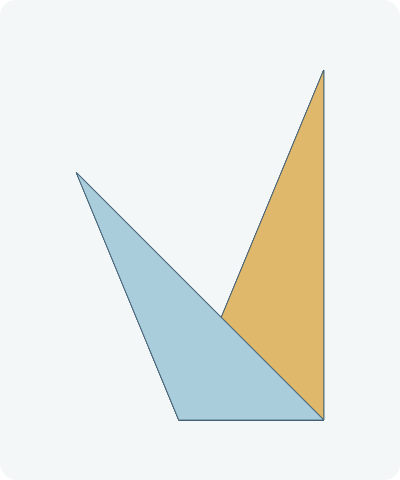
Blue and gold track the original left and right halves of one sheet, not its front and back colors. Darker shades show the reverse. Orange outlines mark moving packets; dashed orange lines mark ordinary active creases.
With the diagram focused: Space plays or pauses, ←/→ change steps, and Home resets.
Every step, at a glance
Compare your paper with each diagram after completing the action. Blue and gold track the original left and right halves of one sheet, not its front and back colors. Darker shades show the reverse. Orange outlines mark moving packets; dashed orange lines mark ordinary active creases.
- 0. Prepare another square
- 1. Crease across the center
- 2. Open the square
- 3. Fold the lower right edge
- 4. Fold the upper right edge
- 5. Fold the lower left edge
- 6. Fold the upper left edge
- 7. Close the lower half
- 8. Prepare the sloping bend
- 9. Open that bend
- 10. Open the center again
- 11. Reverse the long point inside
- 12. Turn and arrange the flower
PREPARATION · Traditional stem and leaf
Prepare another square
Place the square as a diamond, intended stem color down. Keep the left and right corners level.
Layers: One uncut sheet, separate from your flower head.
Check: The four edges are equal.
Explore this step ↑STEP 1 · Traditional stem and leaf
Crease across the center
Bring the bottom corner up to the top corner. Match the sloping edges and press the horizontal center crease.
Layers: Move the complete lower half.
Check: The left and right corners stay in place.
Explore this step ↑STEP 2 · Traditional stem and leaf
Open the square
Return the lower half to the table.
Layers: Keep the new crease; open the fold completely.
Check: A horizontal crease joins the left and right points.
Explore this step ↑STEP 3 · Traditional stem and leaf
Fold the lower right edge
Bring the lower right edge to the horizontal center crease. Press from the right tip inward.
Layers: Move the lower right corner flap.
Check: The old edge follows the right half of the center line.
Explore this step ↑STEP 4 · Traditional stem and leaf
Fold the upper right edge
Bring the upper right edge down to the same center line.
Layers: Carry the small already-folded portion that lies beyond the new hinge.
Check: The right end is a narrow point with matching sloping sides.
Explore this step ↑STEP 5 · Traditional stem and leaf
Fold the lower left edge
Bring the lower left edge up to the horizontal center.
Layers: Move the complete lower left flap. Keep the right folds closed.
Check: The old lower left edge meets the center.
Explore this step ↑STEP 6 · Traditional stem and leaf
Fold the upper left edge
Bring the upper left edge down to the center.
Layers: Carry the earlier folded portion beyond this new crease.
Check: A long narrow diamond lies flat. An inner-flap edge slopes from the top middle corner down toward the left on the center line.
Explore this step ↑STEP 7 · Traditional stem and leaf
Close the lower half
Bring the lower edge up to the upper edge along the horizontal center crease.
Layers: Move every layer of the lower half together.
Check: A shallow triangle has a straight lower edge and two long pointed ends.
Explore this step ↑STEP 8 · Traditional stem and leaf
Prepare the sloping bend
Use the exposed inner-flap edge as your crease guide: it runs from the top corner down-left to the straight lower edge. Lift the entire right point toward you and fold it leftward across that line.
Layers: Carry all layers to the right of the guide, not just the visible flap.
Check: The long point now aims up-left; press this outside bend firmly.
Explore this step ↑STEP 9 · Traditional stem and leaf
Open that bend
Swing the long point back to the right along the same crease.
Layers: Keep both layers together as the bend opens.
Check: The shallow triangle returns, with its new sloping crease retained.
Explore this step ↑STEP 10 · Traditional stem and leaf
Open the center again
Lower the front half to open the narrow diamond. Leave all four edge folds closed.
Layers: Open only the horizontal center fold; do not unfold the small inner flaps.
Check: The bend creases form a pair meeting on the center line.
Explore this step ↑STEP 11 · Traditional stem and leaf
Reverse the long point inside
Lift the two halves toward one another while guiding the right point up and left between them. Let both sloping bend creases hinge together. Close the center around the reversed point and flatten.
Layers: Move every layer of both right-side walls together. Keep the left point outside as the leaf; do not pull any layer free.
Check: The long stem points up-left and the shorter leaf points left. Both remain joined at the base.
Explore this step ↑STEP 12 · Traditional stem and leaf
Turn and arrange the flower
Rotate the whole model clockwise on the table until the short base is level and the outer stem edge is vertical. Place your separately folded flower head beside its upper tip on a flat surface.
Layers: Turn every layer together without adding a crease. The head and stem remain separate pieces.
Check: Your stem and leaf are complete. This is a flat arrangement, not a locking attachment or a standing flower.
Explore this step ↑
Sources & notes
Traditional design; photo tutorial by Origami Guide, How To Make Origami Grass, Stem & Leaf (undated web tutorial).
Traditional stem and leaf reference ↗
Origami Guide labels the design Traditional. Reference photographs and prose have separate rights and are not reproduced here. These instructions, geometry, diagrams and PDF are original. Attribution does not grant a project-wide license.
Adaptation: Separates each edge fold and reopening into an individual action. The reverse fold is taught by opening the outside bend, opening the center, then closing both walls along the paired sloping hinges together. The bend follows the exposed inner-flap edge. A final 67.5-degree clockwise handling turn levels the short base and makes the outer stem edge vertical. The flower head is a separate sheet placed beside the stem for a flat display; no insertion, adhesive-free attachment or self-standing arrangement is established.
Original instructions and diagrams, made with AI assistance. About & reuse
Accuracy notes
Real-paper follow-along and paper weight have not been tested. Diagrams illustrate the sequence, not paper thickness, contact, collisions or exact layer visibility. One connected 36-square-inch sheet with rigid packets and a coupled inside reverse fold. Original material is retained through the complete sequence. Zero-thickness teaching geometry does not simulate paper thickness, friction or contact forces. Real-paper folding and attachment to a flower have not been tested.