 Just Fold Paper
Fold only
Flat Origami Photo Holder
Fold top and bottom retaining edges around a small photo. Follow the original moving diagrams or read the complete illustrated guide below.
Preparation + 13 numbered steps
Materials
6-inch square · 6 × 6 inches
One 6 × 6-inch square (15.24 × 15.24 cm) of paper, a ruler and a pencil. No cutting. Use the measured landmarks below. A separate small photo or drawing is optional.
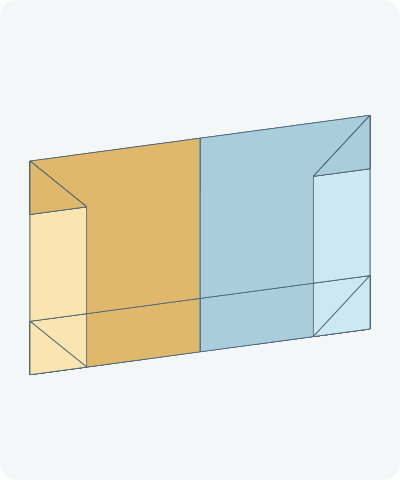
Drag to rotate · swipe sideways on touch.
Arrow keys rotate when focused.
Follow along
PreparationThe interactive guide needs JavaScript. Read every illustrated step below.
Help · controls & diagram
Play or drag the progress slider to watch a fold from 0% to 100%. Use the view buttons or drag the diagram to look from another angle.
Blue and gold track the original left and right halves of the sheet, not your paper colors. Dark shades show the reverse; orange highlights the moving packet and crease.
With the diagram focused: Space plays or pauses, ←/→ change steps, and Home resets.
Every step, at a glance
Compare your paper with each diagram after completing the action. Blue and gold track the original left and right halves of the sheet, not your paper colors. Dark shades show the reverse; orange highlights the moving packet and crease.
- 0. Prepare the holder
- 1. Crease across the middle
- 2. Reopen across the middle
- 3. Crease from side to side
- 4. Reopen from side to side
- 5. Fold the top retaining hem
- 6. Raise the bottom flap
- 7. Shape the lower right flap
- 8. Shape the lower left flap
- 9. Bevel the top right
- 10. Bevel the top left
- 11. Fold the right side behind
- 12. Fold the left side behind
- 13. Turn and fit a small photo
PREPARATION · Origami Club linked construction diagram
Prepare the holder
Lay the square with level edges, intended front color facing up. This version lies flat on a desk or inside a card.
Layers: One square; keep the photo aside until the end.
Check: The sheet is flat, with a horizontal top edge.
Explore this step ↑STEP 1 · Origami Club linked construction diagram
Crease across the middle
Fold the square in half across the middle, matching the opposite edges or points. Press the fold.
Layers: Move the complete half of the sheet.
Check: The opposite edges or points coincide.
Explore this step ↑STEP 2 · Origami Club linked construction diagram
Reopen across the middle
Unfold completely along the crease you just made.
Layers: Return the same half to the table.
Check: The sheet is flat again.
Explore this step ↑STEP 3 · Origami Club linked construction diagram
Crease from side to side
Fold the square in half from side to side, matching the opposite edges or points. Press the fold.
Layers: Move the complete half of the sheet.
Check: The opposite edges or points coincide.
Explore this step ↑STEP 4 · Origami Club linked construction diagram
Reopen from side to side
Unfold completely along the crease you just made.
Layers: Return the same half to the table.
Check: The sheet is flat again.
Explore this step ↑STEP 5 · Origami Club linked construction diagram
Fold the top retaining hem
Fold the upper 0.75 inch down.
Layers: Move the top strip only.
Check: The upper edge is reinforced by a narrow hem.
Explore this step ↑STEP 6 · Origami Club linked construction diagram
Raise the bottom flap
Mark a horizontal line 2.25 inches above the original bottom. Fold the lower section up on it.
Layers: Move the complete lower section.
Check: The old bottom edge stops 0.75 inch below the top hem.
Explore this step ↑STEP 7 · Origami Club linked construction diagram
Shape the lower right flap
On the raised flap, join its bottom-right folded corner to a point 2.25 inches left along its free top edge. Fold the upper-right triangle down and inward.
Layers: Move only the raised flap. Leave the full backing sheet flat and the attached bottom crease still.
Check: The old top-right corner reaches the bottom edge, 2.25 inches left of the right side.
Explore this step ↑STEP 8 · Origami Club linked construction diagram
Shape the lower left flap
Mirror the diagonal on the left, joining the raised flap’s bottom-left folded corner to a point 2.25 inches right along the free top edge. Fold the upper-left triangle down.
Layers: Move only the raised flap, never the backing.
Check: Both diagonal flaps match around a short central rectangle.
Explore this step ↑STEP 9 · Origami Club linked construction diagram
Bevel the top right
Fold the tiny upper-right corner inward on the diagonal joining points 0.75 inch from that corner along the top and right edges.
Layers: Carry the hem and backing in the little corner together.
Check: The top-right corner is beveled.
Explore this step ↑STEP 10 · Origami Club linked construction diagram
Bevel the top left
Repeat the matching 0.75-inch diagonal at the upper left.
Layers: Move both hem and backing in the corner.
Check: The two small top corners match.
Explore this step ↑STEP 11 · Origami Club linked construction diagram
Fold the right side behind
Fold the entire right strip behind on a vertical line 0.75 inch from the original right edge.
Layers: Carry all layers in the strip, including the shaped lower flap.
Check: The side has a straight folded edge.
Explore this step ↑STEP 12 · Origami Club linked construction diagram
Fold the left side behind
Repeat 0.75 inch from the original left edge. Keep the holder flat; do not spread legs.
Layers: Carry all layers in the matching strip.
Check: The side folds are symmetric.
Explore this step ↑STEP 13 · Origami Club linked construction diagram
Turn and fit a small photo
Turn the complete holder over. Try a photo or drawing slightly smaller than 4.5 × 3 inches. Ease its four corners underneath the folded side tabs; reduce the photo size if it bows. Lay the holder flat.
Layers: Turn every paper layer together. The separate photograph is not shown as folded paper.
Check: The folded corner tabs retain the photo while its image faces up.
Explore this step ↑
Sources & notes
Construction reference: Origami Club; diagram credited to Fumiaki Shingu, Origami Club: Flat Origami Photo Holder (web diagram).
The reference diagram credits Fumiaki Shingu. Design authorship and a design-reuse license are not independently established; this is not a public-domain claim. Reference artwork and wording are not reproduced. Teaching text, geometry and rendered diagrams here are original.
Adaptation: Based on the Origami Club Photo stand diagram, steps 1–9 and 11–12. We deliberately omit step 10’s partial opening of the legs and use the complete folded object as a flat photo holder. The photo is a separate item, not part of the paper mesh. Center/quarter/eighth guide creases are replaced by ruler landmarks. Top hem: 0.75 inch; lower hinge: 2.25 inches above the original bottom; side-back folds: 0.75 inch from the sides. Lower corner diagonals meet the raised flap’s top and bottom at matching 2.25-inch offsets.
Original instructions and diagrams, made with AI assistance. About & reuse
Accuracy notes
Real-paper follow-along and paper weight have not been tested. Diagrams illustrate the sequence, not paper thickness, contact, collisions or exact layer visibility. Continuous rigid-axis folds preserve all original material, including carried hidden layers. Measured landmarks and flat-use adaptations are stated in the source notes. Zero-thickness teaching diagrams do not certify paper contact, thickness, retention or physical usability. Real-paper folding has not been tested.