 Just Fold Paper
Fold only
Origami Dove — Pigeon Fold
Fold a simple pigeon-style dove from one square. A returned front flap leaves a pointed head and tail; two separate wing folds complete the bird. This is the simple traditional pigeon construction, not the more elaborate peace dove.
Preparation + 12 numbered steps
Materials
6-inch square · 6 × 6 inches
One 6 × 6-inch square (15.24 × 15.24 cm) of thin origami paper. White on both sides suits a dove; contrasting sides make the return flap easier to follow. Ruler and pencil for the guide marks. No cuts or glue.
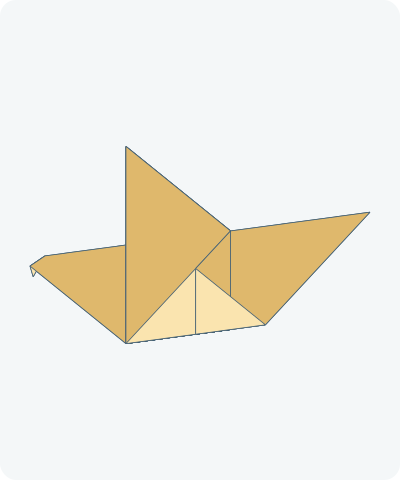
Drag to rotate · swipe sideways on touch.
Arrow keys rotate when focused.
Follow along
PreparationThe interactive guide needs JavaScript. Read every illustrated step below.
Help · controls & diagram
Play or drag the progress slider to watch a fold from 0% to 100%. Use the view buttons or drag the diagram to look from another angle.
Blue and gold identify the original left and right halves, not the actual paper colors. Darker shades show the reverse. Orange marks moving paper and its hinge.
With the diagram focused: Space plays or pauses, ←/→ change steps, and Home resets.
Every step, at a glance
Compare your paper with each diagram after completing the action. Blue and gold identify the original left and right halves, not the actual paper colors. Darker shades show the reverse. Orange marks moving paper and its hinge.
- 0. Prepare the diamond
- 1. Crease the vertical diagonal
- 2. Open the diamond
- 3. Fold a broad triangle
- 4. Raise both bottom layers
- 5. Return just the front point
- 6. Close the body sideways
- 7. Rotate for the wings
- 8. Raise the near wing
- 9. Turn to the far wing
- 10. Raise the second wing
- 11. Return to the head side
- 12. Reverse the little beak
PREPARATION · Traditional pigeon-style dove · source-linked sequence
Prepare the diamond
Place the square with a corner pointing up and the intended outer color facing down.
Layers: One flat square.
Check: The top and bottom corners line up vertically.
Explore this step ↑STEP 1 · Traditional pigeon-style dove · source-linked sequence
Crease the vertical diagonal
Bring the right corner across to the left corner. Press the fold from the top point to the bottom point.
Layers: Move the whole right half.
Check: The side corners coincide.
Explore this step ↑STEP 2 · Traditional pigeon-style dove · source-linked sequence
Open the diamond
Return the folded half fully to the table.
Layers: Open the same right half.
Check: A vertical center crease remains.
Explore this step ↑STEP 3 · Traditional pigeon-style dove · source-linked sequence
Fold a broad triangle
Bring the top corner down to the bottom corner. Align the sloping edges and press the horizontal fold.
Layers: Move the entire upper half.
Check: The long closed edge is across the top.
Explore this step ↑STEP 4 · Traditional pigeon-style dove · source-linked sequence
Raise both bottom layers
Measure 1.41 inches down from the midpoint of the closed top edge. Fold both bottom points upward on a horizontal line through that mark.
Layers: Carry both bottom layers together.
Check: The raised points project 1.41 inches above the old top edge.
Explore this step ↑STEP 5 · Traditional pigeon-style dove · source-linked sequence
Return just the front point
Mark a horizontal line 0.94 inches below the old top edge. Fold only the front raised triangle down on this line. Keep the other raised triangle behind it.
Layers: Move the single front layer, not the rear pointed head.
Check: One point stays up; the returned point extends below the narrow band.
Explore this step ↑STEP 6 · Traditional pigeon-style dove · source-linked sequence
Close the body sideways
Fold the right half to the left along the original center crease. Keep all the raised and returned layers together.
Layers: Move every layer on the right half.
Check: The model is closed along its right vertical edge.
Explore this step ↑STEP 7 · Traditional pigeon-style dove · source-linked sequence
Rotate for the wings
Rotate the entire model a quarter-turn counterclockwise on the table. Do not make a new crease.
Layers: Turn all layers as one piece.
Check: The short head points left, the tail right, and the loose wing tips downward.
Explore this step ↑STEP 8 · Traditional pigeon-style dove · source-linked sequence
Raise the near wing
Measure 1.41 inches down from the horizontal closed edge. On a horizontal crease through that mark, swing the entire near wing packet upward.
Layers: Move the near half only, including its folded-in return flap. Leave the far wing down.
Check: One wing points upward while its partner remains below the body.
Explore this step ↑STEP 9 · Traditional pigeon-style dove · source-linked sequence
Turn to the far wing
Turn the entire bird over from side to side.
Layers: Carry the raised wing with the whole model.
Check: The head now points right and the unraised wing faces you.
Explore this step ↑STEP 10 · Traditional pigeon-style dove · source-linked sequence
Raise the second wing
Fold the remaining downward wing up on the matching horizontal line, 1.41 inches below the closed top edge.
Layers: Move the complete near packet; leave the already raised wing behind it still.
Check: The two wing tips and wing-root creases match.
Explore this step ↑STEP 11 · Traditional pigeon-style dove · source-linked sequence
Return to the head side
Turn the whole bird over once more.
Layers: Turn both wings and the body together.
Check: The short head points left again; both wings point up.
Explore this step ↑STEP 12 · Traditional pigeon-style dove · source-linked sequence
Reverse the little beak
Mark the closed head edge 0.32 inches from its left tip. Ease the two head walls apart, push that tip down and left between them, then flatten both walls. Aim for a tip 0.16 inches left and 0.28 inches below the mark. Let the two short diagonal creases settle as you close.
Layers: Both head walls reverse together. Let the wings ease apart slightly on their existing roots while opening the body, then flatten them again.
Check: A short beak projects below the head. The pigeon-style dove is complete.
Explore this step ↑
Sources & notes
Traditional model; tutorial by Florent Fabre; reference diagrams by Nick Robinson, Origami.me: How to Fold an Easy Origami Pigeon (web tutorial).
Traditional pigeon instructions ↗ · Different peace-dove construction (not used) ↗
The selected source identifies the model as Traditional. That does not license its photographs, diagrams or prose: none are reproduced here. Our English instructions, geometry, drawings and PDF are original. The separately attributed Alice Gray peace dove is not this construction.
Adaptation: A pigeon-style dove, explicitly retaining the source model identity. The approximate thirds are fixed at exact thirds. Each wing is folded separately on a measured line 1.41 inches below the closed top edge. The beak is a coupled inside reverse with an authored 0.32-inch tip and a shallow temporary opening; its crease rolls while the tip is positioned. The source leaves beak size free. No tail crimp, long swan neck, penguin flippers or cut-and-assembled Paper Bird is used.
Original instructions and diagrams, made with AI assistance. About & reuse
Accuracy notes
Real-paper follow-along and paper weight have not been tested. Diagrams illustrate the sequence, not paper thickness, contact, collisions or exact layer visibility.