 Just Fold Paper
Fold only
Flat Origami Christmas Bell
Fold a small bell ornament with a broad rim and a contrasting paper clapper. The whole decoration comes from one square, with no cuts or glue.
Preparation + 21 numbered steps
Materials
6-inch square · 6 × 6 inches
One 6 × 6-inch square (15.24 × 15.24 cm) of thin two-color origami paper. Ruler and pencil for shaping marks. No scissors or glue.
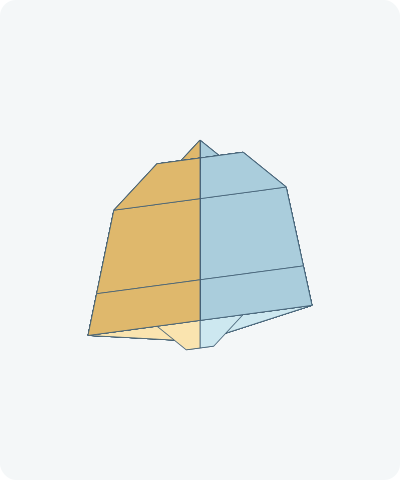
Drag to rotate · swipe sideways on touch.
Arrow keys rotate when focused.
Follow along
PreparationThe interactive guide needs JavaScript. Read every illustrated step below.
Help · controls & diagram
Play or drag the progress slider to watch a fold from 0% to 100%. Use the view buttons or drag the diagram to look from another angle.
Blue and gold track the original left and right halves of one sheet, not literal paper colors. Darker shades show the reverse. Orange highlights the moving packet and its hinge.
With the diagram focused: Space plays or pauses, ←/→ change steps, and Home resets.
Every step, at a glance
Compare your paper with each diagram after completing the action. Blue and gold track the original left and right halves of one sheet, not literal paper colors. Darker shades show the reverse. Orange highlights the moving packet and its hinge.
- 0. Prepare the diamond
- 1. Crease the vertical center
- 2. Open the vertical crease
- 3. Crease the horizontal center
- 4. Open the square
- 5. Raise the bottom corner
- 6. Lower the top corner
- 7. Bring the upper right edge inward
- 8. Bring the upper left edge inward
- 9. Raise the right low point
- 10. Raise the left low point
- 11. Turn to the plain side
- 12. Lift the lower band
- 13. Turn to the shaping side
- 14. Taper the right wall
- 15. Return the right rim
- 16. Taper the left wall
- 17. Return the left rim
- 18. Blunt the clapper
- 19. Lower the crown tip
- 20. Return the crown tip
- 21. Show the finished bell
PREPARATION · OrigamiOK bell photos; measured adaptation
Prepare the diamond
Place one point upward with the intended bell color down and clapper color up.
Layers: One uncut square.
Check: The top and bottom points line up.
Explore this step ↑STEP 1 · OrigamiOK bell photos; measured adaptation
Crease the vertical center
Bring the right point to the left point.
Layers: Move the complete right half.
Check: The side points meet.
Explore this step ↑STEP 2 · OrigamiOK bell photos; measured adaptation
Open the vertical crease
Return the right half fully.
Layers: Open the same half.
Check: A vertical crease remains.
Explore this step ↑STEP 3 · OrigamiOK bell photos; measured adaptation
Crease the horizontal center
Bring the top point down to the bottom point.
Layers: Move the upper half.
Check: The two points meet.
Explore this step ↑STEP 4 · OrigamiOK bell photos; measured adaptation
Open the square
Return the upper half fully to the table.
Layers: Open the same half.
Check: Two creases cross at the center.
Explore this step ↑STEP 5 · OrigamiOK bell photos; measured adaptation
Raise the bottom corner
Bring the bottom point up to the center crossing.
Layers: Move the bottom corner only.
Check: The lower edge is now straight.
Explore this step ↑STEP 6 · OrigamiOK bell photos; measured adaptation
Lower the top corner
Bring the top point to the midpoint of the new bottom edge.
Layers: Move the whole upper corner.
Check: The tip reaches the lower edge on the center line.
Explore this step ↑STEP 7 · OrigamiOK bell photos; measured adaptation
Bring the upper right edge inward
Bring the right half of the horizontal upper edge onto the vertical center crease.
Layers: Carry every layer on the right side of this diagonal.
Check: The old upper edge runs down the center.
Explore this step ↑STEP 8 · OrigamiOK bell photos; measured adaptation
Bring the upper left edge inward
Match the left half of the upper edge to the center crease.
Layers: Carry the complete left packet.
Check: Two low points sit on either side of a central notch.
Explore this step ↑STEP 9 · OrigamiOK bell photos; measured adaptation
Raise the right low point
Fold the loose right low point up along the horizontal line through the widest side corners.
Layers: Move only the right side packet; keep the central lower band still.
Check: The point reaches the right sloping edge.
Explore this step ↑STEP 10 · OrigamiOK bell photos; measured adaptation
Raise the left low point
Repeat across the same horizontal line.
Layers: Move only the left side packet.
Check: A triangle sits above a narrow lower band.
Explore this step ↑STEP 11 · OrigamiOK bell photos; measured adaptation
Turn to the plain side
Turn the entire packet over from side to side.
Layers: Carry all layers.
Check: The broad plain triangle faces you.
Explore this step ↑STEP 12 · OrigamiOK bell photos; measured adaptation
Lift the lower band
Fold the straight lower edge up along the horizontal crease through the widest corners.
Layers: Carry the complete doubled lower band, leaving the separate rear triangle tip down.
Check: A small contrasting clapper appears below the raised band.
Explore this step ↑STEP 13 · OrigamiOK bell photos; measured adaptation
Turn to the shaping side
Turn the complete model back over.
Layers: Carry all layers together.
Check: The clapper stays below the rim.
Explore this step ↑STEP 14 · OrigamiOK bell photos; measured adaptation
Taper the right wall
Mark the right slope 1.06 inches right of center at the original horizontal middle crease. Mark the bottom edge 1.38 inches right of center. Fold the right corner inward on the line joining these marks.
Layers: Carry the complete right corner packet.
Check: The side leans slightly outward toward the base.
Explore this step ↑STEP 15 · OrigamiOK bell photos; measured adaptation
Return the right rim
On the folded right flap, fold the lower portion upward on the line through the previous bottom-edge mark that rises 0.20 inches for each inch to the right. Align the returned lower edge with the bell base.
Layers: Move only the inward-folded right packet.
Check: The small rim edge is level with the base.
Explore this step ↑STEP 16 · OrigamiOK bell photos; measured adaptation
Taper the left wall
Mirror the two marks and fold the left corner inward.
Layers: Carry the whole left corner; leave the returned right rim still.
Check: Both walls have the same taper.
Explore this step ↑STEP 17 · OrigamiOK bell photos; measured adaptation
Return the left rim
Mirror the sloping return fold on the left flap, matching its bottom edge to the bell base.
Layers: Move only the inward-folded left packet.
Check: The two rim ends align.
Explore this step ↑STEP 18 · OrigamiOK bell photos; measured adaptation
Blunt the clapper
Fold the little bottom tip up on a horizontal line 0.17 inches above its point.
Layers: Move the small clapper tip only.
Check: The clapper has a short flat end.
Explore this step ↑STEP 19 · OrigamiOK bell photos; measured adaptation
Lower the crown tip
Fold the very top point down on a horizontal line 0.53 inches below it.
Layers: Carry the complete upper tip.
Check: The top edge becomes flat.
Explore this step ↑STEP 20 · OrigamiOK bell photos; measured adaptation
Return the crown tip
Fold that lowered point back upward along a parallel line 0.15 inches below the new top edge.
Layers: Move only the lowered crown packet.
Check: A small triangular tab rises above the flat crown.
Explore this step ↑STEP 21 · OrigamiOK bell photos; measured adaptation
Show the finished bell
Turn the whole model over. Smooth the folded rim and keep the clapper pointing down.
Layers: Turn all paper together.
Check: A flat crown, tapered sides, rim and small clapper complete the ornament.
Explore this step ↑
Sources & notes
OrigamiOK; tutorial author Bella; photographs credited by the author to Tomas, Origami Bell: Step-by-Step Instructions (undated web tutorial).
Complete photographic bell tutorial ↗ · Publisher copyright information ↗
The page credits its tutorial author and photography, but does not establish the model designer or a design-reuse license. No traditional or public-domain status is asserted. Reference photos, wording and code are not reproduced; our English instructions, material geometry and diagrams are independently authored.
Adaptation: Uses the photographed folded-band bell, not the different pocket-squashed Origami Club bell. Paired folds are separated. Each side rim is returned immediately after its inward fold, avoiding the later flap-lifting reorder in photo 13. The side taper, rim-return, clapper and crown hinges use explicit measured choices for the source’s free shaping lines. One six-inch square replaces the source’s 15 cm square. This is a flat ornament, not a sounding bell.
Original instructions and diagrams, made with AI assistance. About & reuse
Accuracy notes
Real-paper follow-along and paper weight have not been tested. Diagrams illustrate the sequence, not paper thickness, contact, collisions or exact layer visibility. Original-material polygons preserve one uncut square through the doubled lower band, separate side flaps, clapper exposure, rim returns and crown pleat. Zero-thickness teaching diagrams do not certify general contact, finite thickness or physical foldability. Real-paper folding has not been tested.