 Just Fold Paper
Fold only
Origami Banana Bunch
Lift a front flap, close the packet and fold its sides down separately to make a flat bunch of bananas from one square.
Preparation + 8 numbered steps
Materials
6-inch square · 6 × 6 inches
One thin 6 × 6-inch square (15.24 × 15.24 cm), preferably yellow with a light reverse. Ruler and pencil for shaping marks. No cuts or glue.
Drag to rotate · swipe sideways on touch.
Arrow keys rotate when focused.
Follow along
PreparationThe interactive guide needs JavaScript. Read every illustrated step below.
Help · controls & diagram
Play or drag the progress slider to watch a fold from 0% to 100%. Use the view buttons or drag the diagram to look from another angle.
Blue and gold track the original halves of one sheet, not your paper colors. Darker shades show the reverse. Orange highlights moving paper and its hinge.
With the diagram focused: Space plays or pauses, ←/→ change steps, and Home resets.
Every step, at a glance
Compare your paper with each diagram after completing the action. Blue and gold track the original halves of one sheet, not your paper colors. Darker shades show the reverse. Orange highlights moving paper and its hinge.
- 0. Prepare the diamond
- 1. Make the triangle
- 2. Lift the front point
- 3. Fold the stalk tip behind
- 4. Close the right half
- 5. Lower the front banana packet
- 6. Lower the rear banana packet
- 7. Bevel the outer shoulder
- 8. Finish the flat bunch
PREPARATION · Origami Club Bananas diagram; measured shaping marks
Prepare the diamond
Place the square light side up with a corner at the top.
Layers: One uncut square.
Check: The top and bottom points line up.
Explore this step ↑STEP 1 · Origami Club Bananas diagram; measured shaping marks
Make the triangle
Bring the top point down to the bottom point.
Layers: Move the complete upper half.
Check: The long closed edge runs across the top.
Explore this step ↑STEP 2 · Origami Club Bananas diagram; measured shaping marks
Lift the front point
On the center line mark a hinge 1.80 inches below the closed top edge. Fold only the front bottom point upward along a horizontal line through that mark.
Layers: Move the front triangle; leave the rear bottom point hanging down.
Check: The raised front tip projects 0.64 inches above the top edge.
Explore this step ↑STEP 3 · Origami Club Bananas diagram; measured shaping marks
Fold the stalk tip behind
Fold the projecting front tip away from you along the original level top edge.
Layers: Move only the small raised tip above the edge. Fold it to the outside back, not into a pocket.
Check: A short light stalk area replaces the projecting point.
Explore this step ↑STEP 4 · Origami Club Bananas diagram; measured shaping marks
Close the right half
Bring the right half toward you and over the left half along the vertical center line.
Layers: Carry every layer on the right together.
Check: The packet is a right triangle with a vertical edge on the right.
Explore this step ↑STEP 5 · Origami Club Bananas diagram; measured shaping marks
Lower the front banana packet
From the top-right corner draw a crease sloping down-left: drop 0.70 inches for every 1 inch left. Fold the front left-pointing packet toward you and down on this line.
Layers: Move the complete packet that crossed from the right in the previous step. Leave the rear left-pointing packet still.
Check: One long point swings down beside the unchanged lower point.
Explore this step ↑STEP 6 · Origami Club Bananas diagram; measured shaping marks
Lower the rear banana packet
From the same top-right corner draw a shallower crease: drop 0.50 inches for every 1 inch left. Fold the remaining left-pointing packet toward you and down.
Layers: Move only the packet that stayed on the left during half closure. Keep the first lowered banana still.
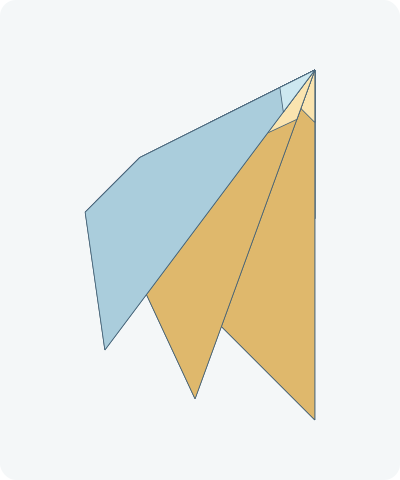
Check: Three attached tips point downward at different angles.
Explore this step ↑STEP 7 · Origami Club Bananas diagram; measured shaping marks
Bevel the outer shoulder
Mark a point 2.33 inches left and 1.27 inches below the top-right corner. Through it make a 45-degree crease rising to the right. Fold the little outer shoulder away from you on that line.
Layers: Carry all layers in the small shoulder corner to the outside back.
Check: The left shoulder has a short bevel while all three lower tips remain.
Explore this step ↑STEP 8 · Origami Club Bananas diagram; measured shaping marks
Finish the flat bunch
Press the folds flat with the stalk at the top. Keep the three attached pointed sections slightly separated in the picture.
Layers: No new fold or cut; the entire bunch is one sheet.
Check: Three long pointed bananas meet at one small folded stalk.
Explore this step ↑
Sources & notes
Origami Club; diagram copyright credit: Fumiaki Shingu, Origami Club: Bananas (undated web diagram).
Complete banana-bunch reference diagram ↗ · Reference model page ↗
The diagram credits Fumiaki Shingu. Traditional/public-domain status and design-reuse permission are not established. No source images, prose or code are reproduced. These English instructions, material geometry and diagrams are original; no project-wide reuse license is implied.
Adaptation: Follows the triangle, lifted front point, backward stalk tip, half closure, two separated downward side folds and rear shoulder bevel. Exact lifted-tip height, flap angles and bevel marks are authored choices for the source’s free dotted lines. Each moving packet includes its attached hidden layers. The finished bunch is a flat three-point picture, not three separate pieces or a curved peel simulation.
Original instructions and diagrams, made with AI assistance. About & reuse
Accuracy notes
Real-paper follow-along and paper weight have not been tested. Diagrams illustrate the sequence, not paper thickness, contact, collisions or exact layer visibility. Rigid hinges preserve one continuous uncut square. Three fruit points remain connected through the original folded material; no final-image substitution or cut is used. Zero-thickness teaching geometry does not certify paper thickness/contact or physical foldability. Real-paper folding has not been tested.