 Just Fold Paper
Cut & fold
Boomerang Paper Airplane
Build a Hunting Flight airplane with a layered nose, upright wingtips and two cut elevator tabs. Then try a banked launch with small adjustments for a returning path. Return flight is not guaranteed.
Preparation + 22 numbered steps
Materials
US Letter, portrait · 8.5 × 11 inches
One flexible 8½ × 11-inch Letter sheet, ruler, pencil and scissors. Four short slits release two tail tabs; no pieces are removed. Use Letter for these measurements. Optional tape may help hold the body closed during trials.
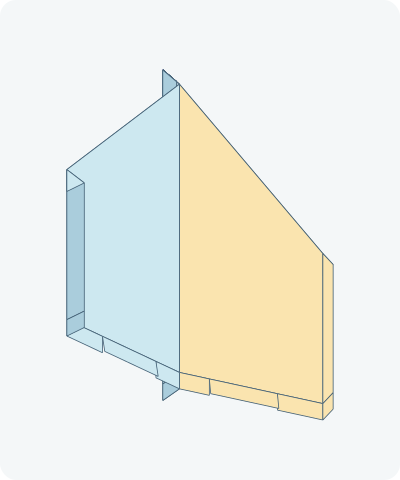
Drag to rotate · swipe sideways on touch.
Arrow keys rotate when focused.
Follow along
PreparationThe interactive guide needs JavaScript. Read every illustrated step below.
Help · controls & diagram
Play or drag the progress slider to watch a fold from 0% to 100%. Use the view buttons or drag the diagram to look from another angle.
Blue and gold identify the original left and right paper halves; dark shades show reverse faces. Orange marks moving paper and hinges. The tail detail distinguishes four solid cut lines from the uncut tab bases.
With the diagram focused: Space plays or pauses, ←/→ change steps, and Home resets.
Every step, at a glance
Compare your paper with each diagram after completing the action. Blue and gold identify the original left and right paper halves; dark shades show reverse faces. Orange marks moving paper and hinges. The tail detail distinguishes four solid cut lines from the uncut tab bases.
- 0. Prepare a Letter sheet
- 1. Crease the center
- 2. Open the center guide
- 3. Make a 5 cm top band
- 4. Halve the band
- 5. Halve the band again
- 6. Fold the left corner behind
- 7. Fold the right corner behind
- 8. Cut four elevator slits
- 9. Close the center body
- 10. Fold the first wing
- 11. Turn to the other side
- 12. Fold the second wing
- 13. Turn back
- 14. Open the first wing
- 15. Open the second wing
- 16. Raise the first wingtip
- 17. Raise the second wingtip
- 18. Raise the first elevator
- 19. Raise the second elevator
- 20. Hold the body underneath
- 21. Try a banked launch
- 22. Adjust in small steps
PREPARATION · Hunting Flight · returning setup
Prepare a Letter sheet
Place the rectangle with a short edge at the top. Keep the lower edge as the tail.
Layers: One whole 8½ × 11-inch sheet.
Check: Have a ruler, pencil and scissors ready.
Explore this step ↑STEP 1 · Hunting Flight · returning setup
Crease the center
Bring the left long edge onto the right long edge. Press a straight crease.
Layers: Move the entire left half.
Check: The long edges match.
Explore this step ↑STEP 2 · Hunting Flight · returning setup
Open the center guide
Unfold fully onto the table. Keep the original top edge at the top.
Layers: Return the same half.
Check: The center guide divides the sheet lengthwise.
Explore this step ↑STEP 3 · Hunting Flight · returning setup
Make a 5 cm top band
Measure 5 cm down from the top on both sides. Fold the top strip toward you on the line between those marks.
Layers: Move the entire top strip.
Check: The folded band is 5 cm deep; its raw edge lands 10 cm below the original top.
Explore this step ↑STEP 4 · Hunting Flight · returning setup
Halve the band
Bring the folded top edge down to the raw edge at the bottom of the band. Crease halfway across the band.
Layers: Carry every layer in the upper half of the band.
Check: The new band is 2.5 cm deep, not another 5 cm roll.
Explore this step ↑STEP 5 · Hunting Flight · returning setup
Halve the band again
Bring the new top edge to the same lower edge of the band. Press firmly.
Layers: Fold the complete upper half of the thick band.
Check: The reinforced band is now 1.25 cm deep and eight layers thick.
Explore this step ↑STEP 6 · Hunting Flight · returning setup
Fold the left corner behind
Fold the upper-left corner away from you, putting its top edge along the centerline on the back.
Layers: Move the whole left corner packet, including all band layers.
Check: A diagonal left shoulder appears on the plain face.
Explore this step ↑STEP 7 · Hunting Flight · returning setup
Fold the right corner behind
Match the other corner on the back, bringing its top edge onto the centerline.
Layers: Carry the whole right corner packet; keep the first closed.
Check: The reinforced nose points upward.
Explore this step ↑STEP 8 · Hunting Flight · returning setup
Cut four elevator slits
At the tail, mark 1¼ inches and 2¾ inches to each side of the center crease. At each mark cut straight inward ⅜ inch, perpendicular to the tail edge. Make four slits only; do not cut across their inner ends.
Layers: Cut the single tail layer while the plane is still open. Nothing is removed.
Check: Two 1½-inch-wide tabs remain attached along their bases.
Explore this step ↑STEP 9 · Hunting Flight · returning setup
Close the center body
Bring the original left half toward you over the right half. Keep the nose layers together.
Layers: Carry the complete left half, including its tail tab.
Check: The edges match and the rear corner folds are outside.
Explore this step ↑STEP 10 · Hunting Flight · returning setup
Fold the first wing
Measure 1.5 cm from the centerfold and draw a parallel root line. Fold the first wing outward along it.
Layers: Move all layers outside the root on the original left half.
Check: The body strip is 1.5 cm deep along its length.
Explore this step ↑STEP 11 · Hunting Flight · returning setup
Turn to the other side
Turn the whole folded plane over to reach the second wing.
Layers: No fold opens.
Check: The other half faces you.
Explore this step ↑STEP 12 · Hunting Flight · returning setup
Fold the second wing
Mark the matching parallel root 1.5 cm from the centerfold and fold the second wing outward.
Layers: Move only the original right wing packet.
Check: Both body strips and wing outlines match.
Explore this step ↑STEP 13 · Hunting Flight · returning setup
Turn back
Turn the complete folded plane back before opening the wings.
Layers: Keep both wing-root creases closed.
Check: The first folded wing faces you again.
Explore this step ↑STEP 14 · Hunting Flight · returning setup
Open the first wing
Hold the body shut and open the first wing past a right angle, so it will sit slightly above level when the body is underneath. The diagram shows 10° above level.
Layers: Move the entire first wing along its root.
Check: The wing rises gently from body to tip.
Explore this step ↑STEP 15 · Hunting Flight · returning setup
Open the second wing
Open the other wing by the same amount. Compare them from the nose.
Layers: Keep the body closed.
Check: Both wings form a shallow upward V, not a downward droop.
Explore this step ↑STEP 16 · Hunting Flight · returning setup
Raise the first wingtip
Mark a strip ½ inch wide along the first outer straight edge. Fold this strip upward to a right angle from the wing.
Layers: Move the complete outer strip, including any nose-band material at its front.
Check: The fin stands above the wing.
Explore this step ↑STEP 17 · Hunting Flight · returning setup
Raise the second wingtip
Fold the matching ½-inch strip upward on the other wing.
Layers: Only the outer strip moves.
Check: The two upright fins match.
Explore this step ↑STEP 18 · Hunting Flight · returning setup
Raise the first elevator
Find the first tab between the two slits. Bend it slightly upward along the uncut line joining the slit ends. The diagram shows a 10° starting bend.
Layers: Only the released tail tab moves.
Check: Its back edge rises while the adjacent tail stays still.
Explore this step ↑STEP 19 · Hunting Flight · returning setup
Raise the second elevator
Bend the other tab upward by the same small amount.
Layers: Keep both uncut tab bases attached.
Check: Both tabs rise equally; the wingtip fins stay upright.
Explore this step ↑STEP 20 · Hunting Flight · returning setup
Hold the body underneath
Rotate the whole plane so the narrow body hangs beneath the wings. This is handling, not a new crease.
Layers: Move the whole connected construction.
Check: Both wings and tail tabs slope upward.
Explore this step ↑STEP 21 · Hunting Flight · returning setup
Try a banked launch
In a clear, calm area, hold the body below the wings. Bank about 45° into the intended turn: left wing lower for a left turn, right wing lower for a right turn. Try a gentle forward release. Do not spin it like an L-shaped boomerang.
Layers: Hold the body shut without crushing the wings.
Check: Bank describes side-to-side tilt, not a 45° upward throw. Returning flight is untested here.
Explore this step ↑STEP 22 · Hunting Flight · returning setup
Adjust in small steps
If it does not complete the turn, the source suggests a little more bank or up-elevator. If the loop is too tight, reduce the elevator bend. Change one small setting at a time. If the body opens, a small tape strip below the wing roots may help hold it closed.
Layers: Adjust only the tab bends, wing openings or body closure; keep left and right wings matched.
Check: Paper, wind and launch technique affect the result. This setup does not guarantee a return or catch.
Explore this step ↑
Sources & notes
Fold’N Fly (construction and returning-flight reference; designer unestablished), Hunting Flight and Turn Paper Airplanes Into Boomerangs (undefined).
Hunting Flight photo instructions ↗ · Hunting Flight folding video ↗ · Returning-airplane setup ↗
The designer and design-reuse license are unestablished; this design is not labeled traditional or public domain. Reference photographs, video and text have separate rights. Our English instructions, geometric diagrams and code are independently authored with AI assistance; reference assets and templates are not reproduced.
Adaptation: Boomerang describes the intended flight setup, not a separate invention or a spinning L-shaped boomerang. The base is Hunting Flight, which the same publisher explicitly recommends for a returning-airplane setup. The 5 cm band is halved twice, matching the photos and video, rather than rolled down by the same width each time. We use Letter only and separate paired folds and handling. The source gives a 15 mm body height; our wing roots run parallel to the centerfold at that distance. The ½-inch tip strips, four ⅜-inch-deep slits at 1¼ and 2¾ inches from center, 10° positive dihedral and 10° elevator bends are authored starting settings, not source-specified or flight-validated measurements. The source allows crimped or slit elevators; this guide uses slits cut while the sheet is flat for access. Optional tape is not part of the illustrated untaped construction. Return advice stays within this guide.
Original instructions and diagrams, made with AI assistance. About & reuse
Accuracy notes
Real-paper follow-along and paper weight have not been tested. Diagrams illustrate the sequence, not paper thickness, contact, collisions or exact layer visibility.