 Just Fold Paper
Fold only
Accordion Hand Fan
Make a pleated hand fan from one rectangle. Keep the bottom pinched as a handle while gently spreading the upper pleats. Follow the animation, read the illustrated steps or print the one-page guide.
Preparation + 6 numbered steps
Materials
8 × 11-inch rectangle · 8 × 11 inches
One prepared 8 × 11-inch rectangle (20.32 × 27.94 cm) of thin paper, a ruler and pencil. Trim a half-inch strip from the long side of US Letter paper before starting if needed. No cuts, glue or fasteners during folding. Avoid stiff card.
Drag to rotate · swipe sideways on touch.
Arrow keys rotate when focused.
Follow along
PreparationThe interactive guide needs JavaScript. Read every illustrated step below.
Help · controls & diagram
Play or drag the progress slider to watch a fold from 0% to 100%. Use the view buttons or drag the diagram to look from another angle.
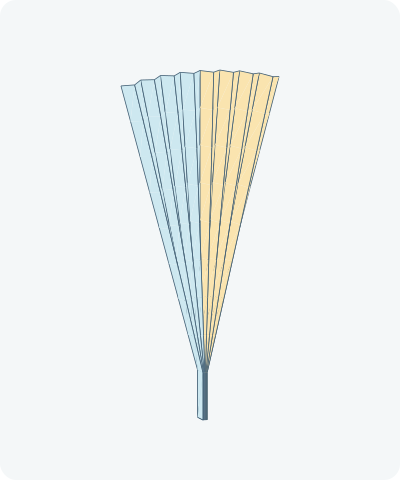
Blue and gold identify the original left and right halves. Darker shades show the reverse. The fine vertical lines are the accordion creases; the short lower section stays gathered in your hand.
With the diagram focused: Space plays or pauses, ←/→ change steps, and Home resets.
Every step, at a glance
Compare your paper with each diagram after completing the action. Blue and gold identify the original left and right halves. Darker shades show the reverse. The fine vertical lines are the accordion creases; the short lower section stays gathered in your hand.
- 0. Prepare the rectangle
- 1. Mark the pleat lines
- 2. Make alternating accordion creases
- 3. Compress the pleats
- 4. Grip the lower end
- 5. Spread the upper fan
- 6. Hold the finished fan
PREPARATION · Measured adaptation of alternating pleats and a pinched handle
Prepare the rectangle
Place the 8-inch edge horizontally and the 11-inch length vertically. Use thin paper that bends easily. Decide which short edge will become the bottom of the handle.
Layers: One prepared rectangle, with no slits or separate pieces.
Check: The sheet is 8 inches wide and 11 inches tall.
Explore this step ↑STEP 1 · Measured adaptation of alternating pleats and a pinched handle
Mark the pleat lines
Along both short edges, make light marks every half inch: 0.5, 1, 1.5 inches and so on through 7.5 inches. Join matching marks with fifteen light vertical lines. Mark 1.5 inches up from the bottom on both sides to locate the grip; do not crease across that height.
Layers: The paper is still flat. Pencil lines are guides, not cuts.
Check: Sixteen equal half-inch-wide panels run the full height of the paper.
Explore this step ↑STEP 2 · Measured adaptation of alternating pleats and a pinched handle
Make alternating accordion creases
Working from the left, fold along the first marked line, then fold the next line in the opposite direction. Continue valley, mountain, valley, mountain across all fifteen lines. Press each crease along its full length. Leave the pleats loosely open while checking them. The animation opens all the angles together; make the creases one at a time.
Layers: Each fold joins adjacent panels of the same sheet. Do not roll several panels over in the same direction.
Check: Viewed from a short edge, the sixteen panels make a regular zigzag. All long creases reach both short edges.
Explore this step ↑STEP 3 · Measured adaptation of alternating pleats and a pinched handle
Compress the pleats
Push the two outside long edges toward each other until the pleats form a narrow bundle. Straighten any crease that has folded in the wrong direction. Keep the top and bottom ends aligned.
Layers: Gather all sixteen panels; none is detached or tucked into another.
Check: The whole sheet is now an approximately half-inch-deep accordion packet. Small gaps in the diagram keep its layers visible.
Explore this step ↑STEP 4 · Measured adaptation of alternating pleats and a pinched handle
Grip the lower end
Hold the bottom 1.5 inches of the packet firmly between your fingers and thumb. Keep every pleat together in that lower section. Leave the upper 9.5 inches free to spread.
Layers: Your hand holds all sixteen layers at the bottom. There is no hidden tie, glue or locking flap.
Check: The gathered lower section is the handle. Keep holding it during the next step.
Explore this step ↑STEP 5 · Measured adaptation of alternating pleats and a pinched handle
Spread the upper fan
Keep the handle pinched and gently draw the two outer upper edges apart. Let the long panels bend gradually above your grip. Stop while the upper edge is still visibly pleated; do not pull it flat or force the neck. Aim for an opening about 5 inches across, adjusting to what your paper allows.
Layers: The lower 1.5 inches stays gathered while all sixteen upper panels spread. No crease is cut or separated.
Check: A broad pleated top rises from a narrow handle. The upper corners settle slightly as the panels bow.
Explore this step ↑STEP 6 · Measured adaptation of alternating pleats and a pinched handle
Hold the finished fan
Keep holding the gathered handle to use or display the fan. To close it, ease the upper edges back together along the existing pleats. Release your grip only after closing; this version has no fastener to hold its shape.
Layers: One connected sheet remains throughout the fan and handle.
Check: The finished object has a spread upper fan and a compressed lower grip, rather than a uniformly opened accordion book.
Explore this step ↑
Sources & notes
wikiHow contributors; co-authored by Amy Guerrero, How to Make Paper Fans (2026 web revision).
Alternating pleats and pinched handle reference ↗
The source documents alternating accordion folds and gathering a handle. It does not establish the original designer or a design license. No source text, photographs, illustrations or code is reproduced; this guide and its diagrams are independently authored.
Adaptation: Uses an authored 8 × 11-inch rectangle, fifteen ruler-marked half-inch creases and a 1.5-inch grip. Omits the source’s folded top hem, gate-fold precreasing and string tie. Keep the handle pinched continuously: it is not a self-locking fan. The pleats are animated together to make their alternating directions visible; crease them one at a time by hand. The upper opening is a bounded flexible teaching approximation, not a rigid origami motion or a measured physical shape.
Original instructions and diagrams, made with AI assistance. About & reuse
Accuracy notes
Real-paper follow-along and paper weight have not been tested. Diagrams illustrate the sequence, not paper thickness, contact, collisions or exact layer visibility. One connected 88-square-inch material mesh carries all sixteen pleats into the gathered grip. The pleating stages preserve panel lengths; the final spread includes disclosed small local deformation and longitudinal bowing. The handle remains fixed throughout that opening. Zero-thickness diagrams leave a small visible separation between compressed layers. They do not model finite paper thickness, friction or retention. Physical folding, comfort, durability and cooling performance have not been tested.